Are you encountering the “Windows Installer Service Could Not Be Accessed” error on your computer? I have explained a few troubleshooting tips that will help you solve this problem easily. This message pops up when you try to install a program on Windows OS, but the installer file that is responsible for setting up the app on your PC doesn’t launch.
If the user trying to initiate the installation doesn’t have administrator privilege, then the installation won’t proceed further. It is also important to check if the Windows Installer service has stopped. This can be caused by the presence of corrupt system files on your computer.
The Windows Installer may have been de-registered. This can also be attributed to corrupt system files. Are you already using an older version of the same program you are trying to install separately? That will cause conflict, and the installation will not work unless you uninstall the existing version of that app.
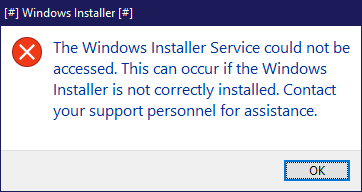
Tips to Fix Windows Installer Service Could Not Be Accessed Error
Here are all the fixes you can try out to tackle the “Windows Installer Service Could Not Be Accessed” error on Windows 11.
1. Uninstall the Existing Version of the App
Here are the steps to uninstall the existing version of an app. Once you uninstall it, then only you can reinstall it again.
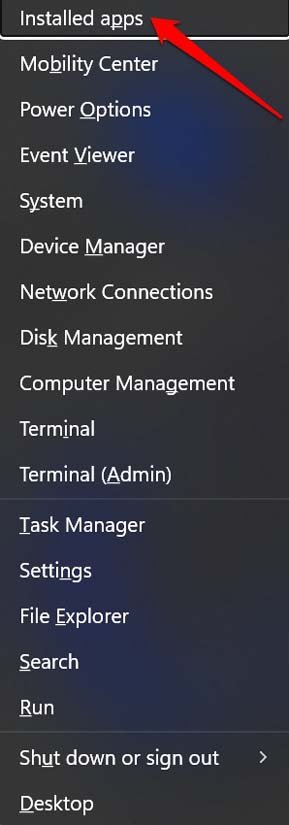
- Press Windows + X to launch the quick-access menu. Select Installed Apps.

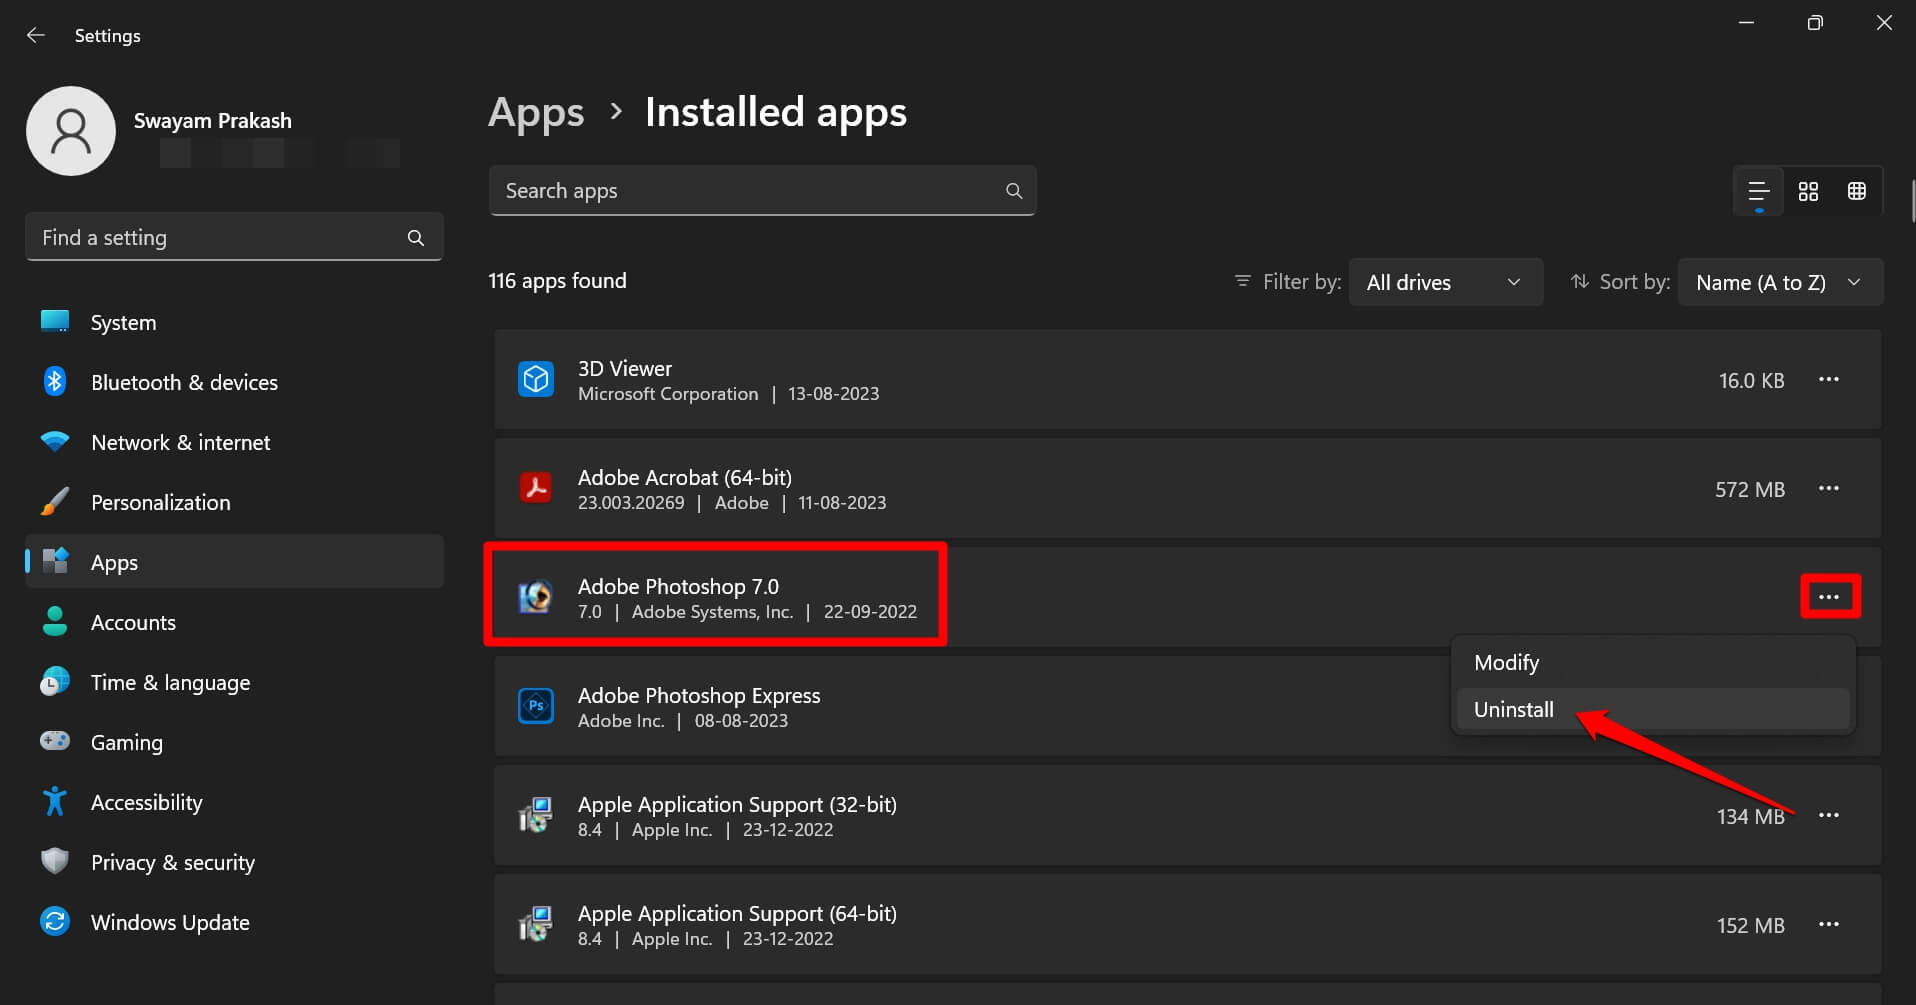
- Access the concerned program within the list of installed apps.
- Click the three-dot icon beside the app name and select Uninstall.

- Confirm the move by clicking on Uninstall when the pop-up appears.
- Restart the computer and run the installer file for the same program.
2. Restart Windows Installer Service
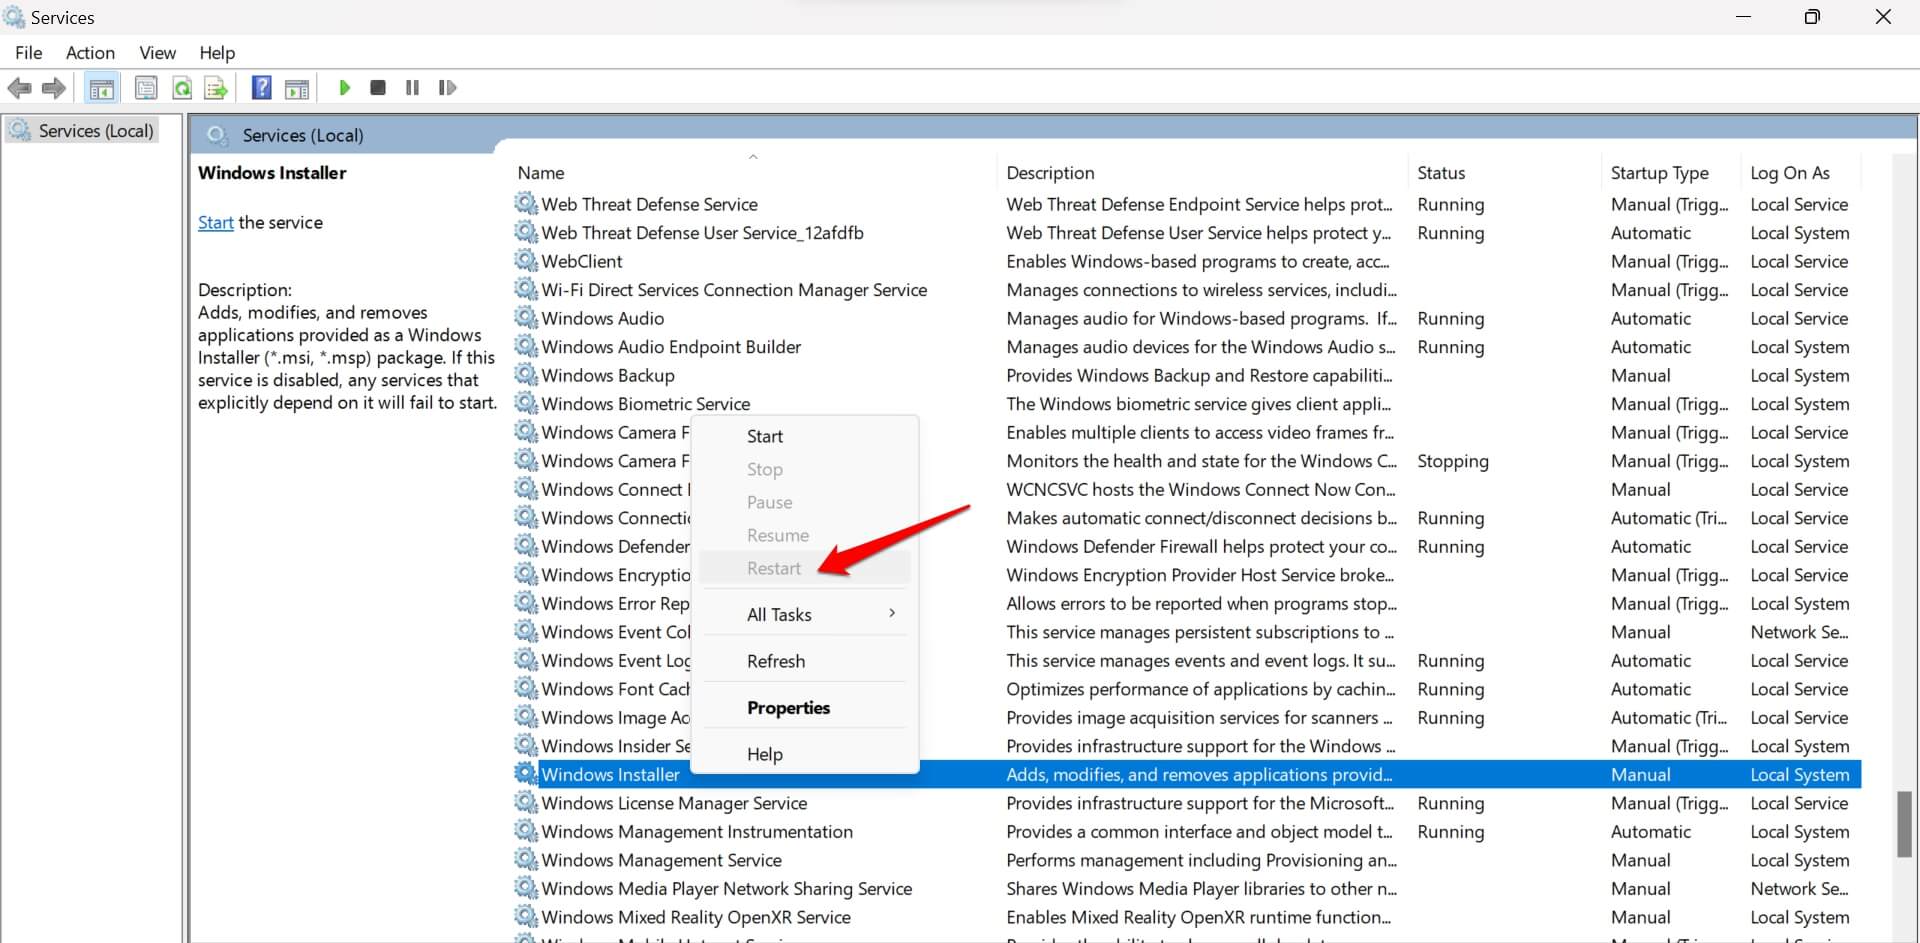
Check if the Windows Installer service is running. If it has stopped, then restart it. Follow the steps below.
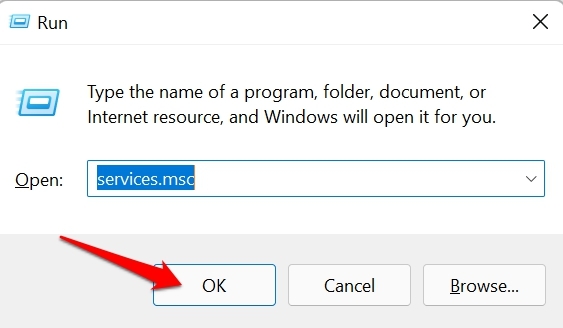
- Press Windows +R to launch the Run box.
- Type services.msc and press enter.

- Scroll to Windows Installer > right-click on it > select Restart.

3. Relaunch the Installer With Administrator Permission
You should check whether you can run the installed program with administrator privilege or not. First, you have to close the installer from the Task Manager if it is still running.
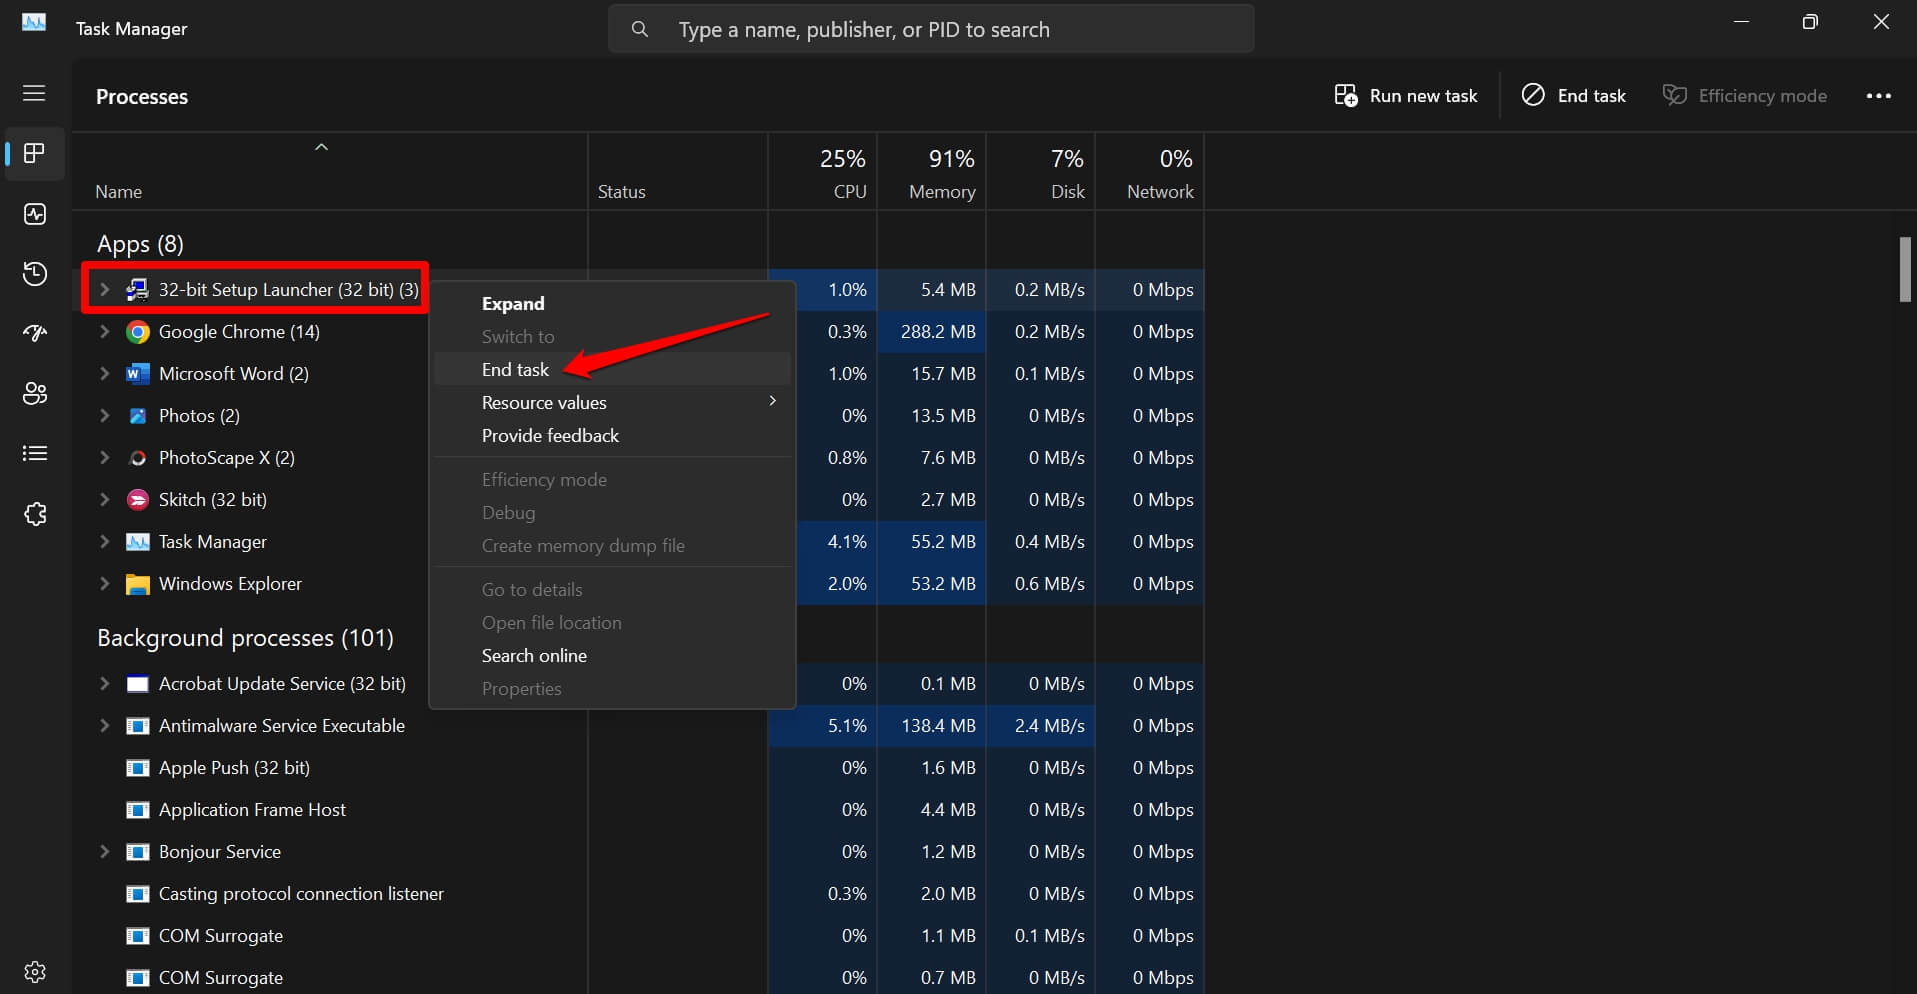
- Press Ctrl +Shift + Esc to launch the Task Manager.
- Scroll to the Installer program under the Apps section, right-click on it, and select End Task.

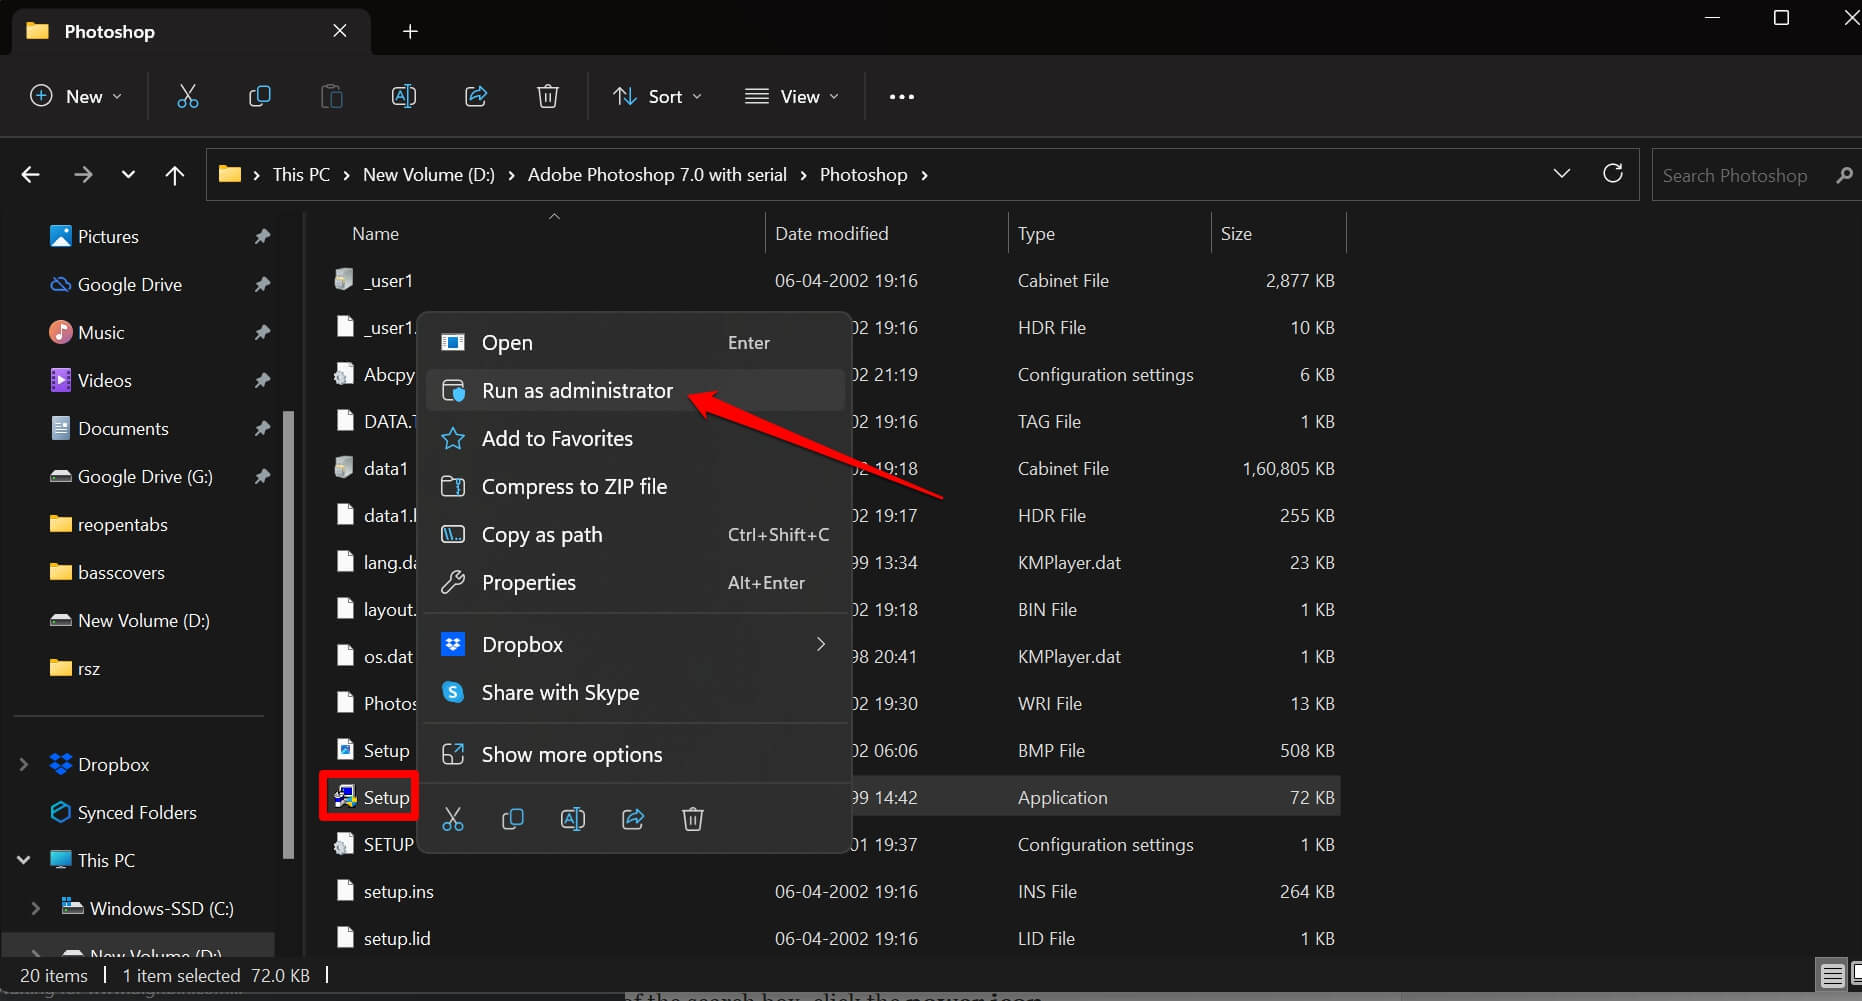
- Launch the File Explorer by clicking on Windows + E hotkeys.
- Scroll to the folder where you have downloaded/saved the installer file for the app you have been trying to install.
- Right-click on the installer file and select Run As Administrator.

- Click on Yes, when the prompt appears.
4. Restart your computer
While you are fixing the “Windows Installer Service Could Not Be Accessed” error, try to restart your PC. It is a very simple fix, but it can solve the random bugs on the Windows OS that may be causing the error.
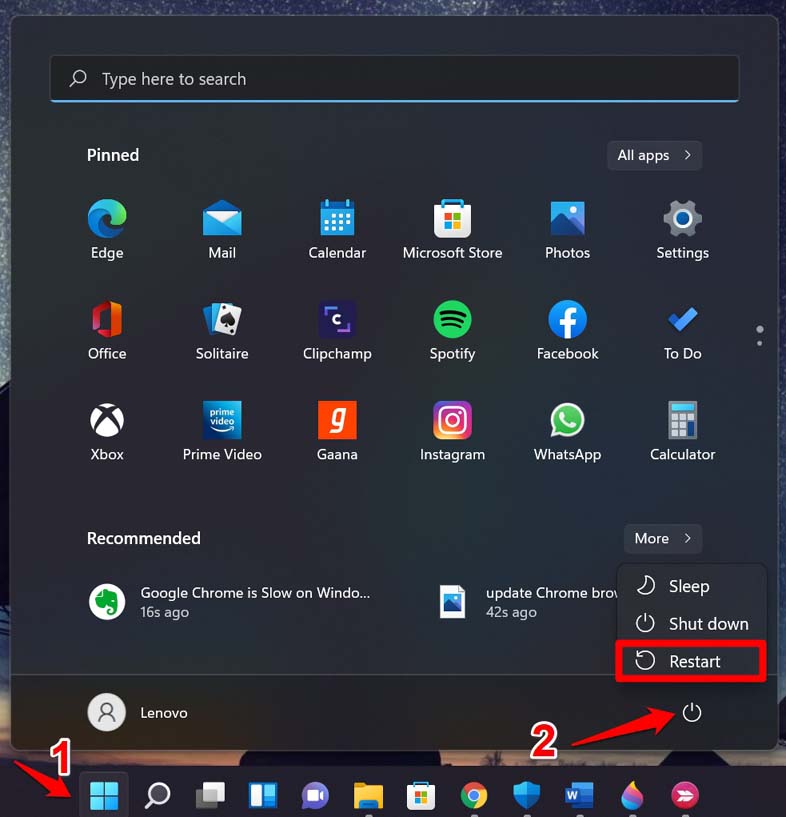
- Press the Windows key to bring up the quick search console.
- At the bottom right corner of the search box, click the power icon.
- Then click on Restart from the menu that appears.

- After the PC restarts, access the Installer file and try to install the app.
5. Re-register Windows Installer
To re-register the Windows Installer service, you have to use the Command Prompt.
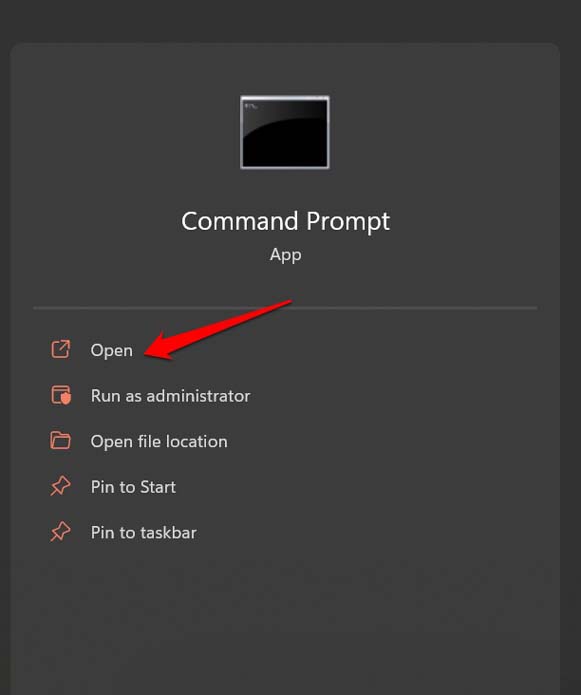
- Open Command Prompt using Windows Search (Windows + S)

- Click on Yes when the prompt appears asking regarding making changes to your computer.
- Enter the following commands one after the other and execute them.
%windir%\system32\msiexec.exe /unregister

%windir%\system32\msiexec.exe /regserver

%windir%\syswow64\msiexec.exe /unregister

%windir%\syswow64\msiexec.exe /regserver
- Close the command prompt after performing this fix.
NOTE: When you execute each of these commands, you won’t see any post-execution message.
7. Run SFC and DISM Scans
The next fix you can implement is scanning for corrupt system files on Windows OS. For that, again, you have to use the command prompt and execute the SFC and DISM scans.
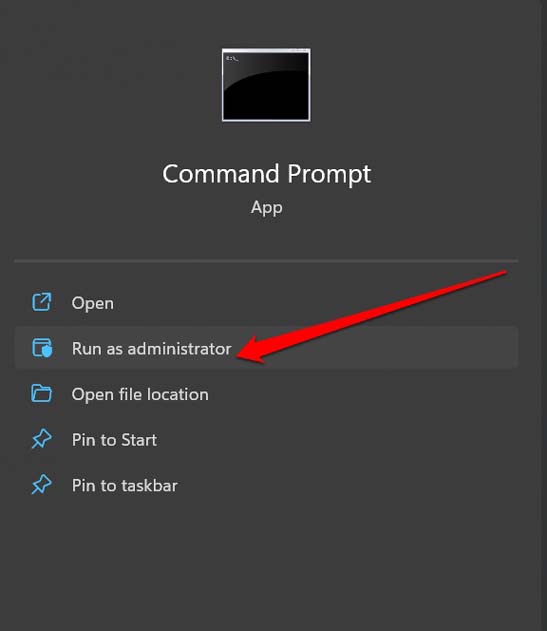
- Launch the Command Prompt with Administrator rights.

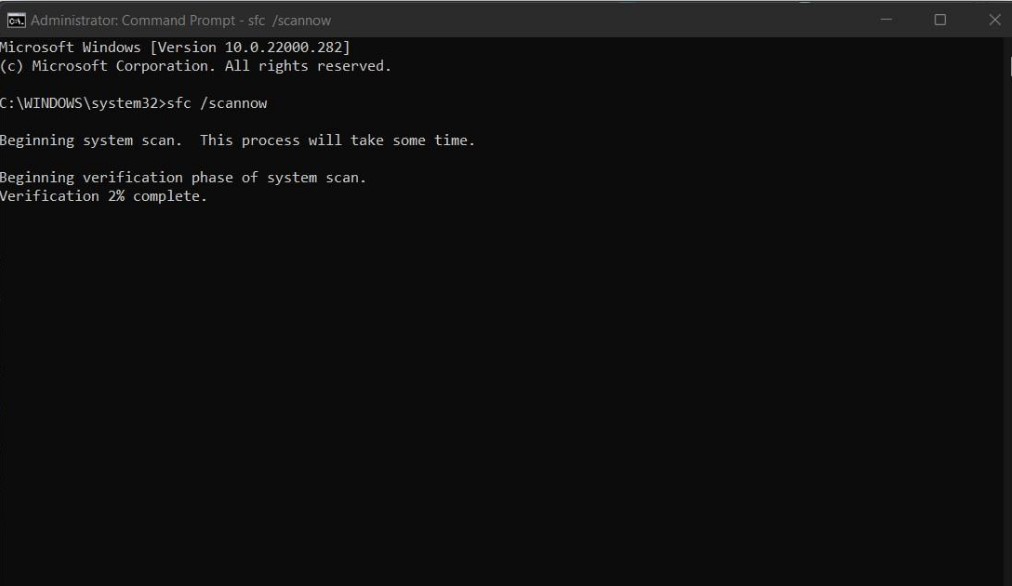
- Enter the command below to start the scan for corrupt system files.
sfc/scannow

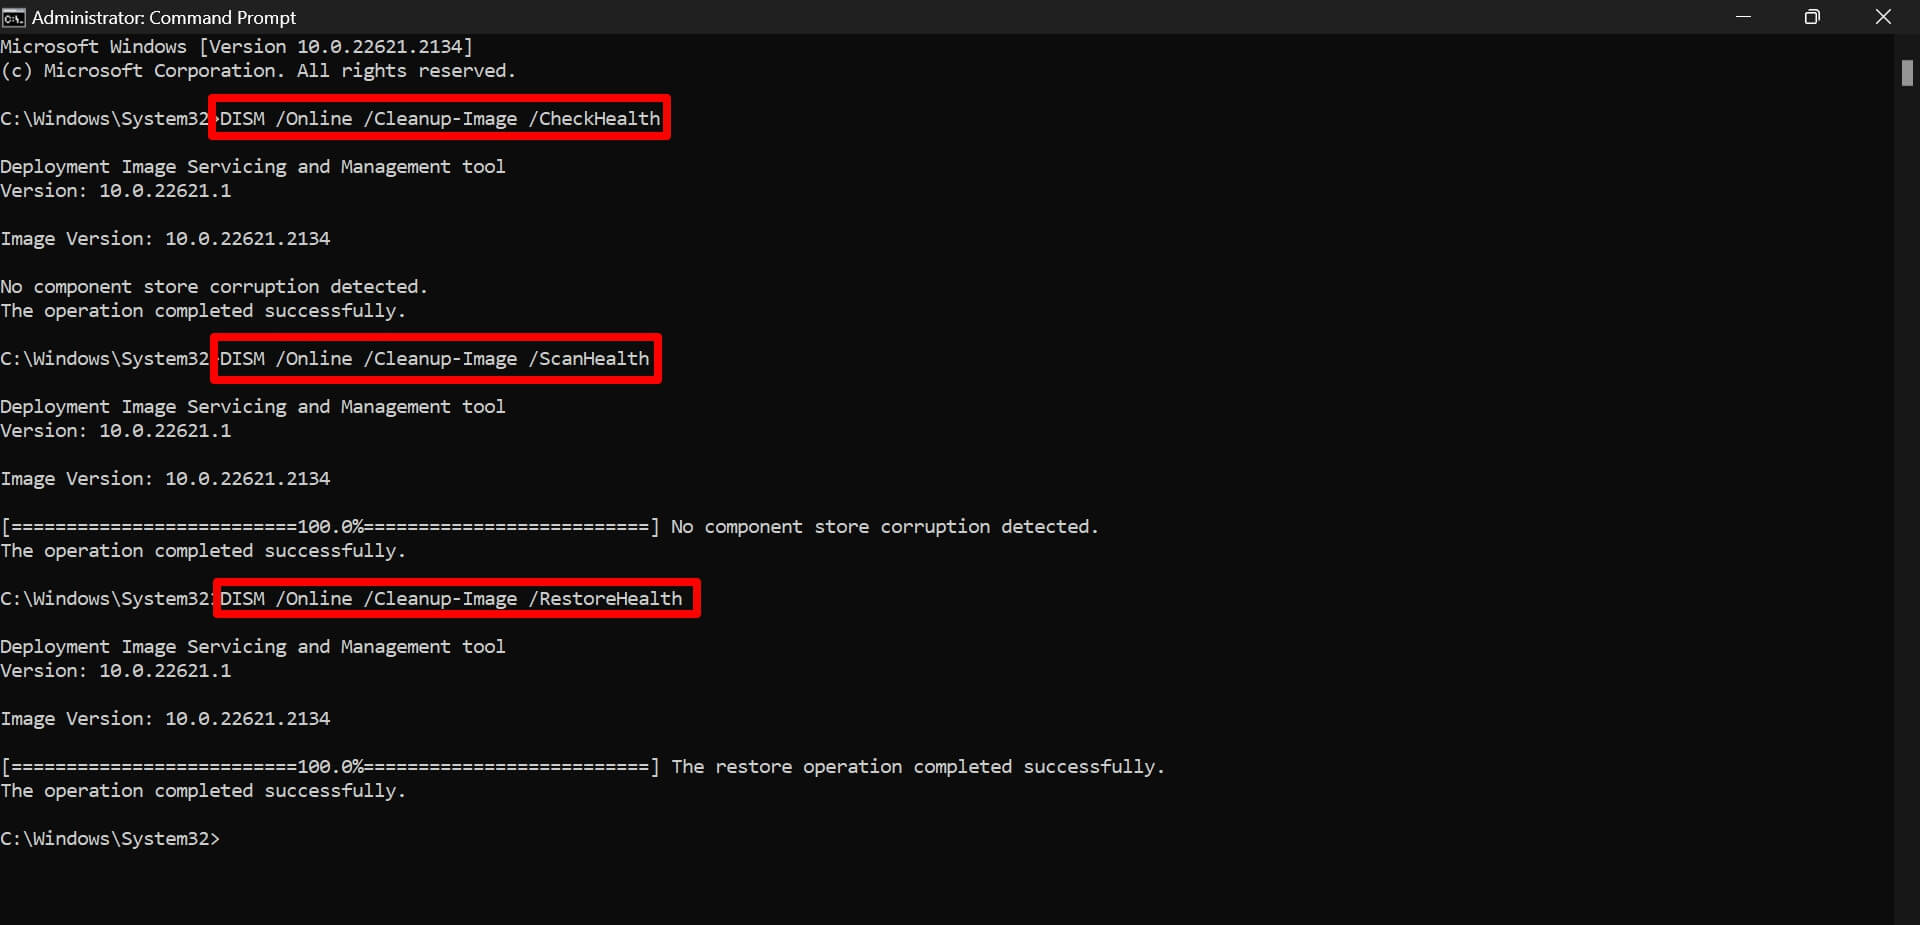
- Next, for the DISM scan, enter these sets of commands one after the other.
DISM /Online /Cleanup-Image /CheckHealth

DISM /Online /Cleanup-Image /ScanHealth

DISM /Online /Cleanup-Image /RestoreHealth

The process of scanning for corrupt system files may take some time. Do not interrupt or stop the process while it is active. Once the problem of corrupt system files is fixed, you can resume installing the application on your PC.
8. Reset the Windows Installer Service
Resetting the Windows Installer service can be a bit technical. There is no existing option in the Windows settings to reset the Windows Installer service. You have to create a registry file and execute it.
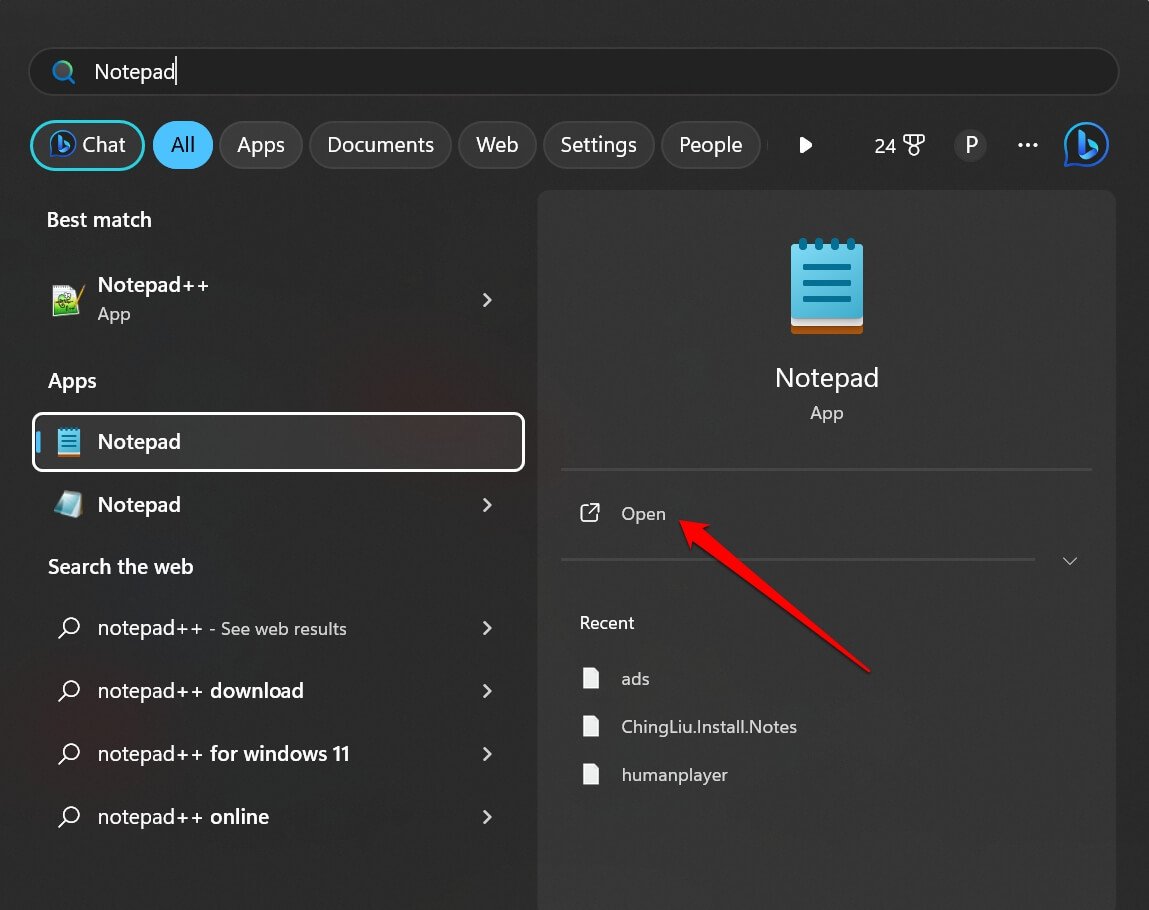
- Launch the Notepad app using Windows search.

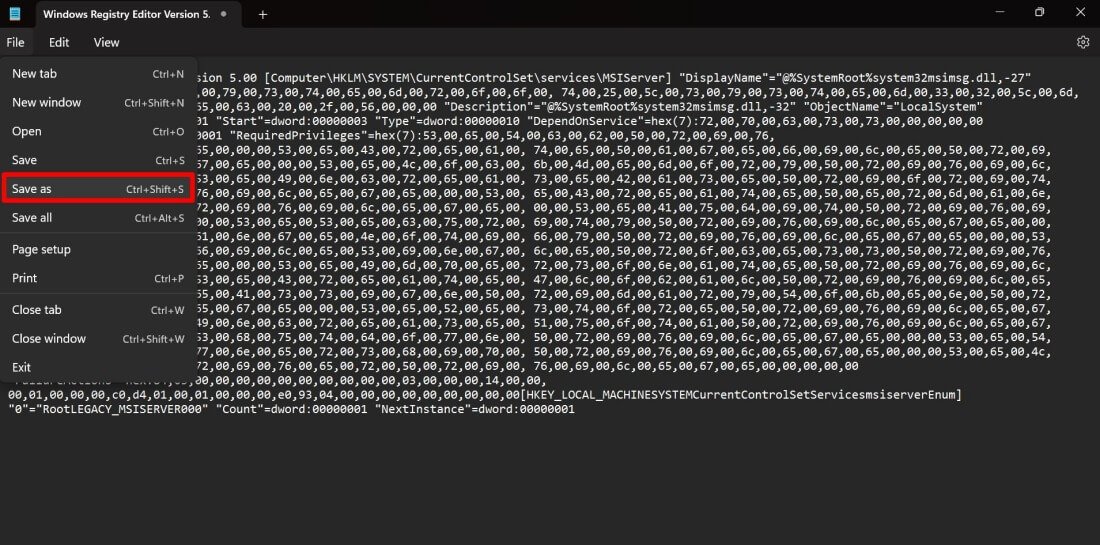
- In the notepad, paste the fragment of code I have mentioned below.
Windows Registry Editor Version 5.00 [Computer\HKLM\SYSTEM\CurrentControlSet\services\MSIServer] "DisplayName"="@%SystemRoot%system32msimsg.dll,-27" "ImagePath"=hex(2):25,00,73,00,79,00,73,00,74,00,65,00,6d,00,72,00,6f,00,6f,00, 74,00,25,00,5c,00,73,00,79,00,73,00,74,00,65,00,6d,00,33,00,32,00,5c,00,6d, 00,73,00,69,00,65,00,78,00,65,00,63,00,20,00,2f,00,56,00,00,00 "Description"="@%SystemRoot%system32msimsg.dll,-32" "ObjectName"="LocalSystem" "ErrorControl"=dword:00000001 "Start"=dword:00000003 "Type"=dword:00000010 "DependOnService"=hex(7):72,00,70,00,63,00,73,00,73,00,00,00,00,00 "ServiceSidType"=dword:00000001 "RequiredPrivileges"=hex(7):53,00,65,00,54,00,63,00,62,00,50,00,72,00,69,00,76, 00,69,00,6c,00,65,00,67,00,65,00,00,00,53,00,65,00,43,00,72,00,65,00,61,00, 74,00,65,00,50,00,61,00,67,00,65,00,66,00,69,00,6c,00,65,00,50,00,72,00,69, 00,76,00,69,00,6c,00,65,00,67,00,65,00,00,00,53,00,65,00,4c,00,6f,00,63,00, 6b,00,4d,00,65,00,6d,00,6f,00,72,00,79,00,50,00,72,00,69,00,76,00,69,00,6c, 00,65,00,67,00,65,00,00,00,53,00,65,00,49,00,6e,00,63,00,72,00,65,00,61,00, 73,00,65,00,42,00,61,00,73,00,65,00,50,00,72,00,69,00,6f,00,72,00,69,00,74, 00,79,00,50,00,72,00,69,00,76,00,69,00,6c,00,65,00,67,00,65,00,00,00,53,00, 65,00,43,00,72,00,65,00,61,00,74,00,65,00,50,00,65,00,72,00,6d,00,61,00,6e, 00,65,00,6e,00,74,00,50,00,72,00,69,00,76,00,69,00,6c,00,65,00,67,00,65,00, 00,00,53,00,65,00,41,00,75,00,64,00,69,00,74,00,50,00,72,00,69,00,76,00,69, 00,6c,00,65,00,67,00,65,00,00,00,53,00,65,00,53,00,65,00,63,00,75,00,72,00, 69,00,74,00,79,00,50,00,72,00,69,00,76,00,69,00,6c,00,65,00,67,00,65,00,00, 00,53,00,65,00,43,00,68,00,61,00,6e,00,67,00,65,00,4e,00,6f,00,74,00,69,00, 66,00,79,00,50,00,72,00,69,00,76,00,69,00,6c,00,65,00,67,00,65,00,00,00,53, 00,65,00,50,00,72,00,6f,00,66,00,69,00,6c,00,65,00,53,00,69,00,6e,00,67,00, 6c,00,65,00,50,00,72,00,6f,00,63,00,65,00,73,00,73,00,50,00,72,00,69,00,76, 00,69,00,6c,00,65,00,67,00,65,00,00,00,53,00,65,00,49,00,6d,00,70,00,65,00, 72,00,73,00,6f,00,6e,00,61,00,74,00,65,00,50,00,72,00,69,00,76,00,69,00,6c, 00,65,00,67,00,65,00,00,00,53,00,65,00,43,00,72,00,65,00,61,00,74,00,65,00, 47,00,6c,00,6f,00,62,00,61,00,6c,00,50,00,72,00,69,00,76,00,69,00,6c,00,65, 00,67,00,65,00,00,00,53,00,65,00,41,00,73,00,73,00,69,00,67,00,6e,00,50,00, 72,00,69,00,6d,00,61,00,72,00,79,00,54,00,6f,00,6b,00,65,00,6e,00,50,00,72, 00,69,00,76,00,69,00,6c,00,65,00,67,00,65,00,00,00,53,00,65,00,52,00,65,00, 73,00,74,00,6f,00,72,00,65,00,50,00,72,00,69,00,76,00,69,00,6c,00,65,00,67, 00,65,00,00,00,53,00,65,00,49,00,6e,00,63,00,72,00,65,00,61,00,73,00,65,00, 51,00,75,00,6f,00,74,00,61,00,50,00,72,00,69,00,76,00,69,00,6c,00,65,00,67, 00,65,00,00,00,53,00,65,00,53,00,68,00,75,00,74,00,64,00,6f,00,77,00,6e,00, 50,00,72,00,69,00,76,00,69,00,6c,00,65,00,67,00,65,00,00,00,53,00,65,00,54, 00,61,00,6b,00,65,00,4f,00,77,00,6e,00,65,00,72,00,73,00,68,00,69,00,70,00, 50,00,72,00,69,00,76,00,69,00,6c,00,65,00,67,00,65,00,00,00,53,00,65,00,4c, 00,6f,00,61,00,64,00,44,00,72,00,69,00,76,00,65,00,72,00,50,00,72,00,69,00, 76,00,69,00,6c,00,65,00,67,00,65,00,00,00,00,00 "FailureActions"=hex:84,03,00,00,00,00,00,00,00,00,00,00,03,00,00,00,14,00,00, 00,01,00,00,00,c0,d4,01,00,01,00,00,00,e0,93,04,00,00,00,00,00,00,00,00,00[HKEY_LOCAL_MACHINESYSTEMCurrentControlSetServicesmsiserverEnum] "0"="RootLEGACY_MSISERVER000" "Count"=dword:00000001 "NextInstance"=dword:00000001
- Press Ctrl + Shift + S.

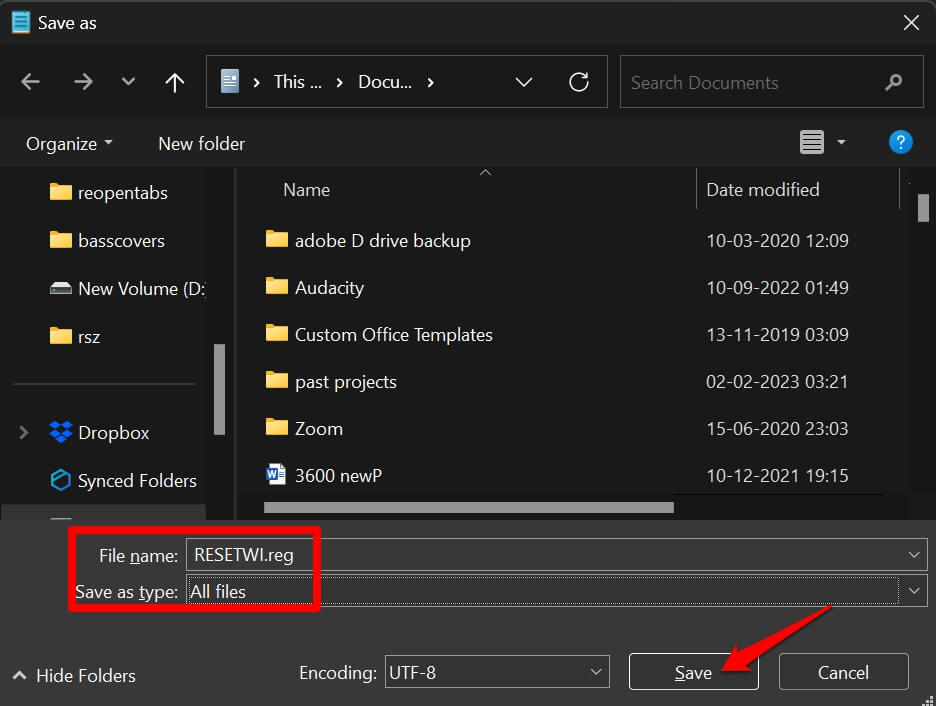
- In the Save As window, set the filename as RESETWI.reg
- Set the Save as type to All Files.
- Click on Save.

- Go to the folder where the Notepad file is saved and double-click it to launch it.
- Click on Yes > Click OK after you see a prompt that the new component gets integrated into the registry.
NOTE: Modifying the registry may make a few features on your PC dysfunctional or behave weirdly. So, proceed with this troubleshooting method at your risk.
Install Applications Without any Error
I hope these tips and tricks were useful and you were able to fix the “Windows Installer Service Could Not Be Accessed” error on Windows 11. Now, while installing any program on your computer and running the installer files, you should not see any error message.
If you've any thoughts on How to Fix Windows Installer Service Could Not Be Accessed Error?, then feel free to drop in below comment box. Also, please subscribe to our DigitBin YouTube channel for videos tutorials. Cheers!

