Many people don’t bother deleting old files from their PCs, which leads to their accumulation and eventually causes storage issues that affect the operation of your Windows PC. It’s always a good idea to delete old files you no longer need from your computer to keep it free of unwanted files and running smoothly.
Your Windows 11 machine remains more organized when old files are removed, in addition to increasing storage capacity. If you are someone who often forgets to delete old files, the integrated features to auto-delete old files in Windows 11 come to your rescue.
Removing obsolete and unnecessary files on a Windows 11 PC can improve performance. To help you out, in this post, we’ll walk you through many methods for automatically deleting outdated files on a Windows 11 computer.
Tips to Automatically Delete Old Files on PC
In Windows 11, you have three options for automatically deleting outdated files. Let’s examine each technique in turn.
1. Use Storage Sense to delete old files on Windows 11
The Storage Sense function in Windows 11 can erase old files automatically. This capability allows you to set up automatic file deletion depending on various criteria and intervals. Take these actions:
- Press the Windows + I keys to open the Settings menu on your Windows 11 computer.
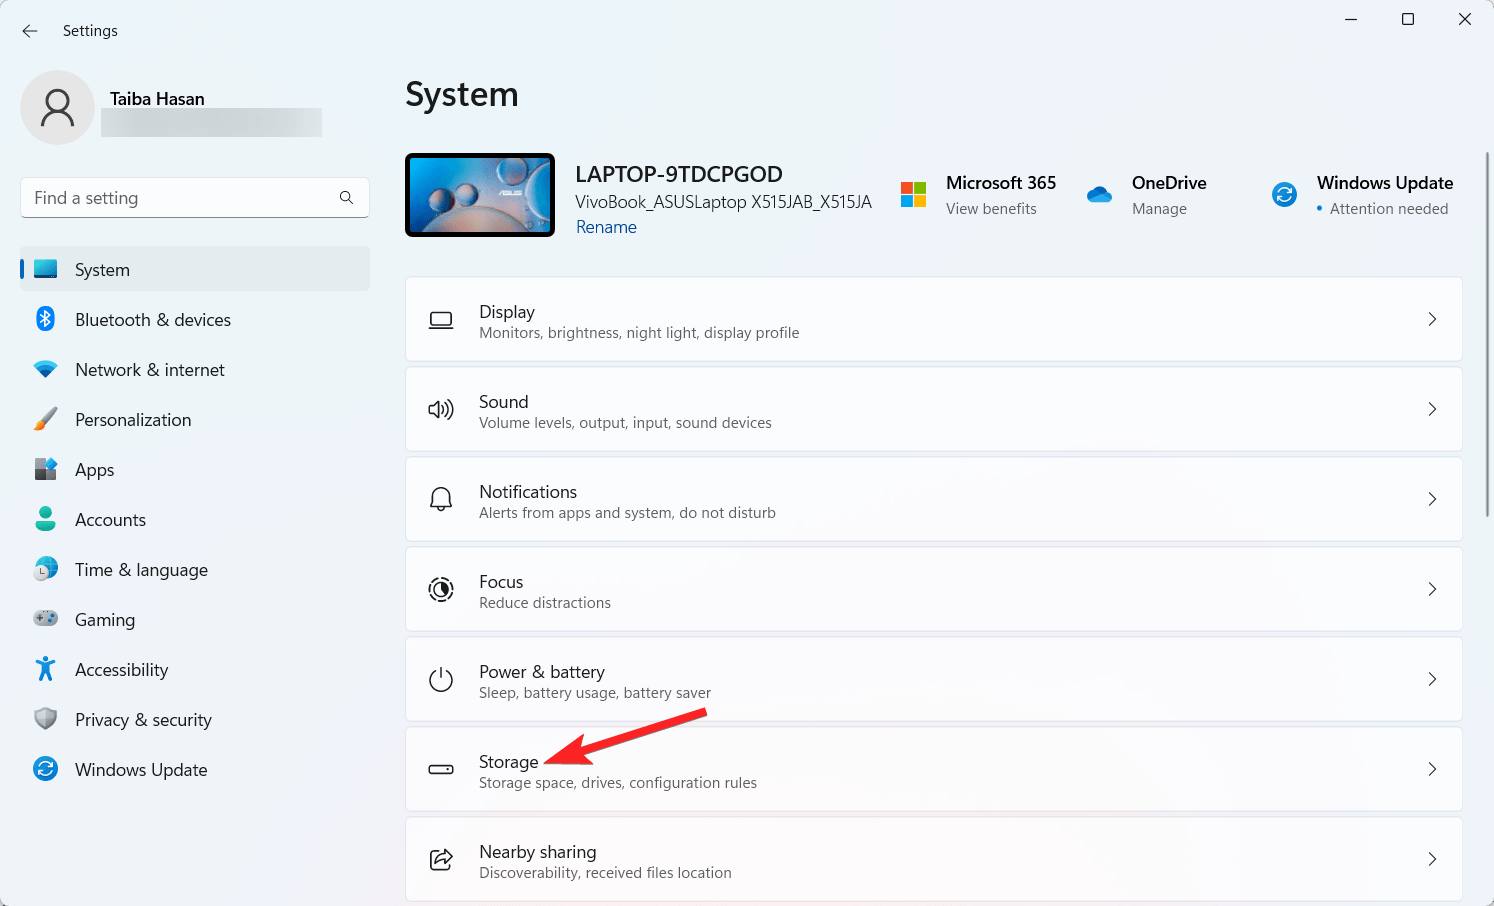
- Select the System option from the left pane.
- Select Storage from the right section of the System settings.

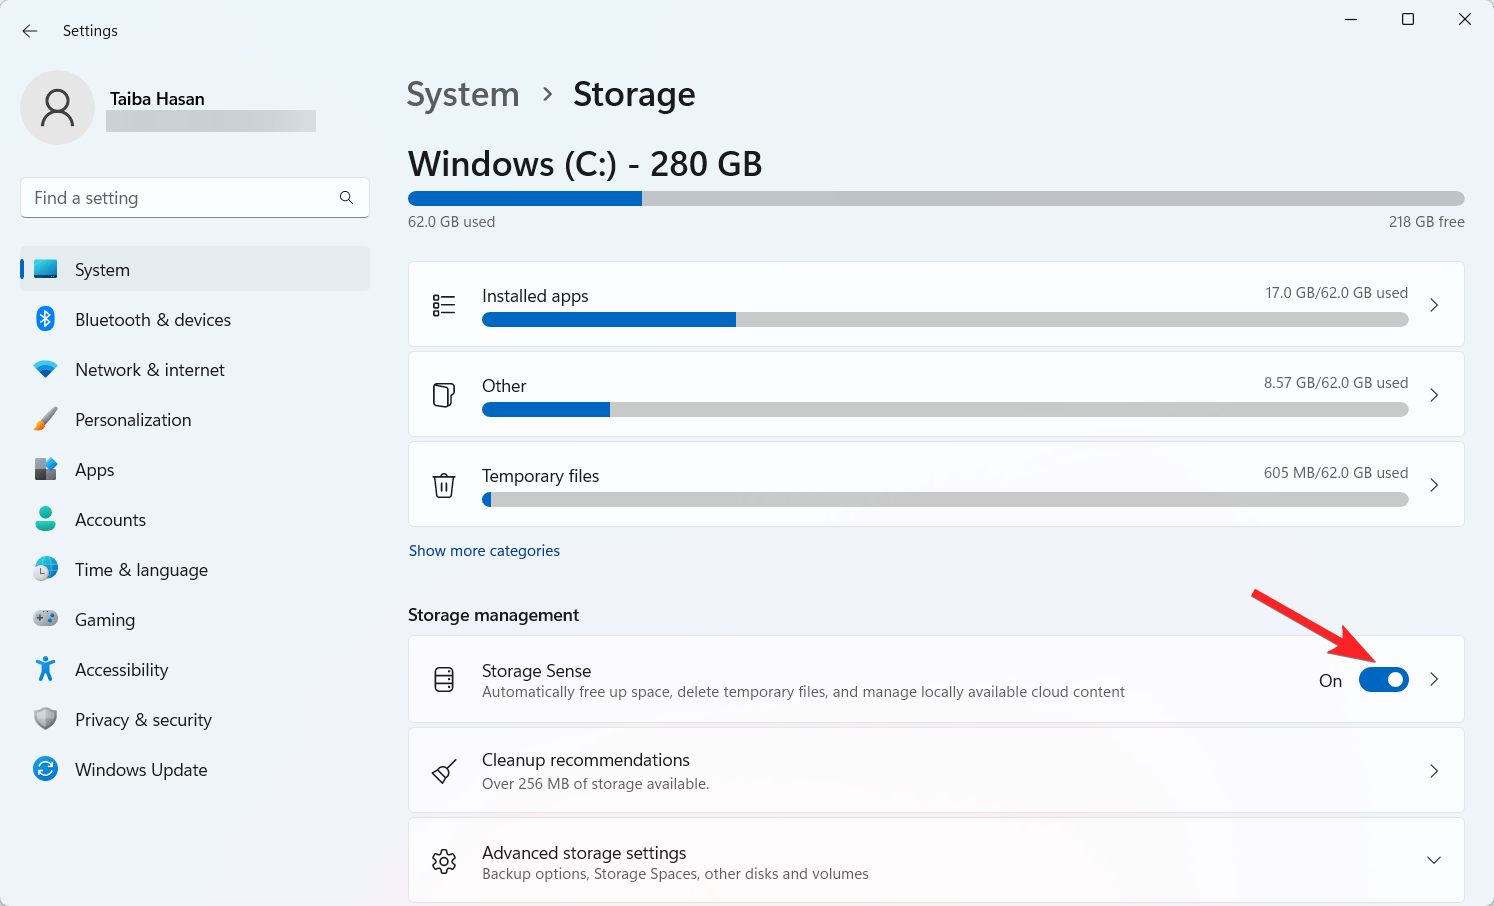
- Toggle on the Storage Sense option.

- Next, click the Storage Sense to customize its settings.
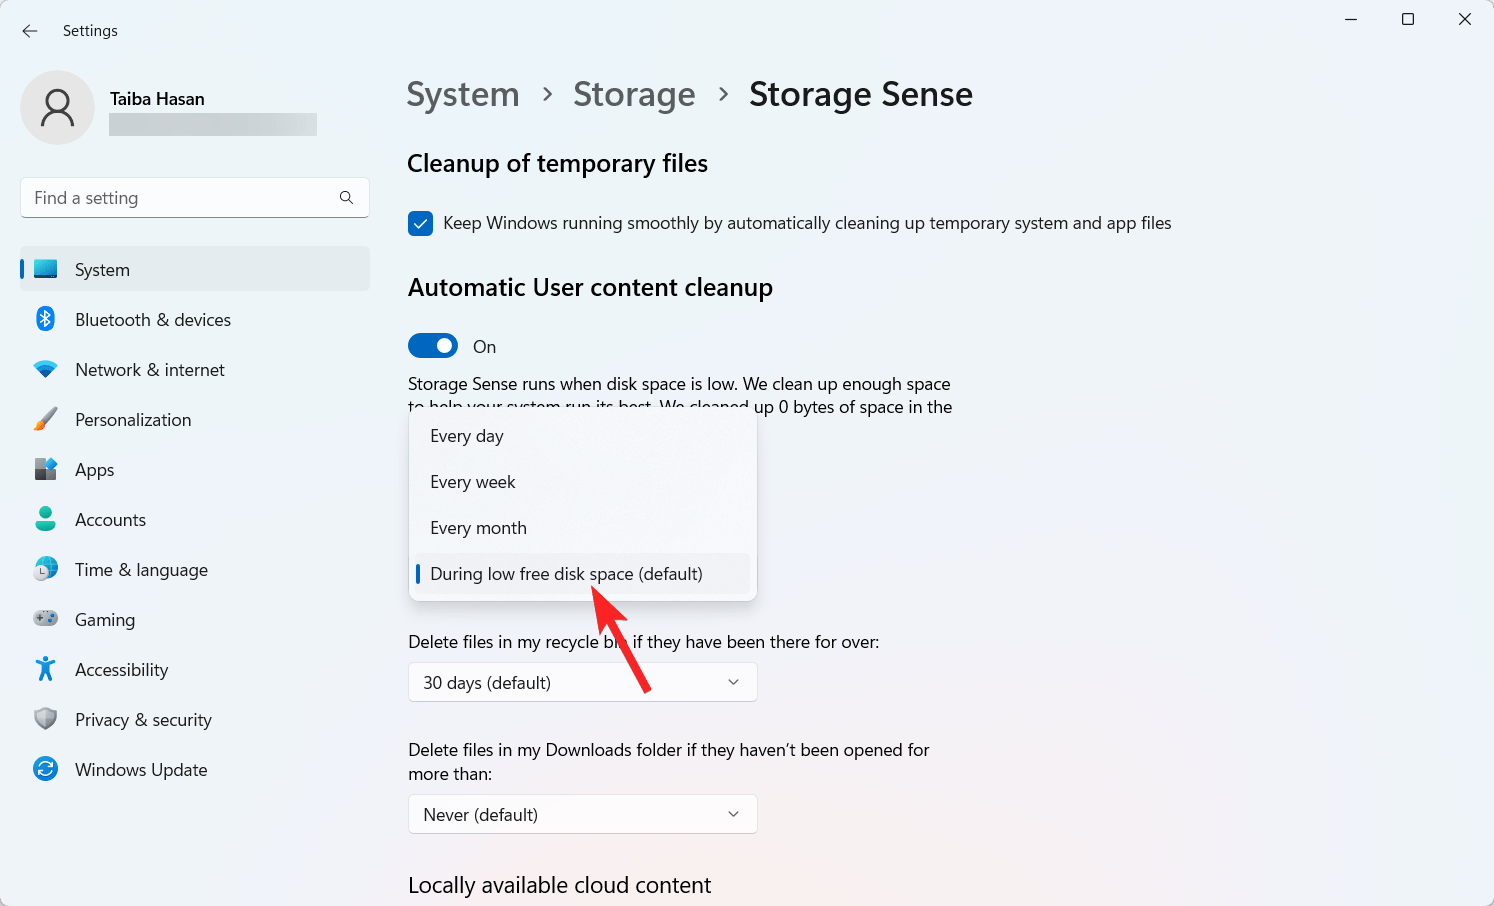
- Under Configure cleanup schedules, choose the desired time frame for the Run Storage Sense option. Options include running Storage Sense every day, every week, every month, or automatically during low free disk space (default).

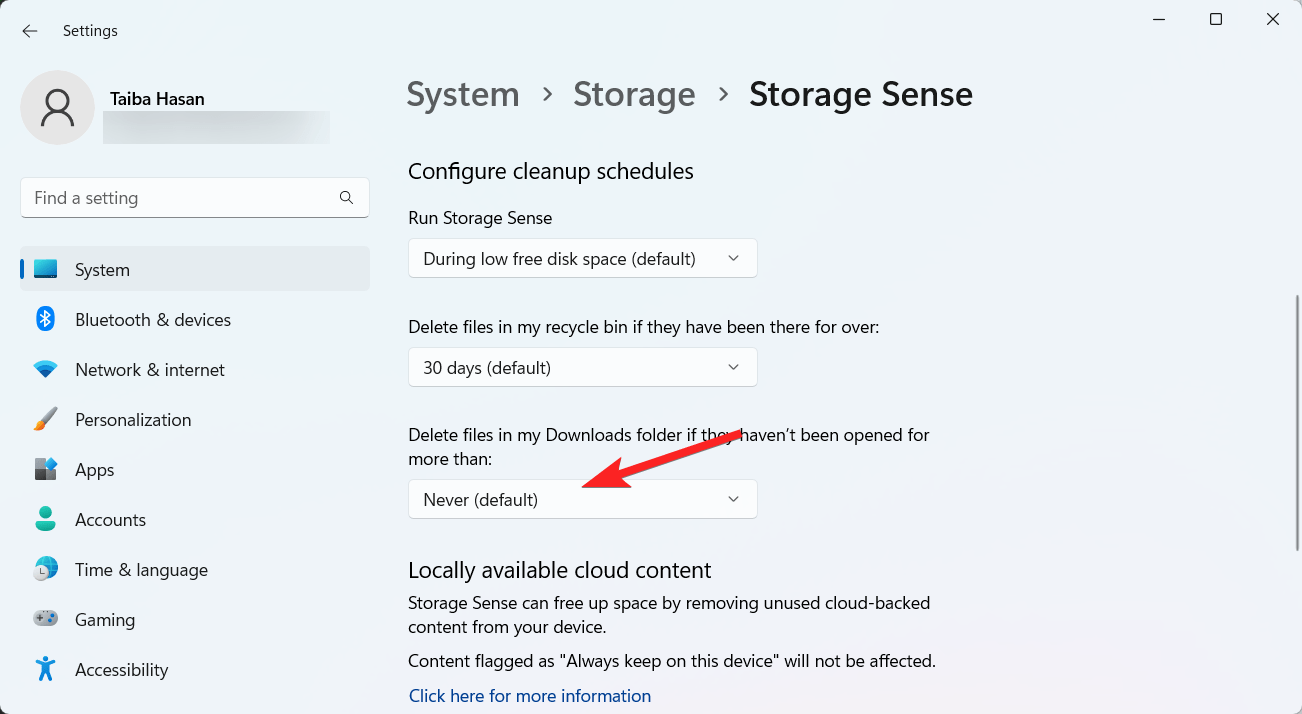
- Next, select the length of time a file should be in the Recycle Bin before being automatically deleted from the Delete files in my Recycle Bin drop-down option if it has been there for more than that.
- Additionally, choose whether files should be deleted from your Downloads folder.

Once everything is configured, click the Run Storage Sense Now button to activate the settings.
2. Delete Old Files using Command Prompt
Using Command Prompt is one of the simplest ways to configure the deletion of old files from your Windows 11 computer automatically. Here is how you can enable the auto-deletion feature using the Command prompt on Windows 11.
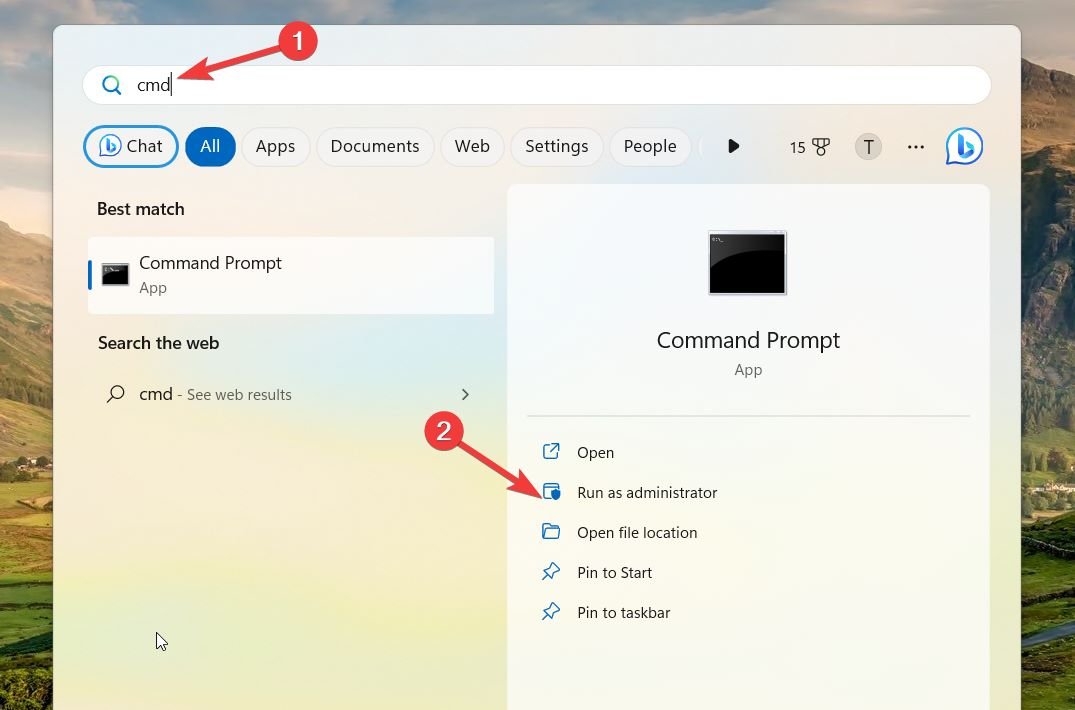
- Press the Win key to access the Start menu. Type Command Prompt and select Run as administrator to launch Command Prompt with administrator privileges.

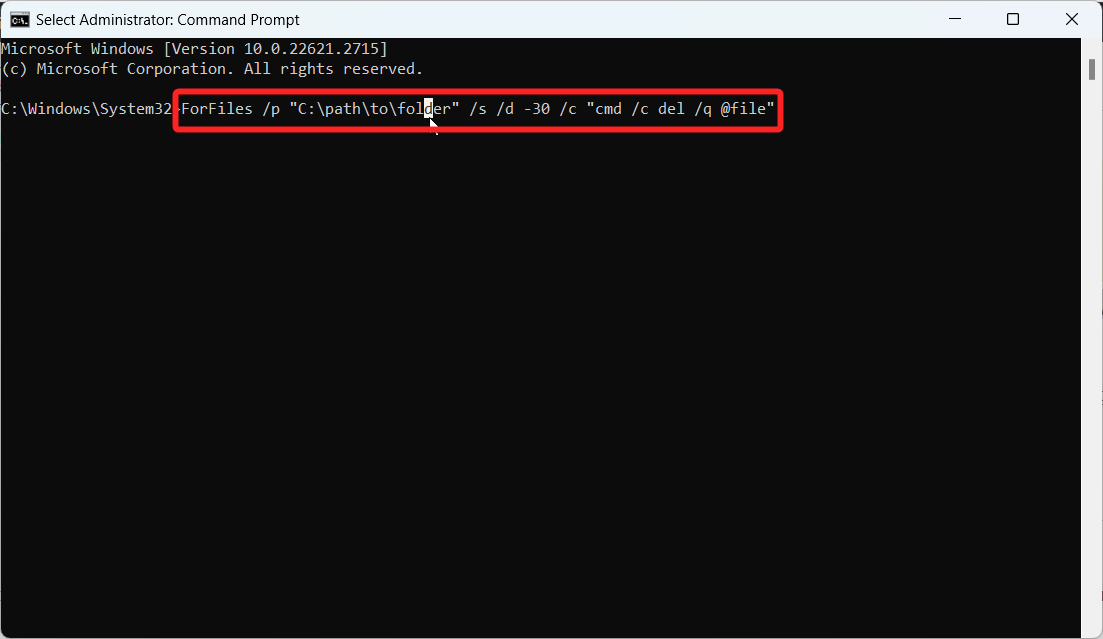
- Run the following command to delete files not accessed or modified in the last 30 days:
ForFiles /p "C:\path\to\folder" /s /d -30 /c "cmd /c del /q @file"

Here’s a breakdown of the ForFiles command components:
/p: Specifies the starting location for the file search.

/s: Indicates that the search should include subfolders.

/d -30: Sets the last modified date for a file to be within the last 30 days.

/c: Instructs ForFiles to perform a command on the files.

/q: Suppresses confirmation prompts for file deletion. (Adjust the command parameters, such as C:\path\to\folder

/d -30, according to your preferences.  The specified files will be promptly deleted upon executing the command.
- If you wish to delve deeper into the ForFiles command, execute ForFiles/? in the command prompt to access detailed information about each command.
Unfortunately, reversing the actions of the ForFiles command is not feasible. Once executed, files on your Windows 11 PC are automatically removed after the designated time frame. Your only recourse is to relocate the files to another directory if you wish to retain them.
3. Use Task Scheduler
The Task Scheduler in Windows effectively automates repetitive tasks, such as deleting old files. Follow these steps to set up a scheduled task using the ForFiles command on Windows 11:
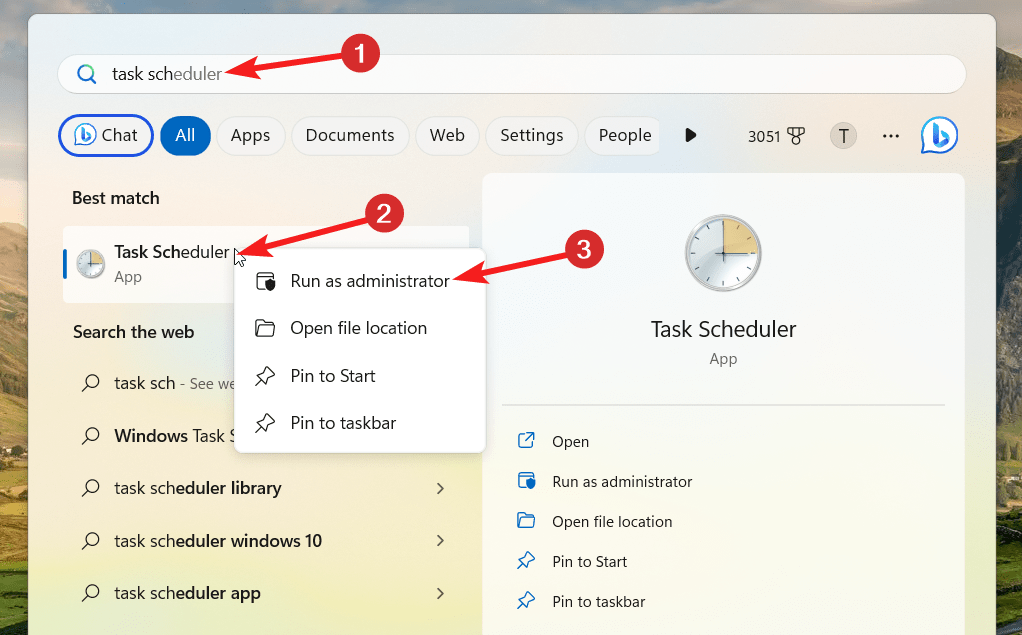
- Push the Win key to bring up the Start menu. Enter Task Scheduler and select the relevant outcome.

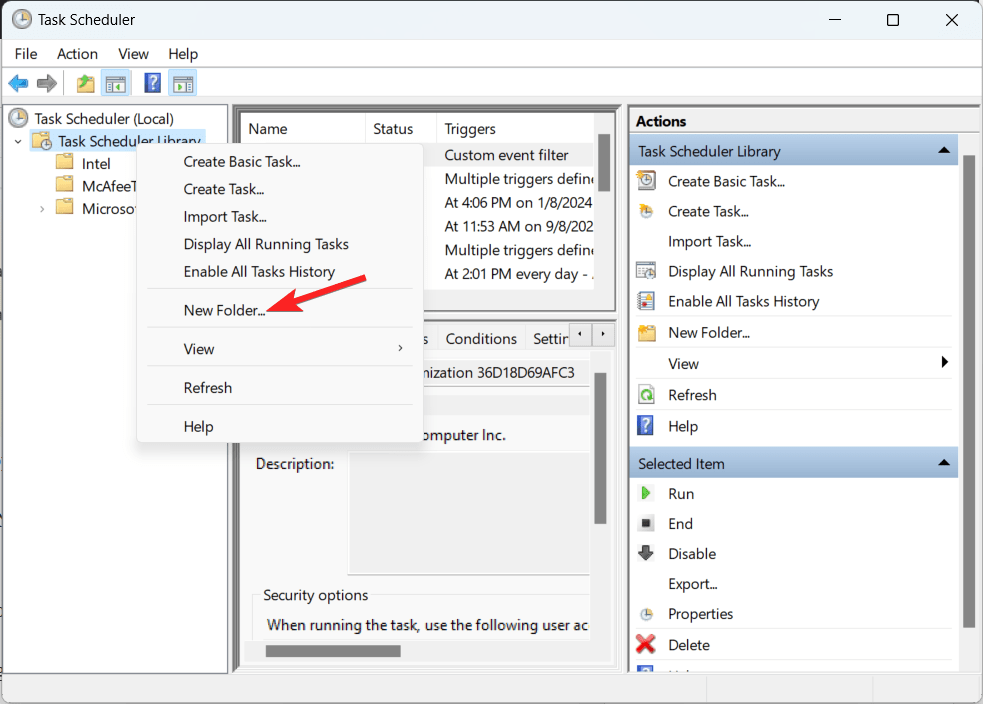
- In the left pane, right-click the Task Scheduler Library and select the New Folder option from the context menu.

- Assign a new folder name and click the OK button to save it.
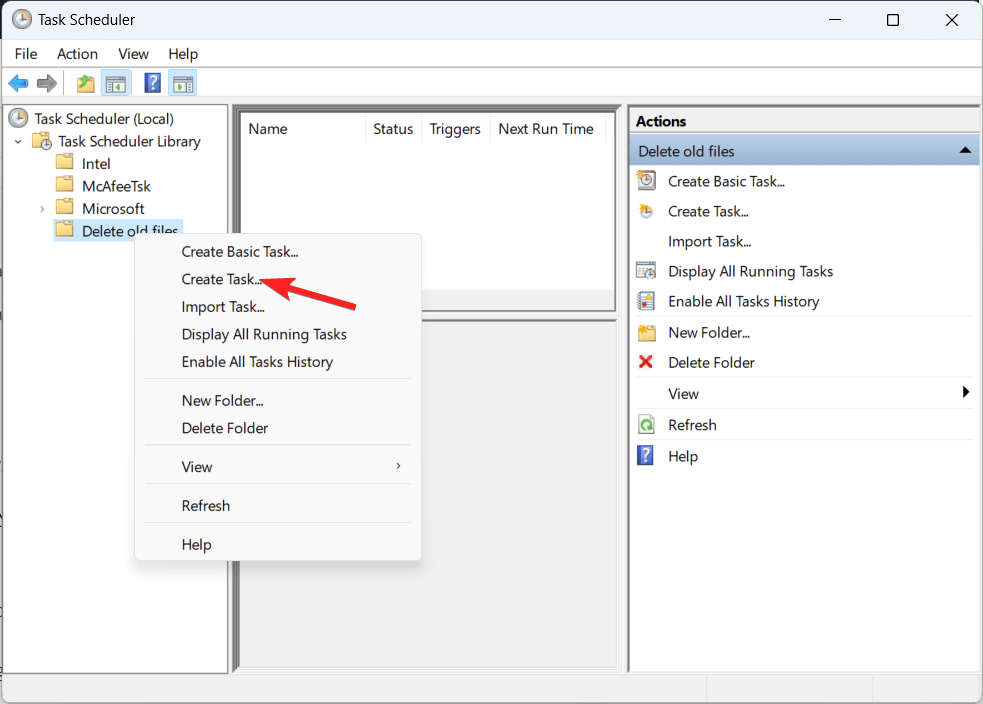
- Now click the Task Scheduler Library in the left pane to expand the list of folders. Next, right-click on the newly created folder and select the Create task option.

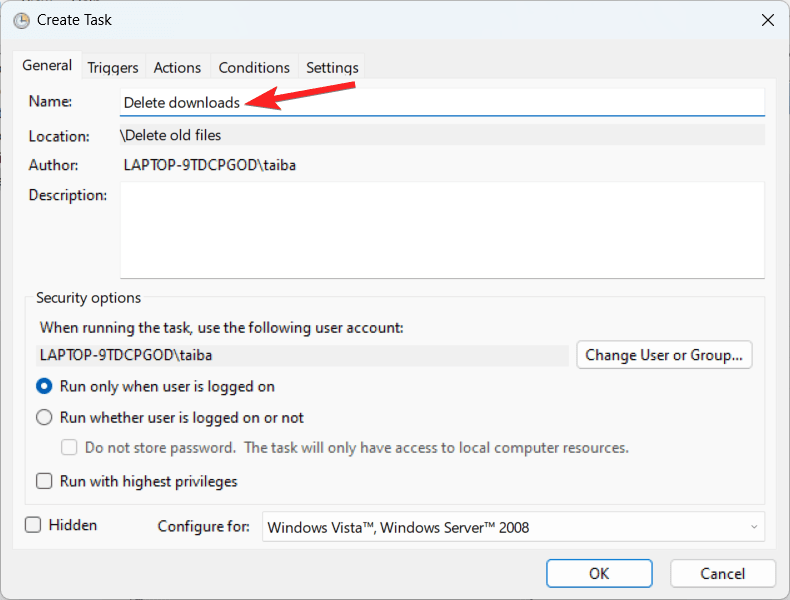
- In the General tab of the Task Creation window, enter a name for the task.

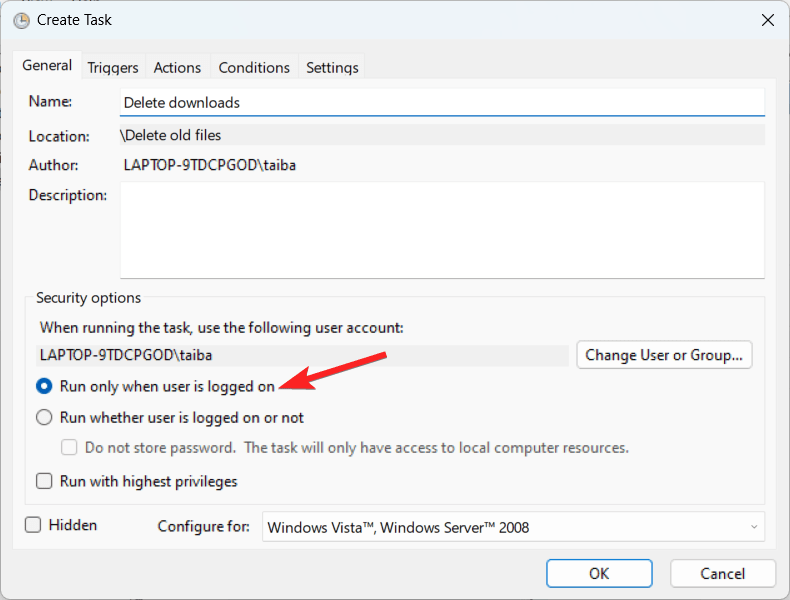
- Now move to the Security Choices section and enable the radio button for the option Run whether the user is logged on or not an option. Also, ensure that the Do not store password tick is not selected at the moment.

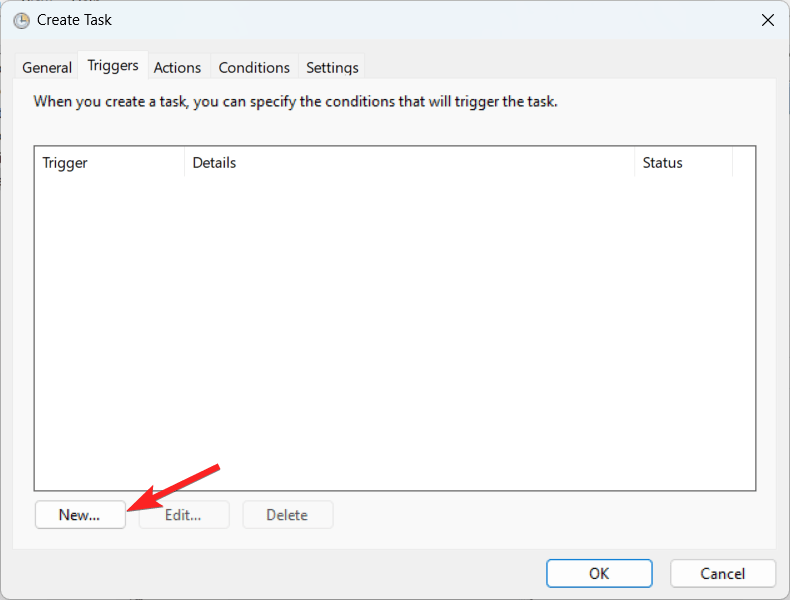
- Next, switch to the Triggers tab and press the New button present at the bottom right.

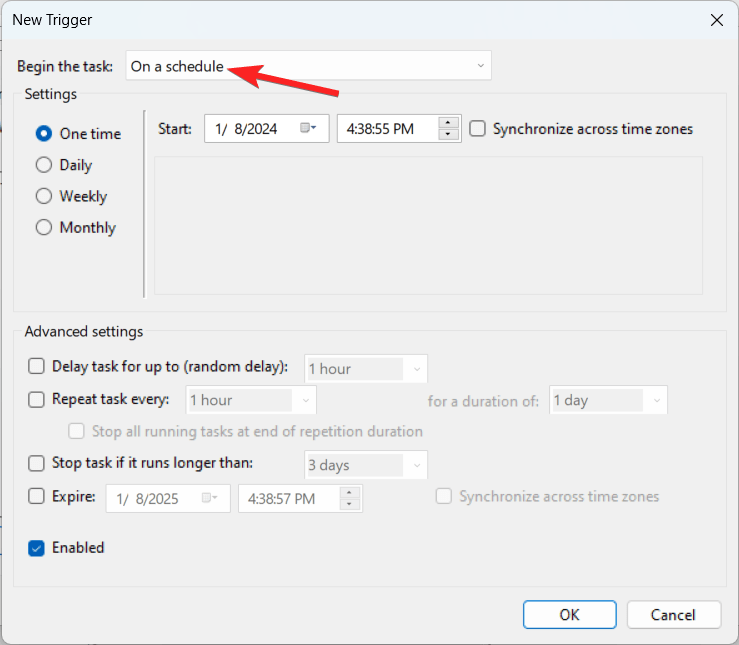
- Now choose the On a Schedule option from the Begin task drop-down.

- Set up the desired time frame for the task and then click the OK button.
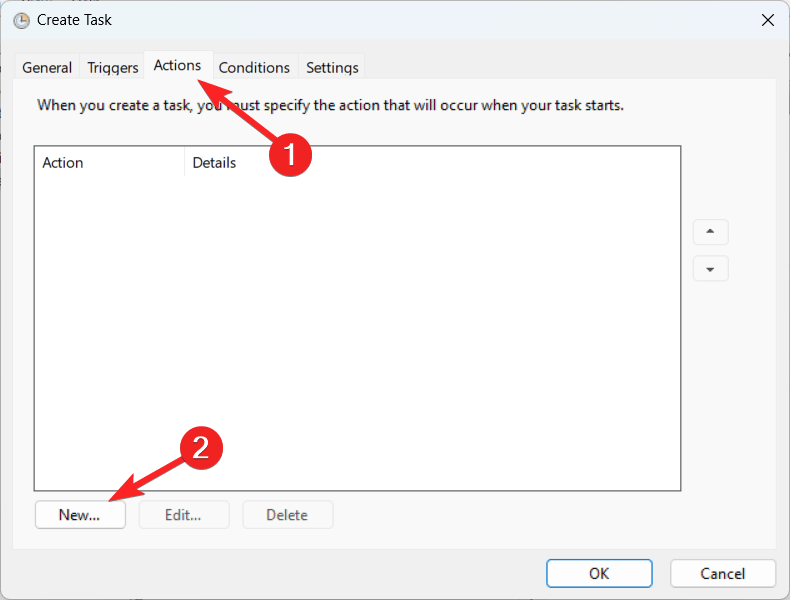
- Now go to the Actions tab in the Create task window and press the New button present at the bottom right.

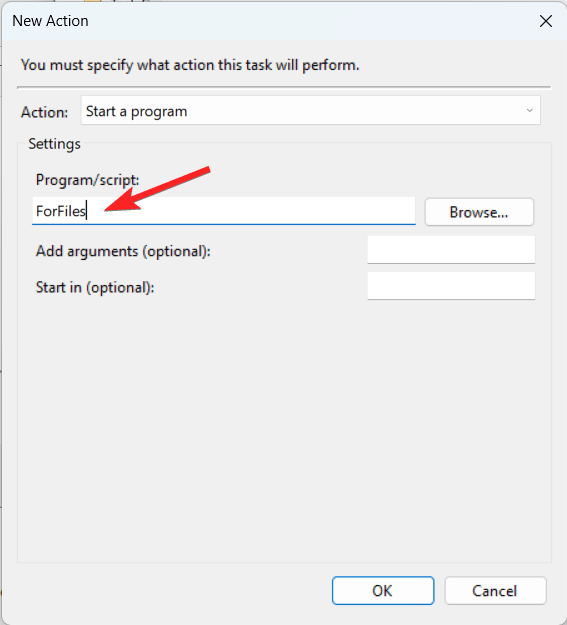
- Select Start a program in the Action drop-down.
- Next, type ForFiles in the Program/script box.

- In the Add arguments box, enter the command: /p C:\path\to\folder” /s /d -30 /c “cmd /c del /q @file. Modify the command by replacing the folder and file name with the file or folder you wish to delete.
- Then press the OK button to close the Actions window.
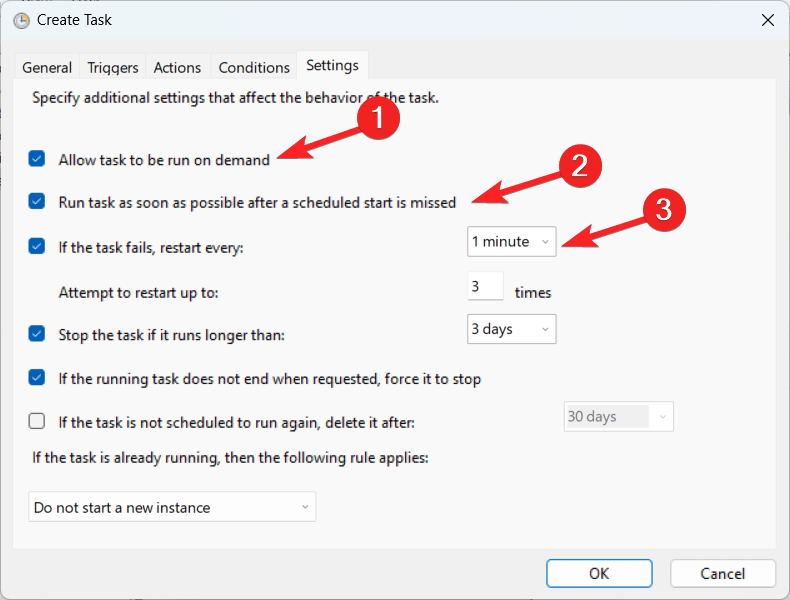
- Next, switch to the Settings tab, and check the following options: Allow tasks to be run on demand. Run task as soon as possible after a scheduled start is missed. If the task fails, restart every.

- Click OK to finalize the configuration.
Once configured, the Task Scheduler will automatically delete files in the specified location within the defined time. To stop automatic deletion, you can delete the created task.
Conclusion
It’s rarely helpful to keep extra files on your computer. They clutter file organization, consume RAM, and impair the efficiency of your PC. By configuring auto-delete instructions, you can remove this unnecessary clutter from your PC using whichever way you choose.
We would point out that automatically deleting files or folders from your computer is only a small portion of Windows cleanup. Numerous additional significant hacks exist, such as eliminating unnecessary applications, ending unnecessary background activities, and adjusting settings to suit your needs best. Thus, to ensure that Windows runs as smoothly as possible, adhere to all recommended guidelines.
If you've any thoughts on How to Automatically Delete Old Files on Windows 11, then feel free to drop in below comment box. Also, please subscribe to our DigitBin YouTube channel for videos tutorials. Cheers!
