If you’ve got a new Windows 11 PC and want to copy your files from the old one, there are a couple of ways to do so. Typically, the simplest process involves copying your files onto an external USB storage device and transferring them to your new computer. However, the regular copy-paste operation might take a lot of time and might encounter a problem during the process. Not many people are aware that you can utilize the Robocopy command to quickly transfer the files to your new PC running on Windows 11.
Thankfully, there’s a super solution: utilizing the powerful Robocopy (short for Robust File Copy) command-line tool. This tool is the quickest way to move your files over a network between your old and new Windows 11 devices. If you are clueless about this process. Do not worry!
Here’s a walkthrough that will explain the process of copying files over the network using the Robocopy command on your Windows 11.
What is the Robocopy Command?
Robocopy, or robust file copy, presented alongside the Windows Resource Kit NT 4.0, is a powerful command-line utility embedded within the Windows operating system. This tool lets users copy and share files between different locations.
Robocopy has developed into a standard feature from Windows Vista to Windows Server 2008.
The primary purpose behind Robocopy’s outcome was to enrich the mirroring and copying directories that corresponded to the customary file copying tools incorporated into Windows, such as Xcopy. By comprising a multitude of beneficial elements and controls, Robocopy promotes functions like:
- Network-based file transfer with the power to recommence tasks following network troubles.
- Intra-computer file transfers between two specified points.
- Replica of NTFS permissions, ownership details, and audit data.
- Exclusion of NTFS junction files from the copying process.
- Backup mode for copying files while displacing permission settings.
- Security of integral files and directory traits like timestamps.
- Bi-directional folder synchronization.
- Harnessing multithreaded functionality for simultaneous copying of multiple files.
Robocopy command options
Robocopy supports several options that allow you to customize the functionality of copying files using the Robocopy command. Some of the important opens are as follows:
- /E — Copy Subdirectories, including empty ones.
- /Z — Copy files in restartable mode.
- /ZB — Uses restartable mode. If access is denied, use backup mode.
- /R:5 — Retry 5 times (You can replace 5 with a different number, the default value is 1 million).
- /W:5 — Wait 5 seconds before retrying (You can replace 5 with a different number, the default value is 30 seconds).
- /TBD — Wait for share names To Be Defined (retry error 67).
- /NP — No Progress – It does not display the percentage copied.
- /V — Produce verbose output, showing skipped files.
- /MT:16 — Do multithreaded copies with n threads (default value is 8).
- /compress — Use SMB compression to speed up network transfer.
Steps to Copy Files using the Robocopy Command in Windows 11
You’ll need to go through two main steps to transfer files from one Windows PC to another. Firstly, you’ll have to enable the file-sharing feature on the Windows 11 PC where the files are currently located. After that, you can utilize the Robocopy command to copy files to your new Windows 11 device. So let’s proceed:
Enable the File-sharing feature in Windows 11
Enabling the file-sharing feature is a straightforward process. Here is the step-by-step procedure to enable the file-sharing option on the source computer.
- Launch File Explorer on your device using the Windows + E shortcut.
- Locate the folder having the files you intend to copy.
- Right-click that folder and choose the Properties option from the context menu.
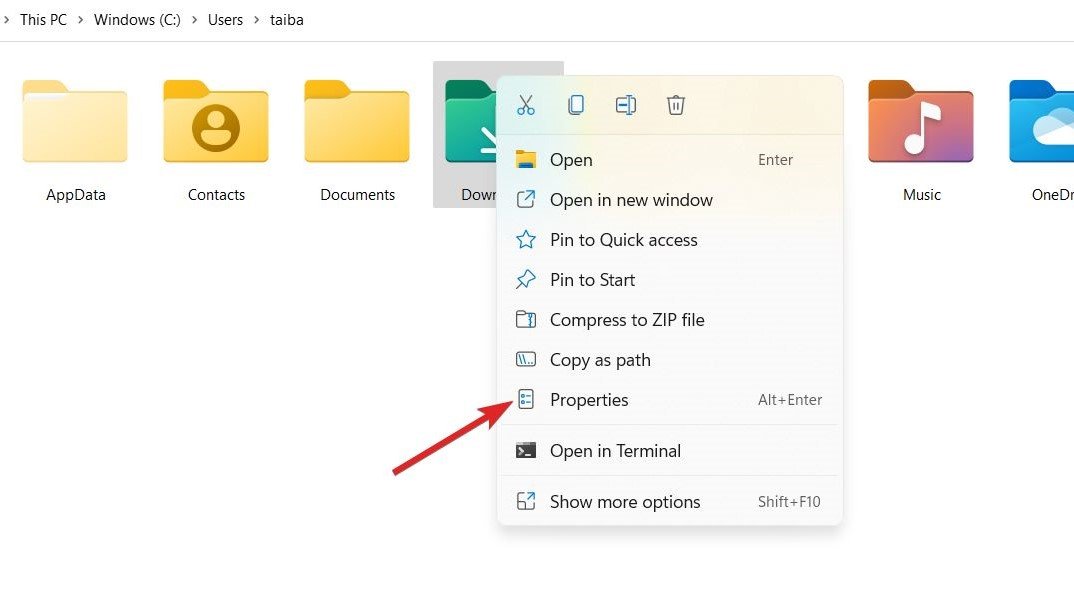
- Switch to the Sharing tab of the properties window and click the Share button under the Network File and Folder Sharing section.
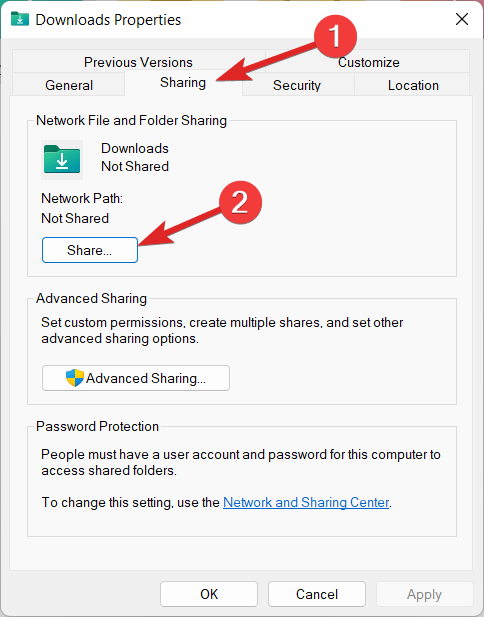
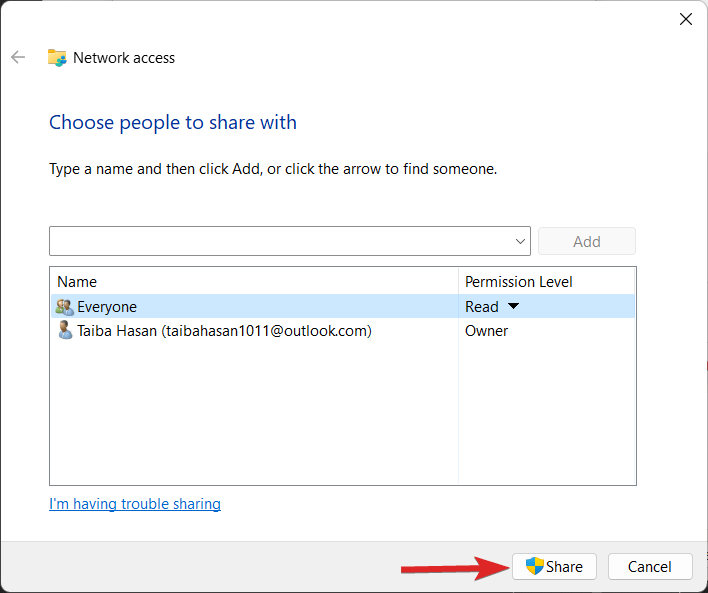
- Pick the users to whom you want to grant access to the folder. You can also choose Everyone. Once done, press the Add button on the right.
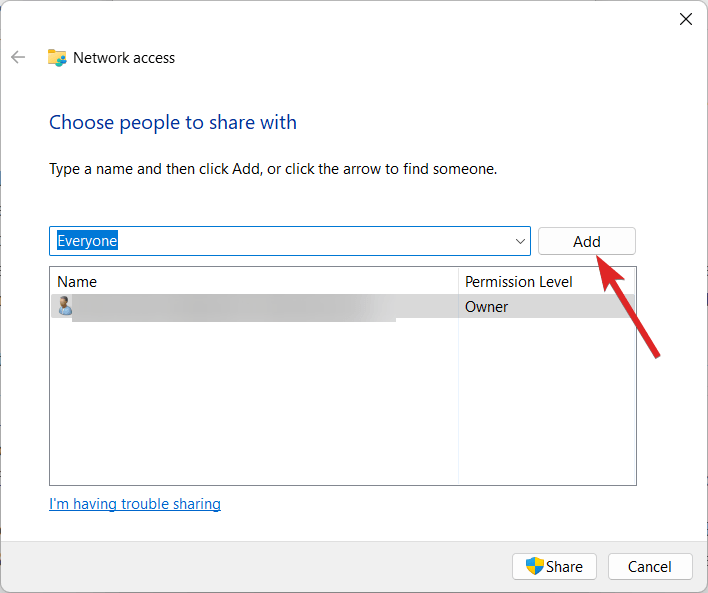
- Below the Permission level section, specify the permission you want to assign the users. Based on your preference, you can assign the Read (default) option if you want users to be able to open and view files without the ability to modify them. Similarly, the Read/Write option will allow the users to view as well as modify the files inside the folder.
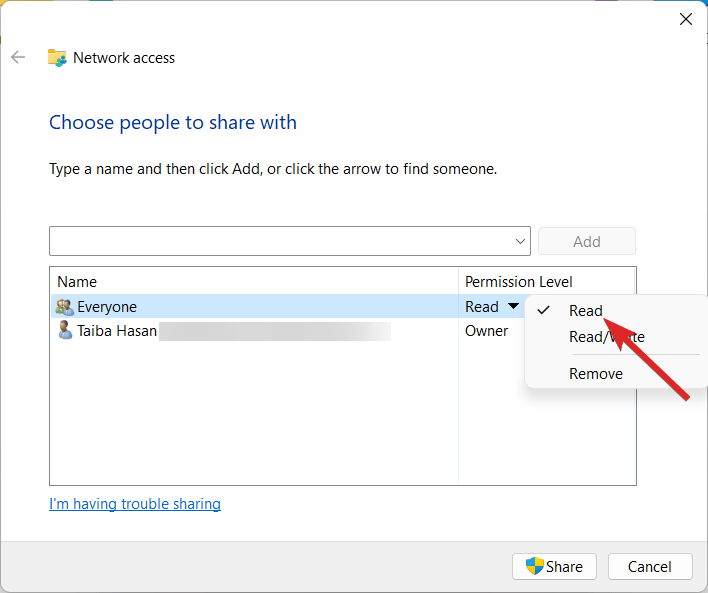
- After configuring the permission settings, click the Share button at the bottom right.
- Right-click the network path of the folder you wish to transfer from and select Copy Link from the context menu.
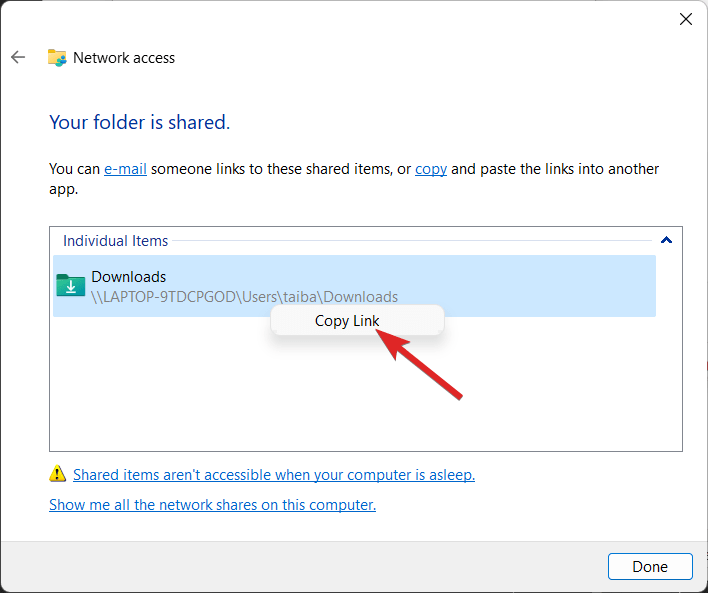
Before proceeding to the next step, you need to be aware of the IP address of the source and destination Windows 11 PC. You can easily do it by navigating to Settings > Network & Internet > Wi-Fi and choosing the WIFI connection to access the IP address details.
Use the Robocopy command to copy files
- Use the Windows + S shortcut combination to launch the Search menu. Type cmd in the top search bar and select the Run as administrator option from the right section.
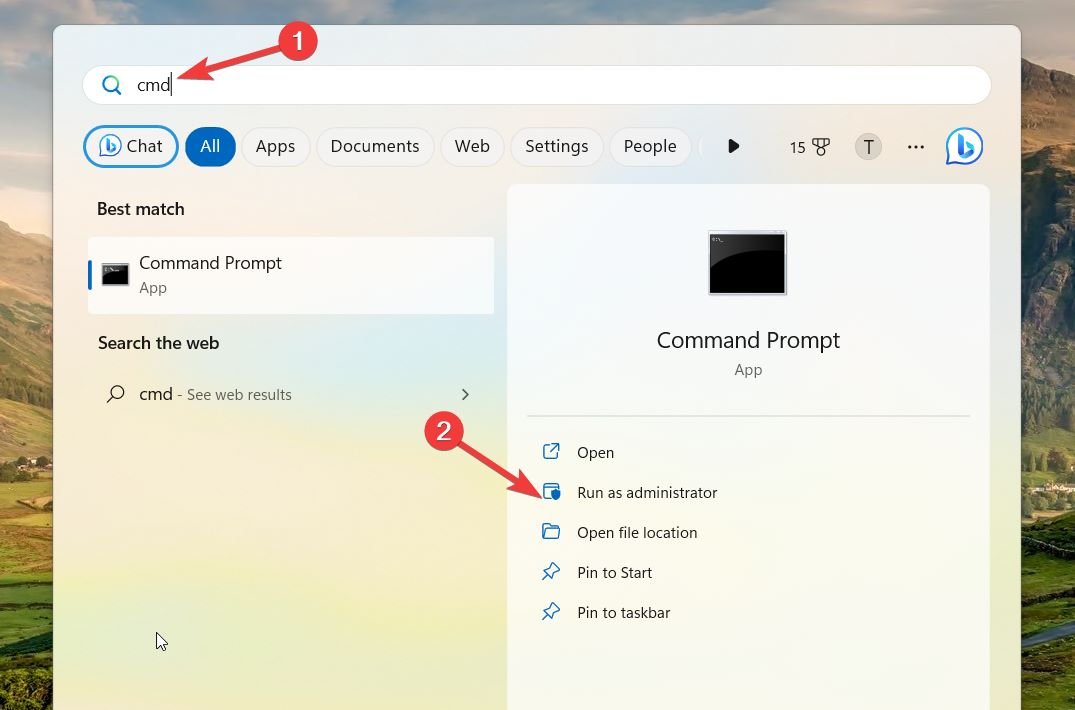
- Press the Yes button on the User Action Control window to launch the Command Prompt with elevated permissions.
- Now type the command
cmdkey /add:COMPUTER-OR-DOMAIN /user:COMPUTER-OR-DOMAIN\USERNAME /pass:PASSWORD
within the Command Prompt window and press the Enter key after each. You will have to replace COMPUTER-OR-DOMAIN with the IP address or domain of the destination computer. Also, replace COMPUTER-OR DOMAIN\USERNAME with the destination device’s username and PASSWORD with the account password. As soon as you execute the command, the user and password will be successfully added to the network on Windows 11.
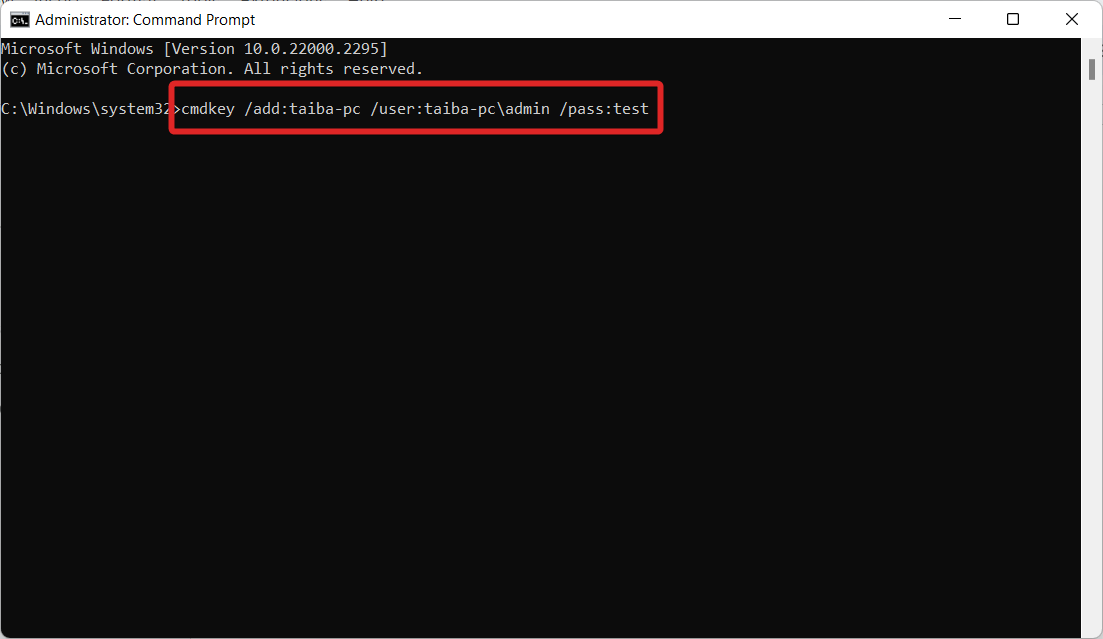
- Next, enter the command
robocopy \\source-device-ip\path\to\share\folder C:\destination-device\path\to\store\files /E /Z /ZB /R:5 /W:5 /TBD /NP /V /MT:16 /compress
and hit the Enter key. Enter the source device’s IP address, the network route to the transferred directory, and the target destination path. Be sure to enter your exact source and destination routes. After that, press Enter to initiate the file transfer.
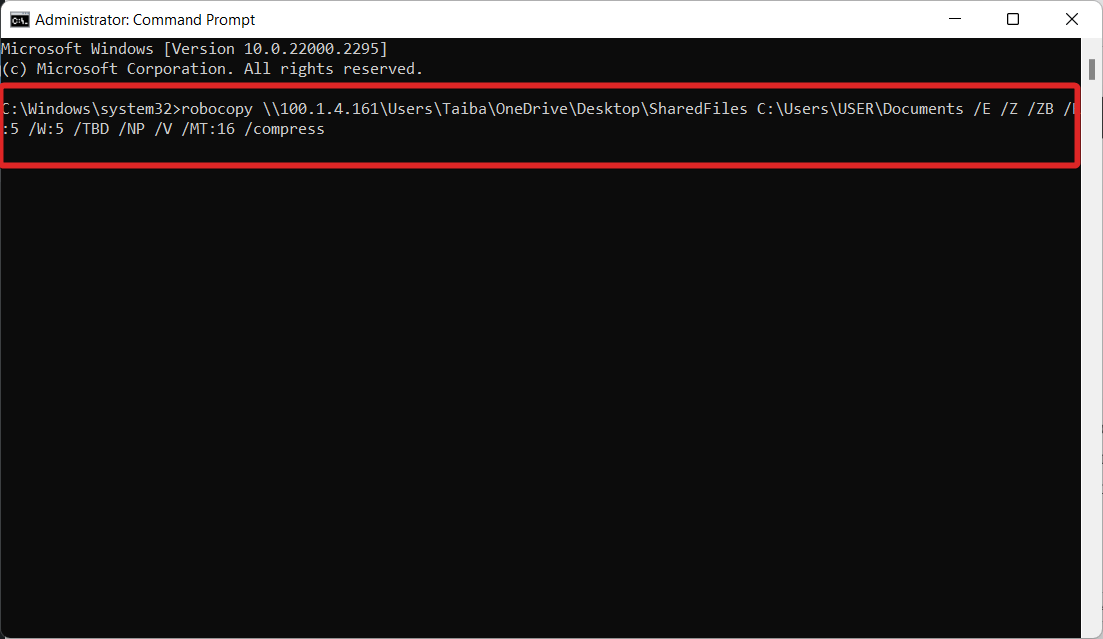
Note: Remember to replace the paths and IP address placeholders according to your network setup.
Conclusion
Now that you understand how to copy and transfer files and data between computers utilizing Robocopy on Windows, you may do so without a USB flash drive. Remember that you must first set up file sharing on Windows 11, where the files are coming from, before using Robocopy to copy files from one computer to another. This will make it easier for you to transfer the files to the target computer without encountering the error.
If you've any thoughts on How to Copy Files Over the Network Using Robocopy on Windows 11?, then feel free to drop in below comment box. Also, please subscribe to our DigitBin YouTube channel for videos tutorials. Cheers!


