When you run out of disc space on your Windows 11 computer, you can manually implement a variety of tactics, such as deleting temporary files or emptying the recycle bin to free up the disc space. Interestingly, you can also utilize a variety of inbuilt programs to clean up your computer’s disk space. This seems to do the task, but switching between programs and doing different tasks to clean up the storage space causes a lot of inconvenience.
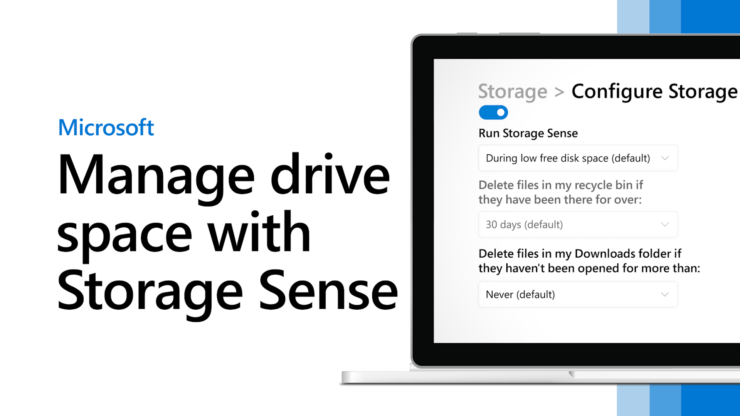
To avoid this, you may turn on a very useful feature by Windows 11 known as Storage Sense, which is programmed to check for and remove unnecessary files automatically. If you are here, it means you are curious to know more about Storage Sense.
This article will walk you through setting up Storage Sense settings so that your Windows 11 computer can autonomously enforce a set of guidelines for freeing up space.
What is the Storage Sense Feature in Windows 11?
Storage Sense is a long-standing feature that was created to automatically remove temporary system and application files, empty the recycle bin of unnecessary objects, and get rid of files from your Downloads folder that you no longer require.
It also allows you to remove files from OneDrive and keep them online solely, which frees up more space on your computer.
Ways to Enable Storage Sense Feature in Windows 11
Below are the different methods by which you can enable the storage sense feature on your Windows 11 app.
1. Using Settings App
You must configure Storage Sense on your PC to manage your disc space effectively. Here’s how to accomplish it on the most recent version of Windows, albeit the procedure may differ slightly from Windows 11:
- Start by utilizing the Start menu to search for Settings, then select the Settings app from the search result.
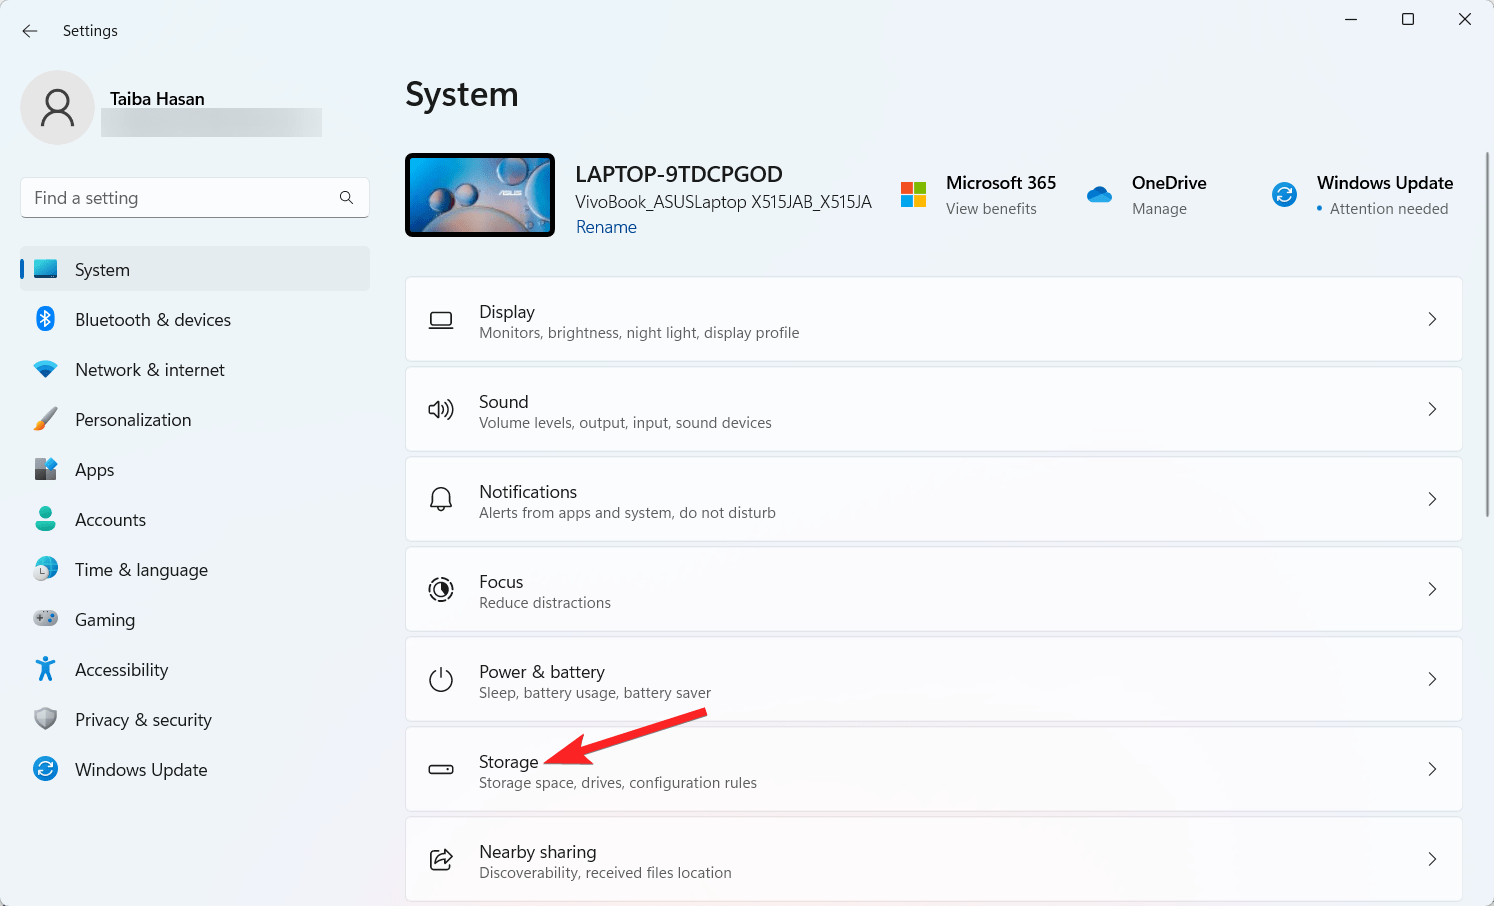
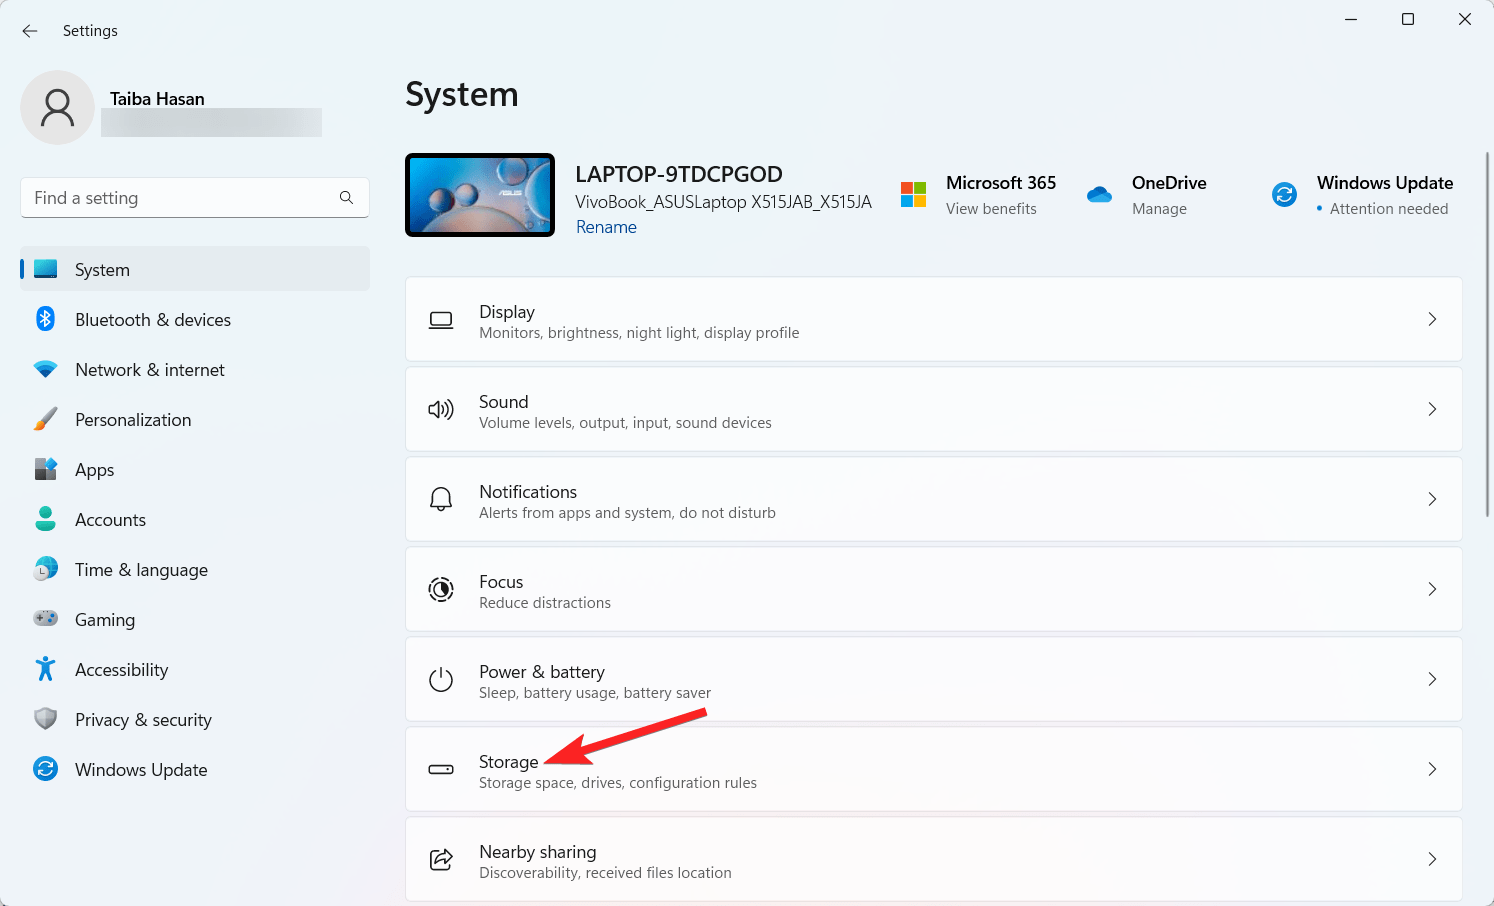
- In the sidebar of the Settings app, select System and then select the Storage tab from the System menu.

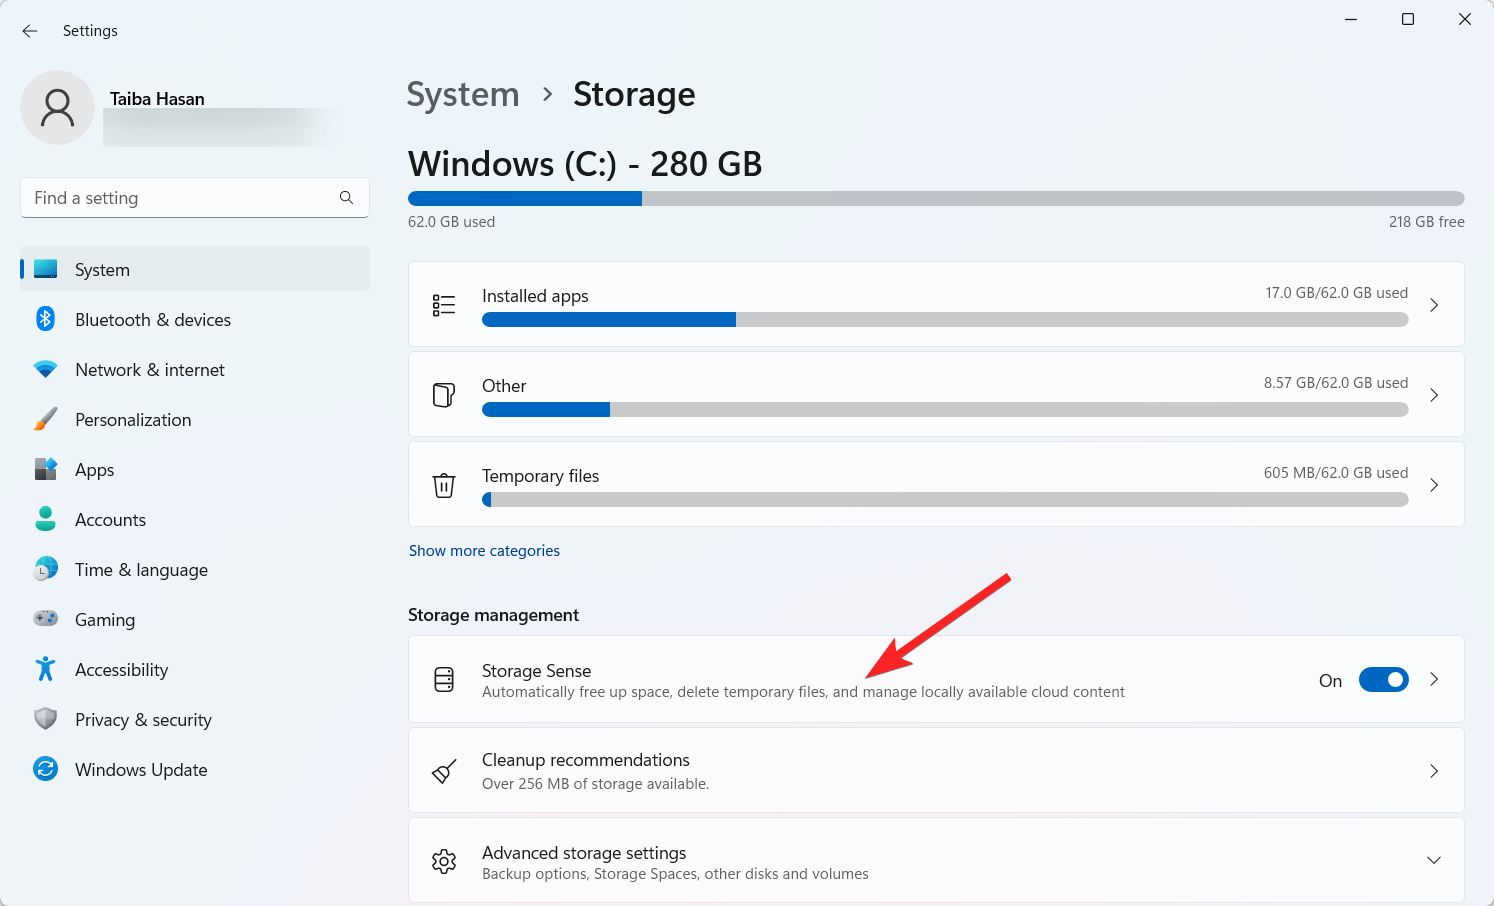
- Toggle the button to activate Storage Sense under the Storage Management section.

- To access the customization options for controlling your disc space, select Storage Sense. This is where you set the schedule for Windows to run Storage Sense and the frequency at which files are deleted from the Downloads and Recycle Bins.
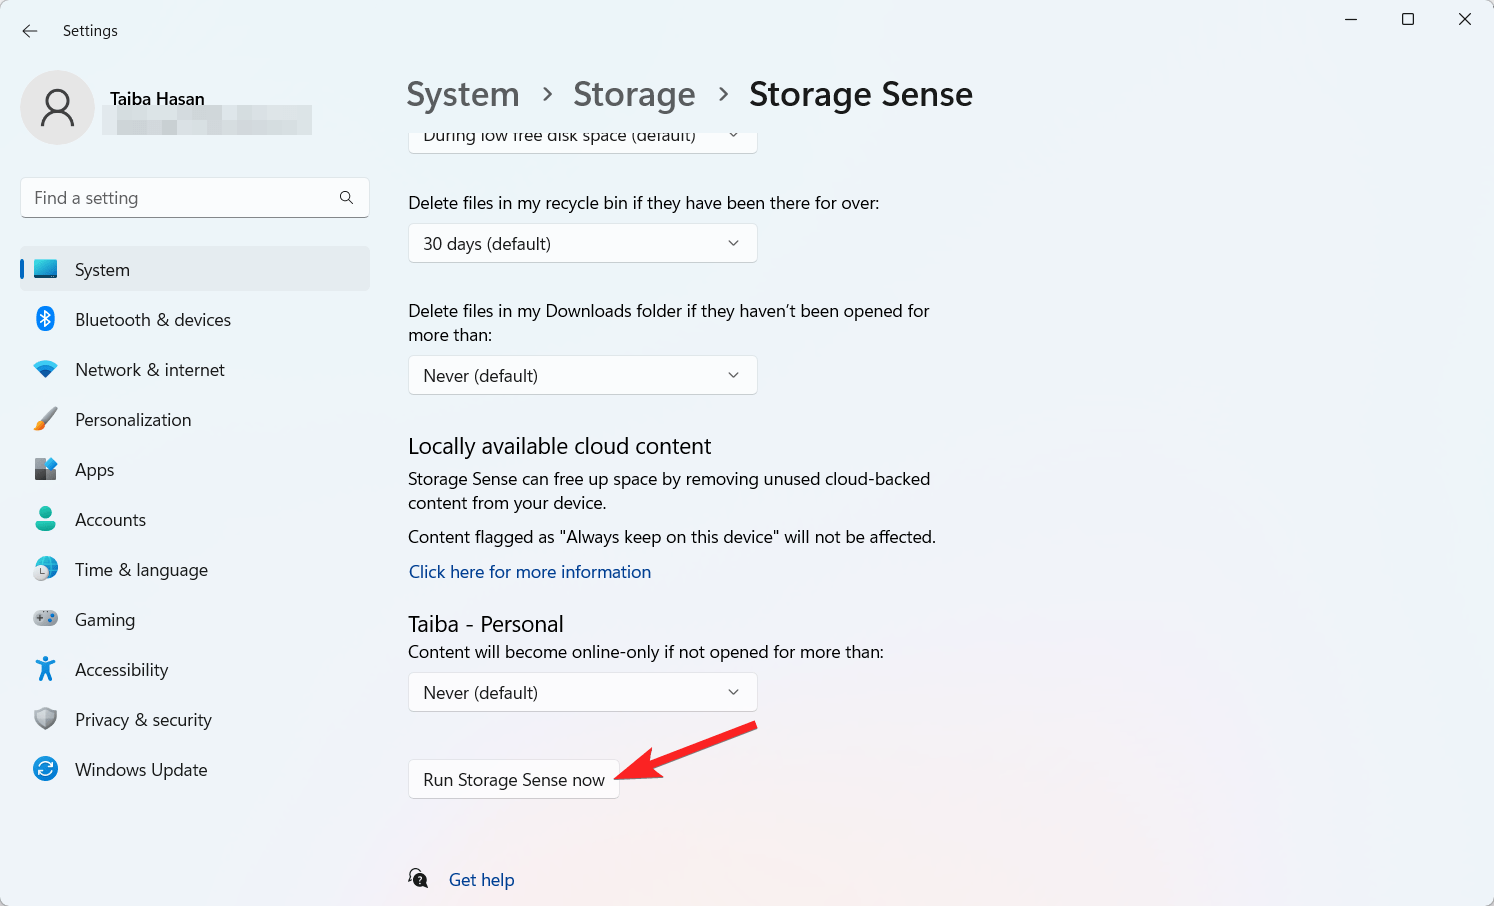
- Once your choices have been set, scroll down the window and press the Run Storage Sense now button.

2. Using Group Policy Editor
You can also use the Group Policy Editor to turn on the Storage Sense feature in Windows 11. To enable the Storage Sense feature using the Local Group Policy Editor (gpedit.msc), follow this step-by-step process:
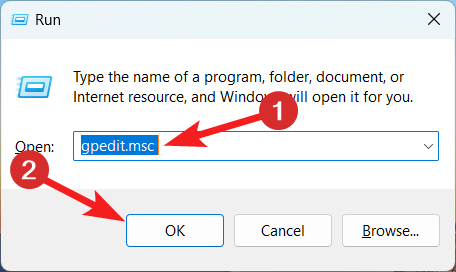
- Press the Windows + R on your keyboard to open the Run dialog. Type gpedit.msc and press Enter.

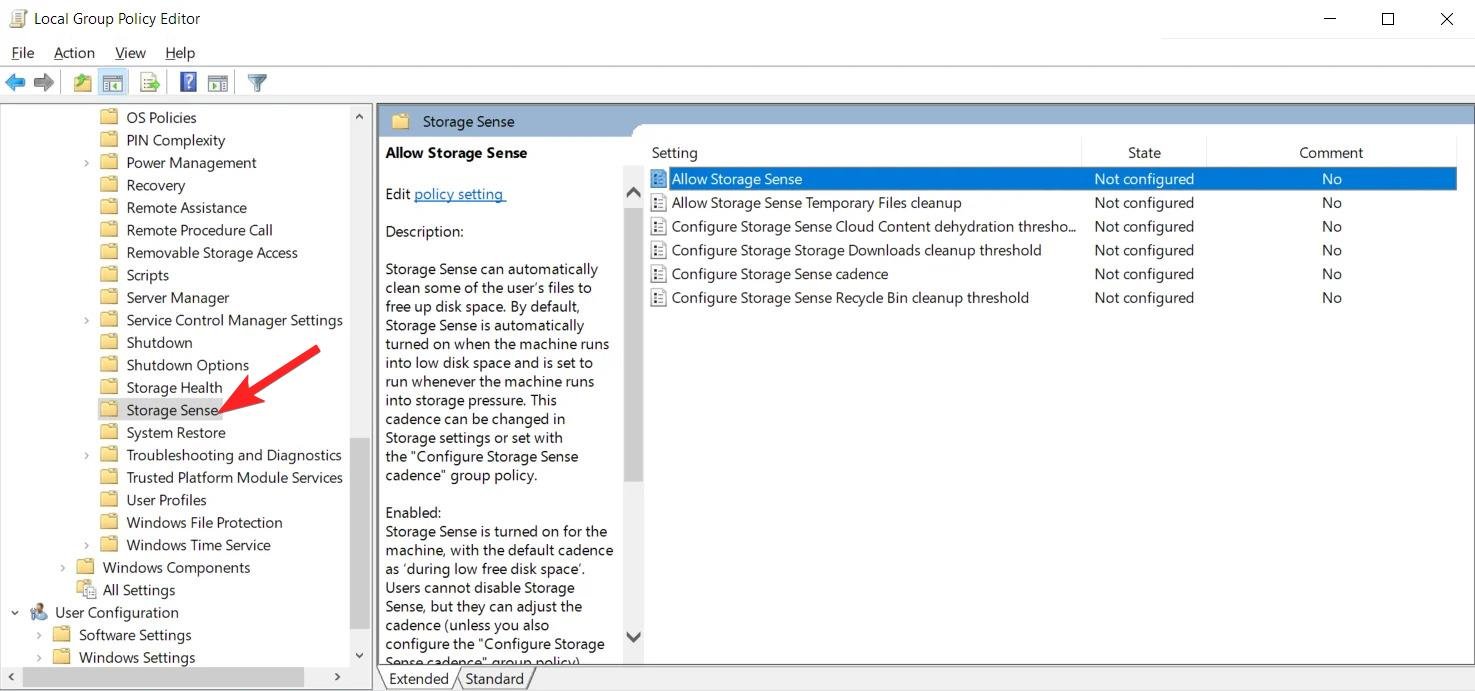
- In the left pane of the Local Group Policy Editor, navigate to the following policy location: Computer Configuration\Administrative Templates\System\Storage Sense

- In the right pane of the Storage Sense policy in the Local Group Policy Editor, perform one of the following actions based on your preference.
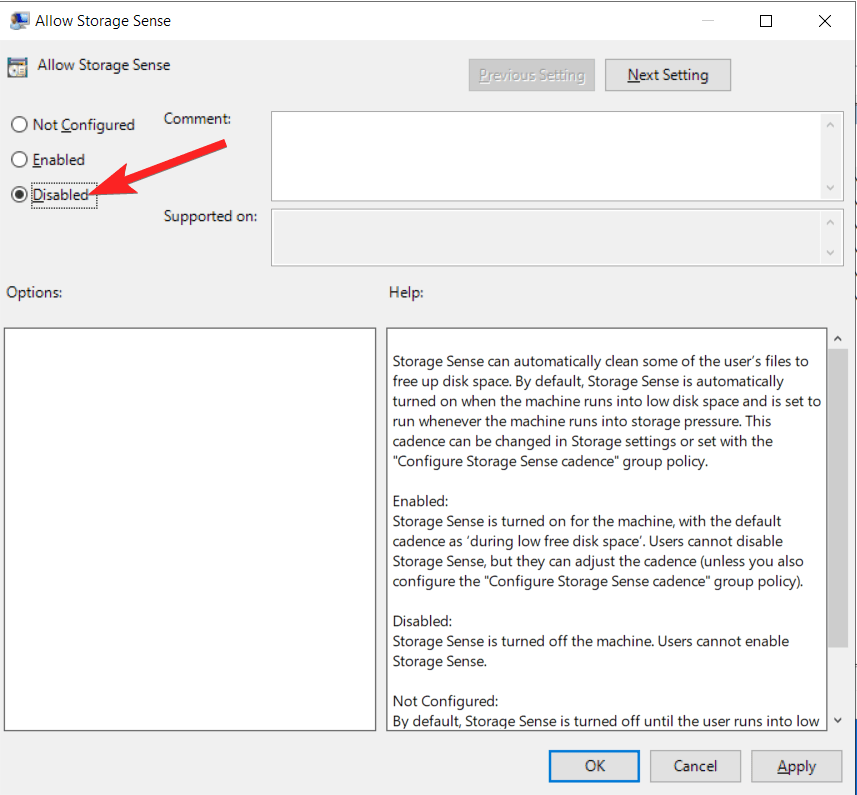
- Select the Not Configured option enabled by default if you do not want to configure this setting. Click or tap on OK.
- Next, select the Enabled option always to Enable Storage Sense for All Users. Click or tap on OK.
- Next, Select the Disabled option always to disable storage sense for all users. Click or tap on OK.

- Once you have made the desired changes in the local group policy, you can close the Local Group Policy Editor.
How to Manage Space Using the Storage Sense Feature?
Now that you have successfully enabled the Storage Sense, it’s time to configure this automatic space-saving feature. To fix this, you simply need to follow these detailed steps:
- Launch the Settings app on Windows 11 PC from the pinned section in the Start menu.
- Scroll down the System settings and select the Storage option.

- On the next page, look for the Storage Management section and click on the Storage Sense option to view the related settings.

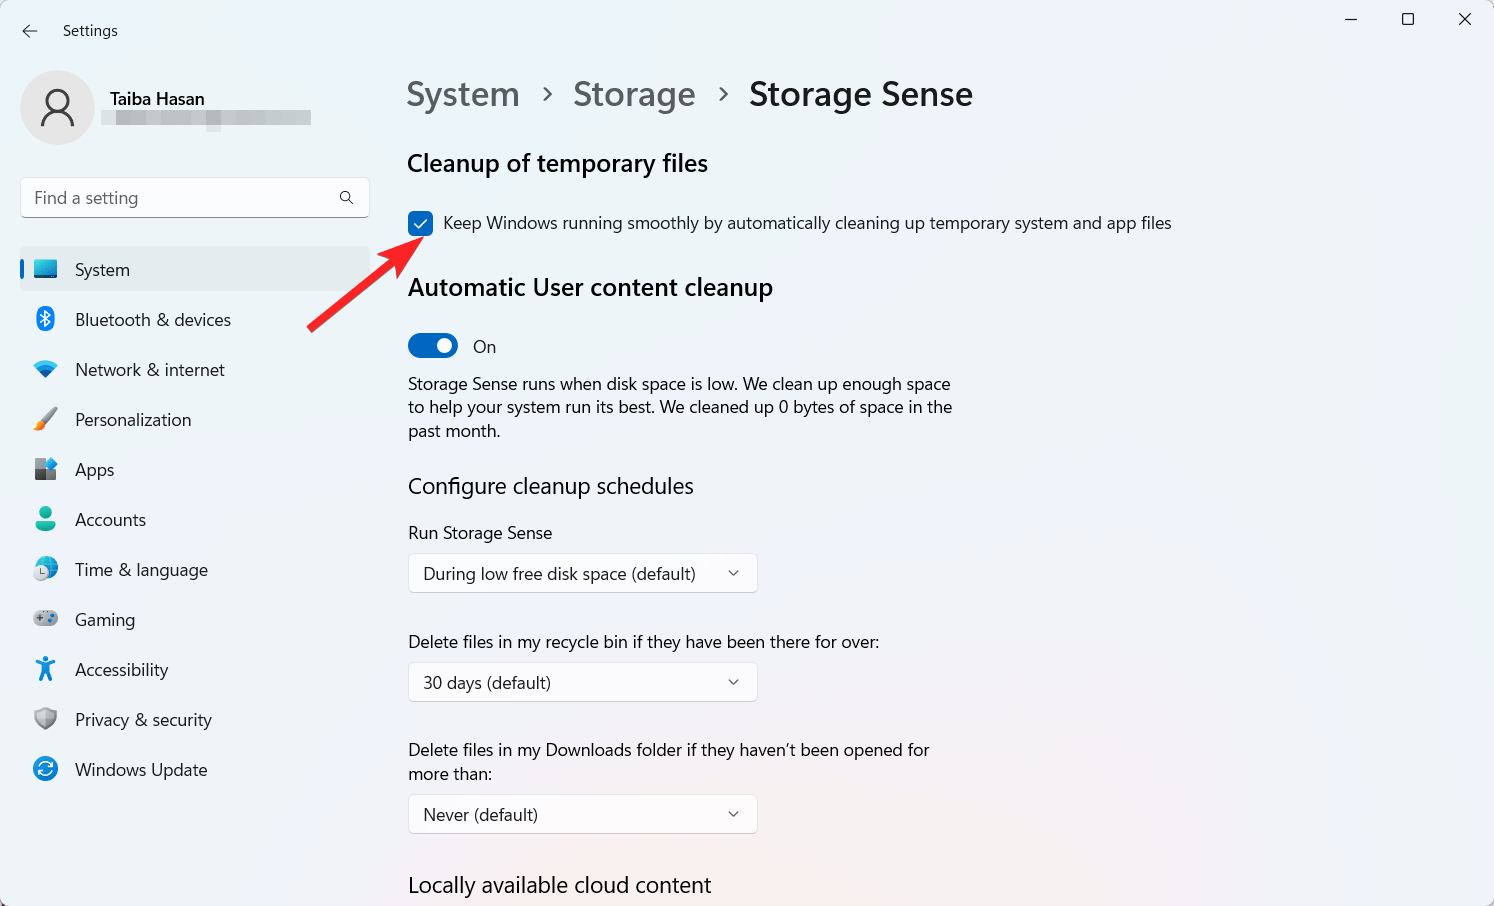
- Enable the checkbox next to the first option that says Clean up of temporary files.

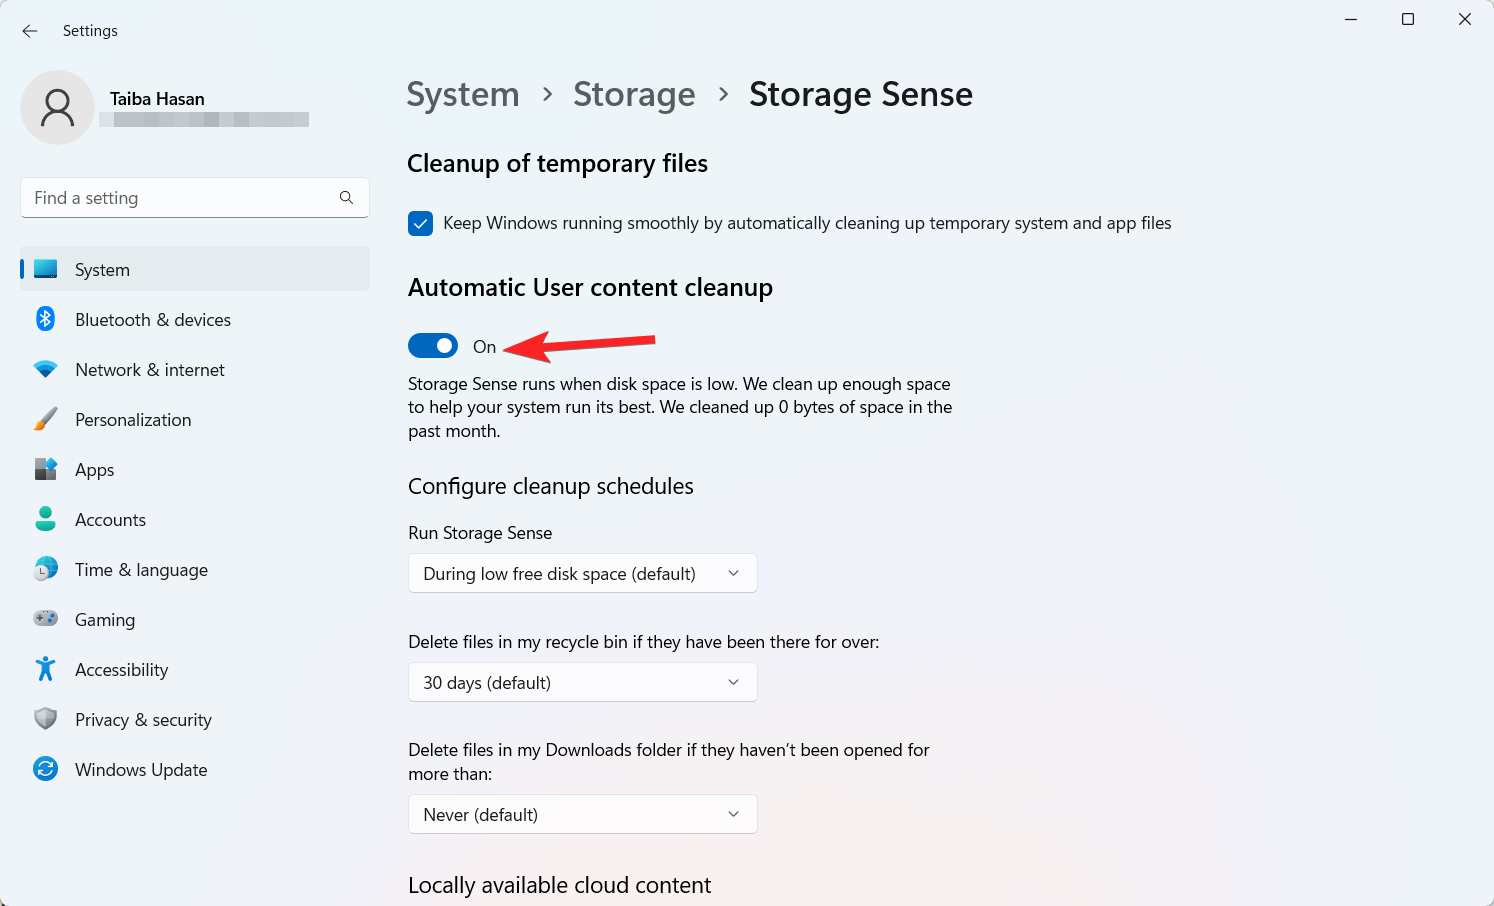
- Now, turn on the toggle switch for Automatic User content cleanup.

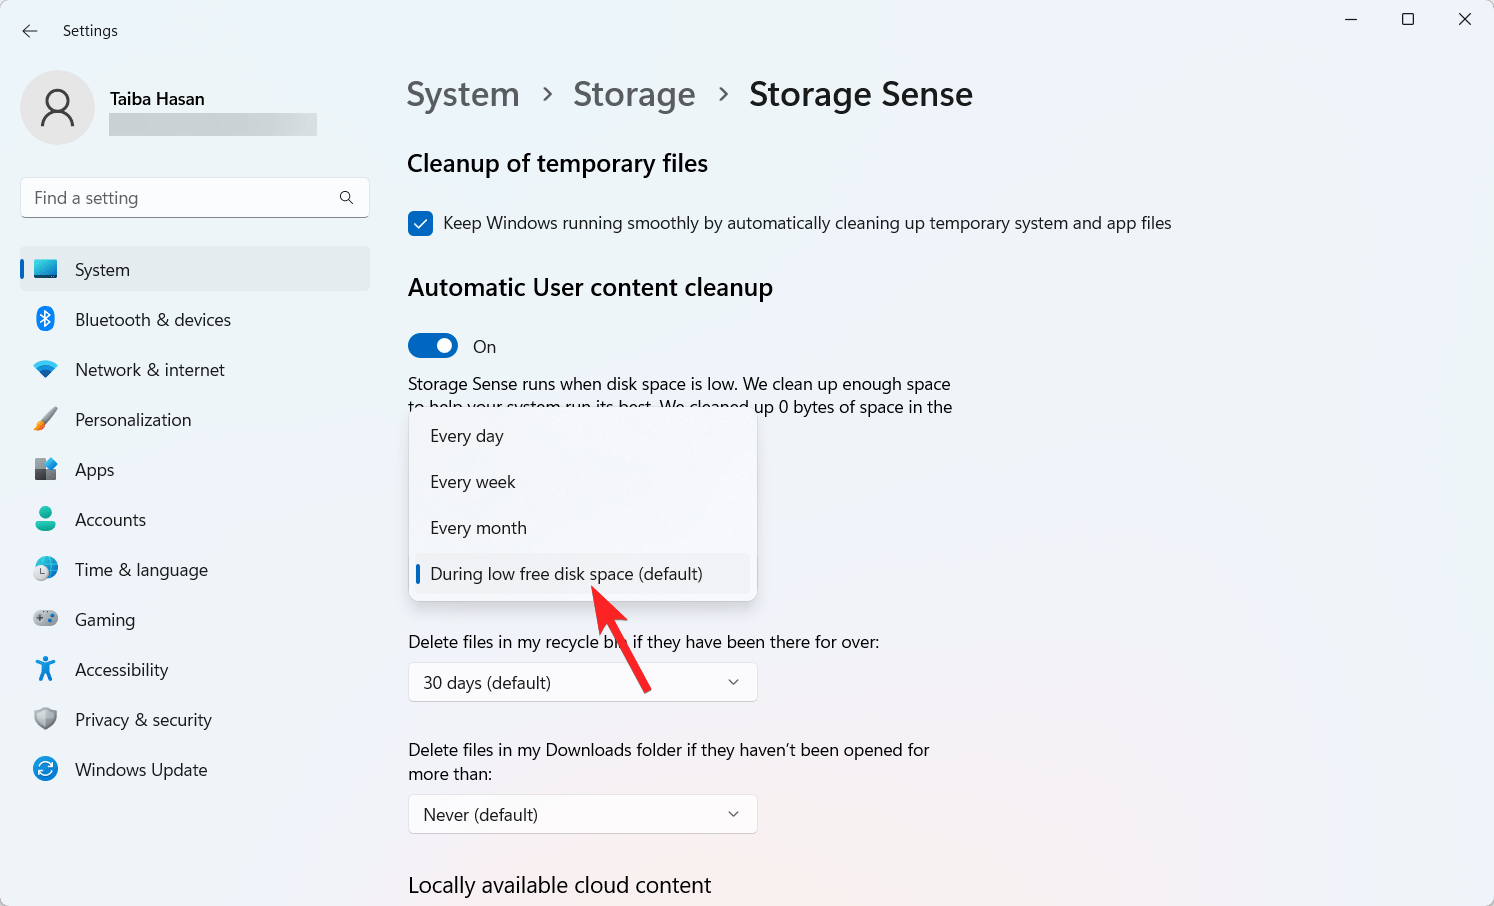
- In the Configure cleanup schedules section, choose the Run Storage Sense setting and select the During low free disk space option (default). You can also choose the Every day, Every week, or Every month option based on your preference.

- If desired, you can use the Delete files in my recycle bin if they have been there forever option to specify how old files in your recycle bin should be before they are deleted. You have options like Never, 1 day, 14 days, 30 days, and 60 days.
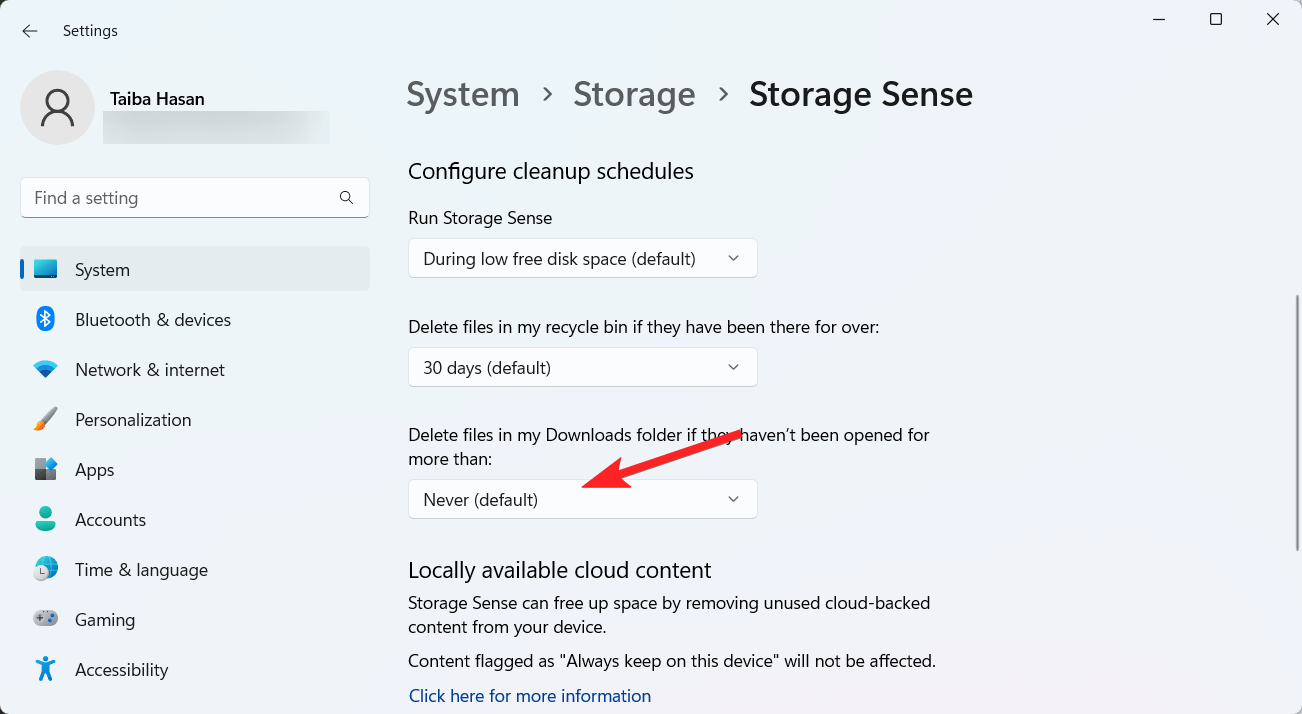
- Additionally, you can set the Delete files in my Downloads folder to define the number of days a file must remain unchanged before it’s marked for deletion.

- There is also an option related to OneDrive, allowing you to decide when files already synchronized to the cloud should become online-only to free up local storage. Note that when you use this feature, the files will still be visible in your OneDrive folder, but you’ll need an internet connection to access them.
- Once you have completed these steps, Storage Sense will automatically run when your computer is running low on available storage based on your configured settings.
- Alternatively, you can always use the Run Storage Sense Now button to initiate an immediate space-saving cleanup on your computer.
A quick reminder: The Downloads folder might contain essential files you have downloaded from the internet, so it’s advisable to check and copy any files you want to keep before enabling this setting
In previous versions of Windows, Storage Sense had the option to delete files from the last setup after an upgrade. However, this option is now exclusively accessible through the Temporary Files page.
Conclusion
That’s everything you need to know about the Storage Sense option on Windows 11 PC. You must handle your system’s disc space sensibly and efficiently. Temporary files that can consume a lot of storage space include older Windows Update files. Therefore, it is necessary to remove these files to free up space using the Storage Sense feature. What’s your take on the Storage Sense feature of Windows 11? Do let us know in the comments section.
If you've any thoughts on How to Enable and Use Storage Sense in Windows 11, then feel free to drop in below comment box. Also, please subscribe to our DigitBin YouTube channel for videos tutorials. Cheers!
