AMD has changed the game in the computing market after they introduced Ryzen processors to the world. Millions of computer administrators focus on desktop processors, but they don’t pay attention to the Radeon Graphics Card capabilities. The Radeon control panel comes with tons of features, and one of them is a screen recorder.
You can take advantage of the inbuilt features to record the desktop screen including games, and follow the guide to do so. We have compiled this guide for the basic users and advanced users, who want to record screen for tutorials, gaming, media content, and more. Read the entire AMD Relive screen recorder guide to master the controls and achieve the best results.
What is AMD Relive?
AMD Relive is an advanced screen recorder added in the Graphics Control Panel, and it is available in modern software. You can use the Relive functionalities to record games, screens, videos, and other content. We want to inform the readers that you have advanced options that allow the users to record microphones, desktop/game audio, and more.
You can install AMD Relive during the setup and if you have skipped it then you have launched the same setup again and it will provide the option again.
We are going to explore all options and features to record the screen smoothly on Windows PC.
Note: Read the entire guide because AMD Radeon Software performs differently on older processors.
How to Enable/Disable AMD Relive Screen Recorder?
Follow our easy-to-implement guide to enable/disable the screen recorder, and do not skip the settings part that we have covered below.
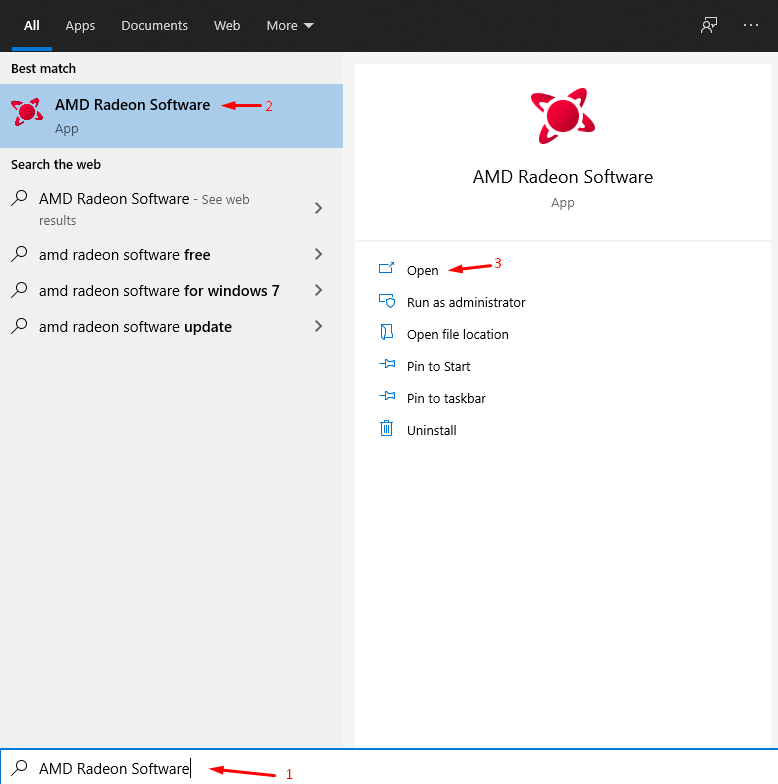
Step 1: Press Windows Key + S and then open “AMD Radeon Software” on Windows PC.
Step 2: Click on the gear icon to view “Settings” in the AMD Graphics Control Panel.
![]()
Step 3: Now, click on “General” to continue.

Step 4: Scroll down a little to find “Recording” and then click on “Record Desktop” to enable/disable it.

That’s it, you have successfully enabled/disabled the screen recorder. AMD should reconsider designing the control panel because it has become complicated for an average user to remember the option placement.
How to configure AMD Relive Screen Recorder?
As I have mentioned above that the inbuilt screen recorder performance differs on different hardware and we have tested it on Ryzen 5 processor and AMD A4-6210 processor. So you have to work around with the settings to get FPS, quality, and stable performance throughout the session.
Step 1: Go to “Record Desktop” following the above instructions.
Step 2: Play around with the settings that I have mentioned below.
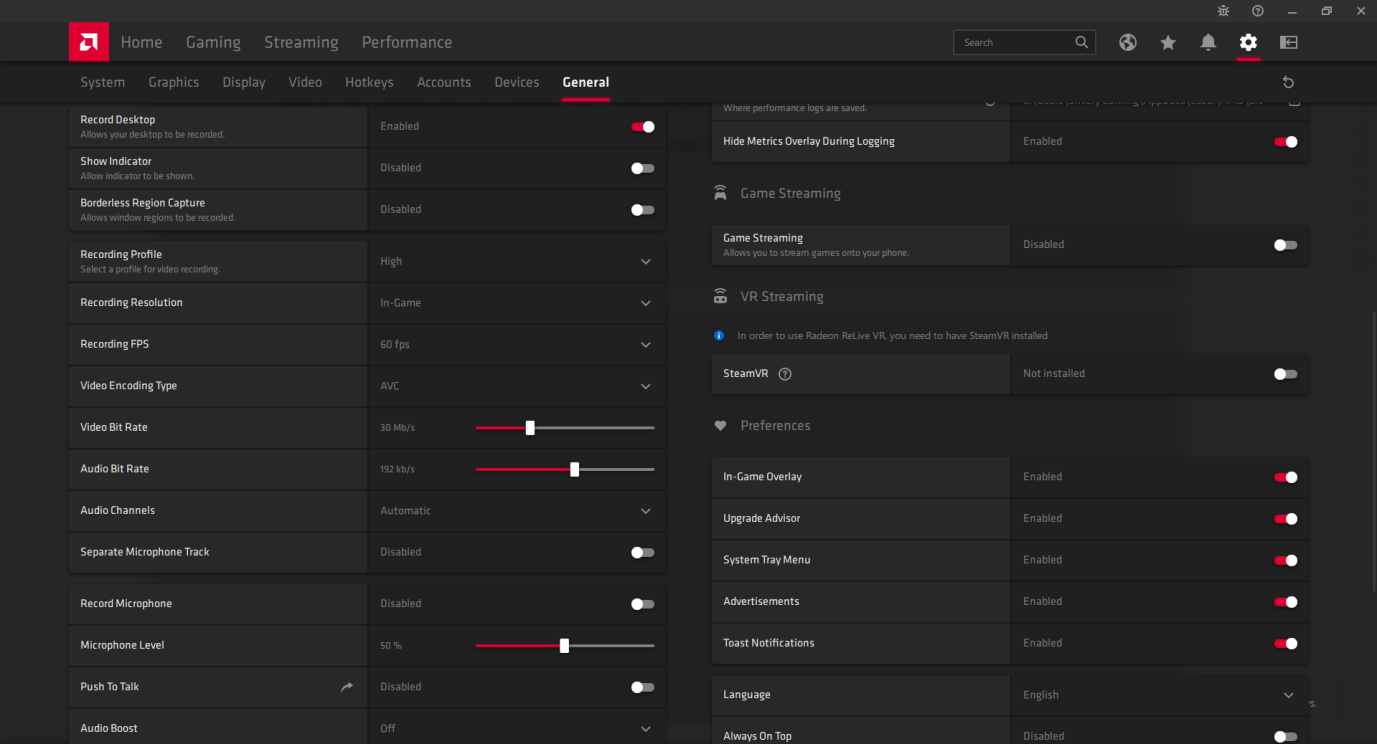
Show Indicator: The indicator comes in handy, when you start recording or stop recording, so enable it.
Borderless Region Capture: Disable it.
Recording Profile: You got low, medium, high, and custom. Select one profile depending on the hardware, and I have selected low on A4-6210 because it is a low-powered processor.
Recording Resolution: Choose in-game and if your graphics card cannot take it then you can switch to lower resolution.
You have 360p, 480p, 720p, 1080p, 2k, and whatever comes next if your monitor supports it.
Remember, you don’t have to change anything, if you are not planning to record games like Apex Legends, Valorant, PUBG PC, Mario, and more.
Recording FPS: You have two options, and it is 30fps & 60fps. Choose 30fps, if you have a low-end machine or mid-range machine because it will help the machine maintain stable performance.
Video Encoding Type: You got AVC & HEVC and choose whatever you like because it falls to your preference.
Video Bit Rate: The default bit rate is 30 MB per second, and it goes all the way up to 100 MB per second. You can go with 30 MB per second for 1080p recording, and it applies to gaming & screen recording purposes.
Audio Bit Rate: You can choose 1920 kbps or 320kbps for the best sound output. The audio bit rate depends on your preference and but choosing a higher output won’t harm the machine.
Audio Channels: Keep the audio channels to automatic until or unless you know what you are doing.
Separate Microphone Track: You can record the screen with desktop audio and keep the microphone audio separately.
Record Microphone: This is where you can enable/disable the microphone.
Microphone Level: You can increase the level up to 100%, but it is a helpful option for low-volume microphones.
Push-To-Talk: You can set one key to use a microphone, and until, then it will be quiet.
Audio Boost: You can turn it on to boost the audio (microphone) volume.
Choose the settings wisely, and it may seem like a complicated process, but it takes less than a few minutes to master the controls.
Best Settings for Screen Recording
Remember, you may have problems with recording the screen if you have a low-end AMD machine. It is important to choose the correct settings to ensure that the recording is going smoothly without FPS drops & performance decline.
We have listed the hardware requirements after testing it on a Ryzen 5 gaming PC and an A4-6210 laptop
Processor: Quad-Core CPU!
RAM: 4GB to record desktop and 16GB to record games.
HDD/SSD: 10GB free space
Follow the settings to get the best screen recording output on Windows 10 PC
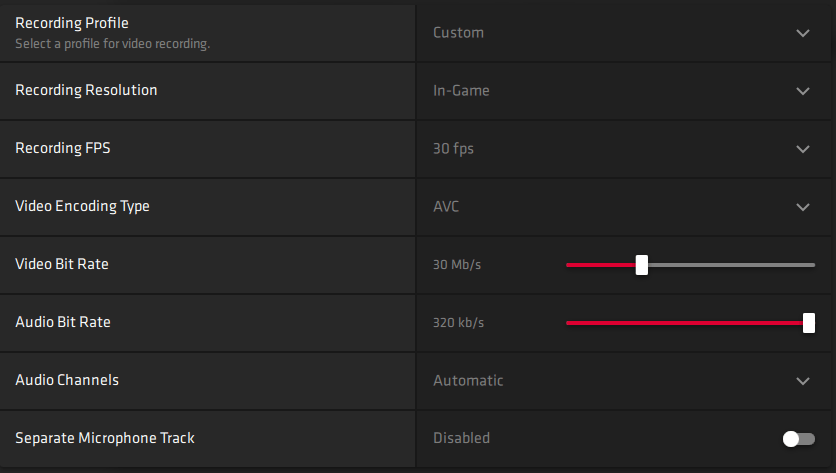
Recording Resolution: In-game
Recording FPS: 30 fps
Video Bit Rate: 30 mb/s
Audio Bit Rate: 320 kb/s
We did not touch the rest of the options and kept it to default settings.
Set Shortcut Key
AMD Radeon Software default hotkeys require we-work because it is horrible for a gamer. We recommend the readers to change the hotkey to something else because it always pop-up the sidebar panel.
Step 1: Press Windows Key + S and then open “AMD Radeon Software” on Windows PC.
Step 2: Click on the gear icon to view “Settings” in the AMD Graphics Control Panel.
Step 3: Now, click on “Hotkeys” to continue.

Step 4: Go to “Recording Hotkeys” and then double-click on the “Toggle Recording” setting.
Step 5: Set a combination of keys, and we have selected “Alt + Z” because it is a better choice.
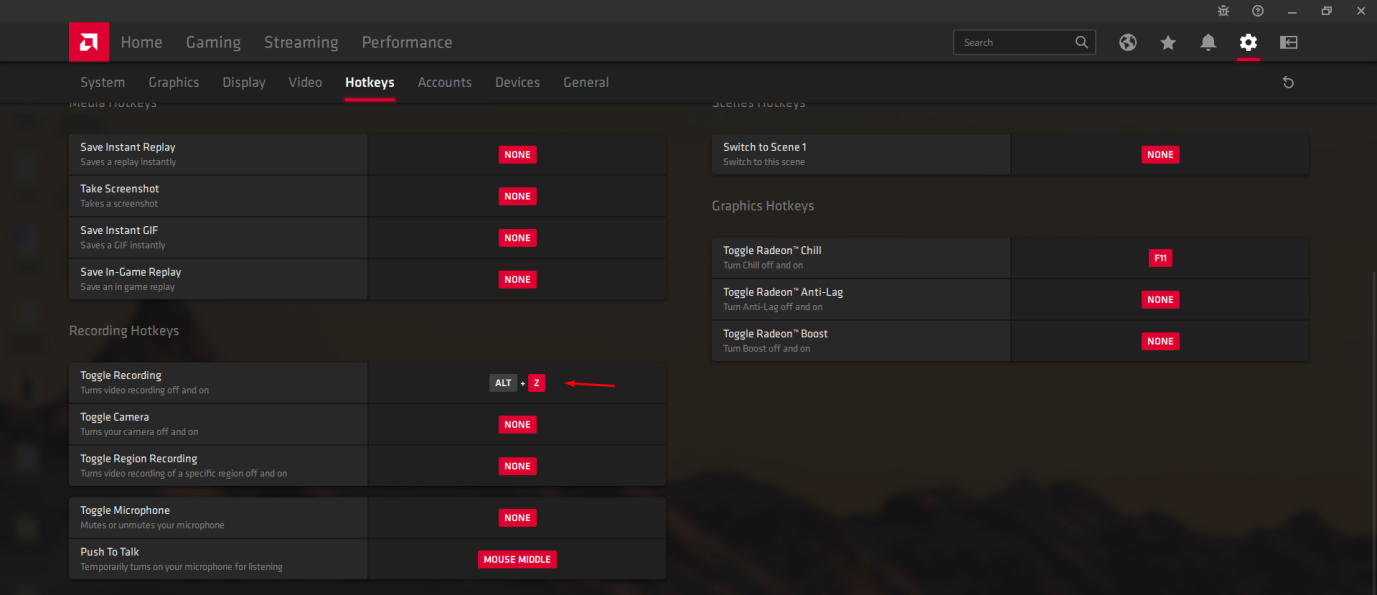
Now, you can start/stop recording the screen using the “Alt + Z” shortcut key, and it doesn’t clash with existing Windows keyboard shortcut keys.
Bottom Line
We have taught you how you can record desktop screens using AMD Radeon Software or AMD Relive. AMD should focus on optimizing the software and adding a list of compatible & incompatible thresholds. I have always complained about the shortcomings of AMD Relive as it pretends like a gimmick of Nvidia Shadow Play. Drop a comment below, if you encounter problems and challenges during the screen recording.
If you've any thoughts on How to Use AMD Relive to Record Screen on PC?, then feel free to drop in below comment box. Also, please subscribe to our DigitBin YouTube channel for videos tutorials. Cheers!
