While Google Chrome is a dependable browser, it throws errors and issues every now and then. One such common error which users face quite often is Facebook not working on the Google Chrome browser on the desktop. Facebook may have lost its charm to the likes of Instagram or Snapchat, but it is a nice place to connect with friends, family members, or lost acquaintances.
So, not being able to use it on your favorite Google Chrome browser on the desktop can be really frustrating and might give headaches to some who really dig using Facebook. Thankfully, in this guide, we will show you some methods that you can look into to fix this problem. Without any further ado, let us jump straight into the article itself.
1. Terminate & Restart Google Chrome
If Facebook isn’t opening on the Google Chrome browser in your desktop after multiple attempts then, you should close the browser and restart it. Maybe some key files did not load during your previous session, which could be causing the Chrome browser to misbehave and ultimately stop Facebook from working. Simply click the close button on your Chrome browser top bar and re-open it and see if this fixes the issue or not.
2. Check Facebook Servers
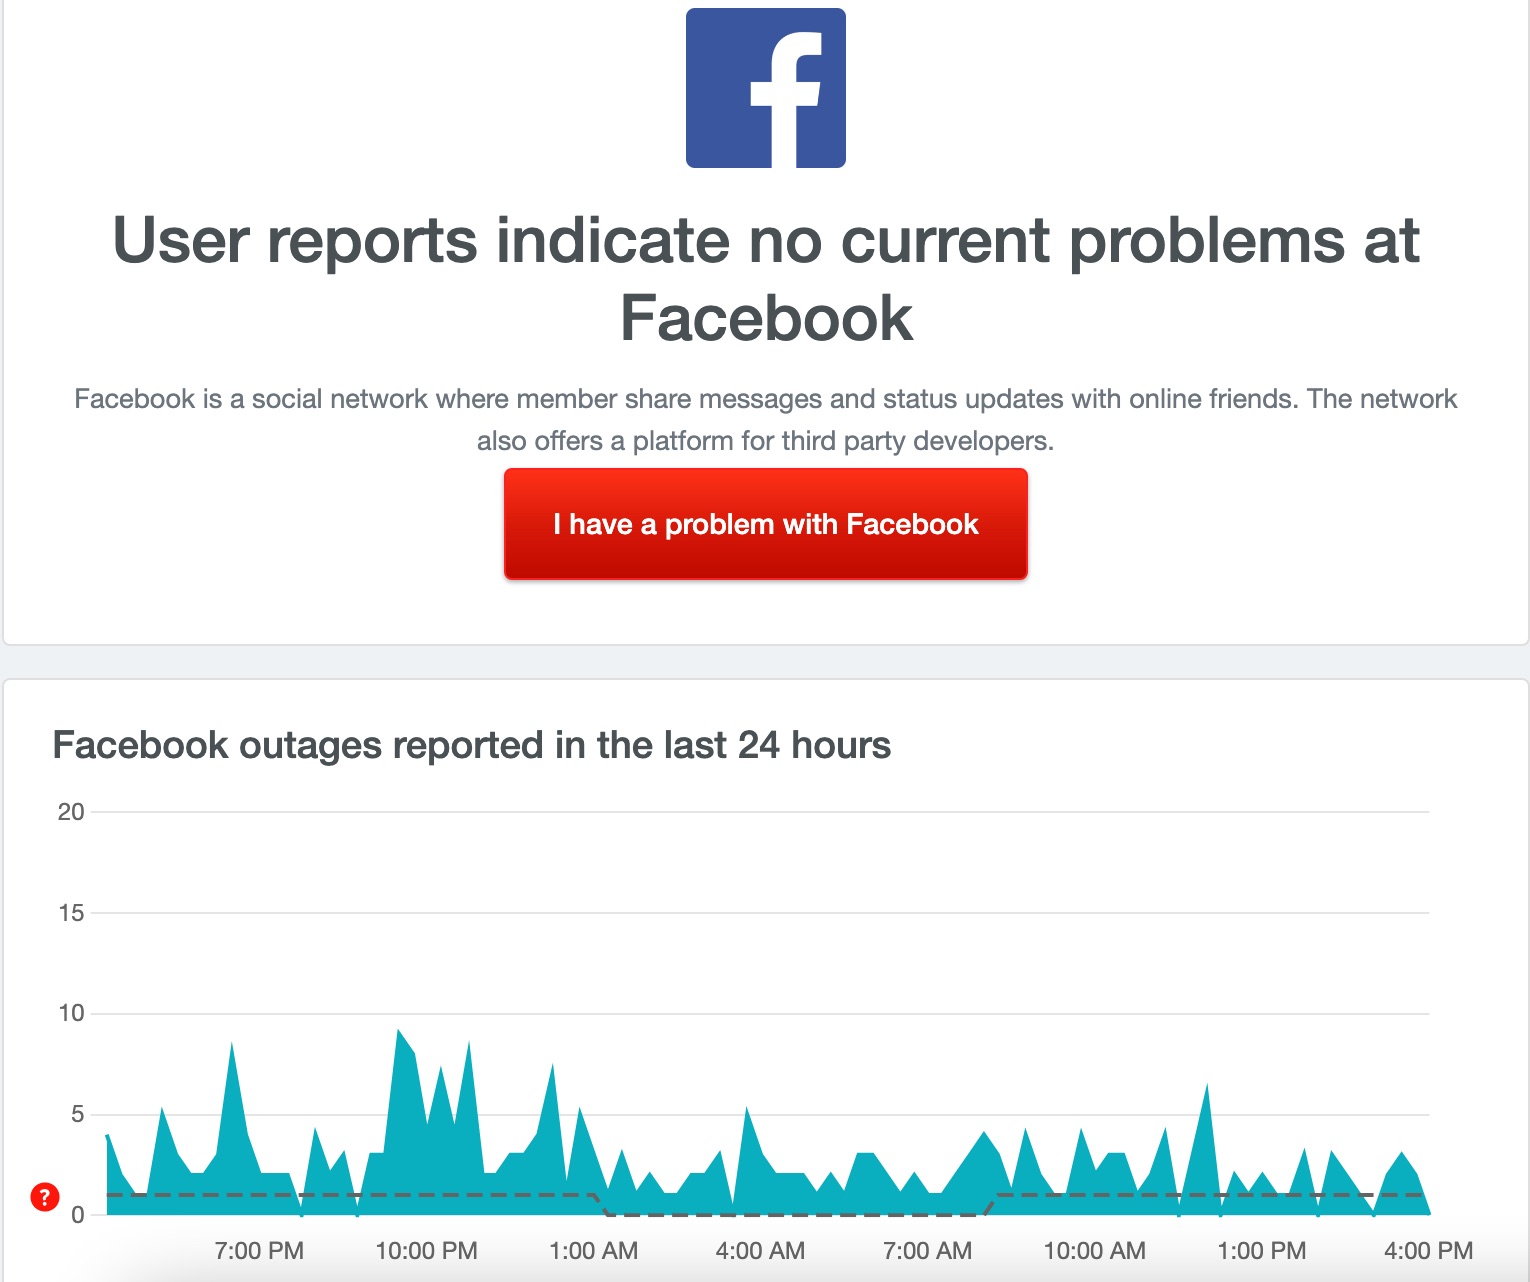
Facebook not loading on Google Chrome, may not always be the fault of the web browser. Instead, it could be Facebook servers that are causing the issue. So, in order to check if it’s the fault of the Facebook servers, then you can head over to websites such as IsItDownRightNow or Downdetector to see if Facebook is facing any issues. If that is the case, then you cannot do much and you need to wait for the servers to go up to finally use Facebook without any hiccups.
3. Clear Google Chrome Cache
The presence of corrupt cache or temporary data is also one of the reasons your browser will not perform up to the mark. It is advised that you clear the cache of the web browser regularly to avoid such issues. Here are the steps that you need to follow to clear the cache files for Google Chrome on your desktop.
- Open Google Chrome browser.
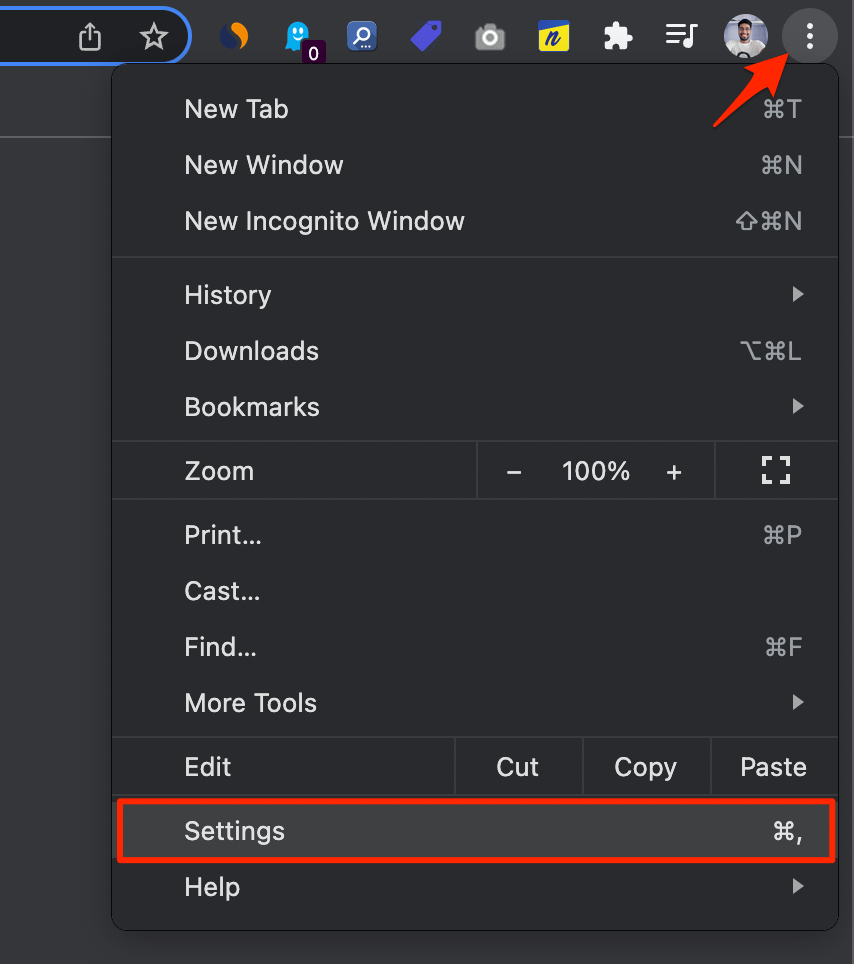
- Click on the 3-dot menu on the top-right menu bar and select Settings from the list of options that appear.

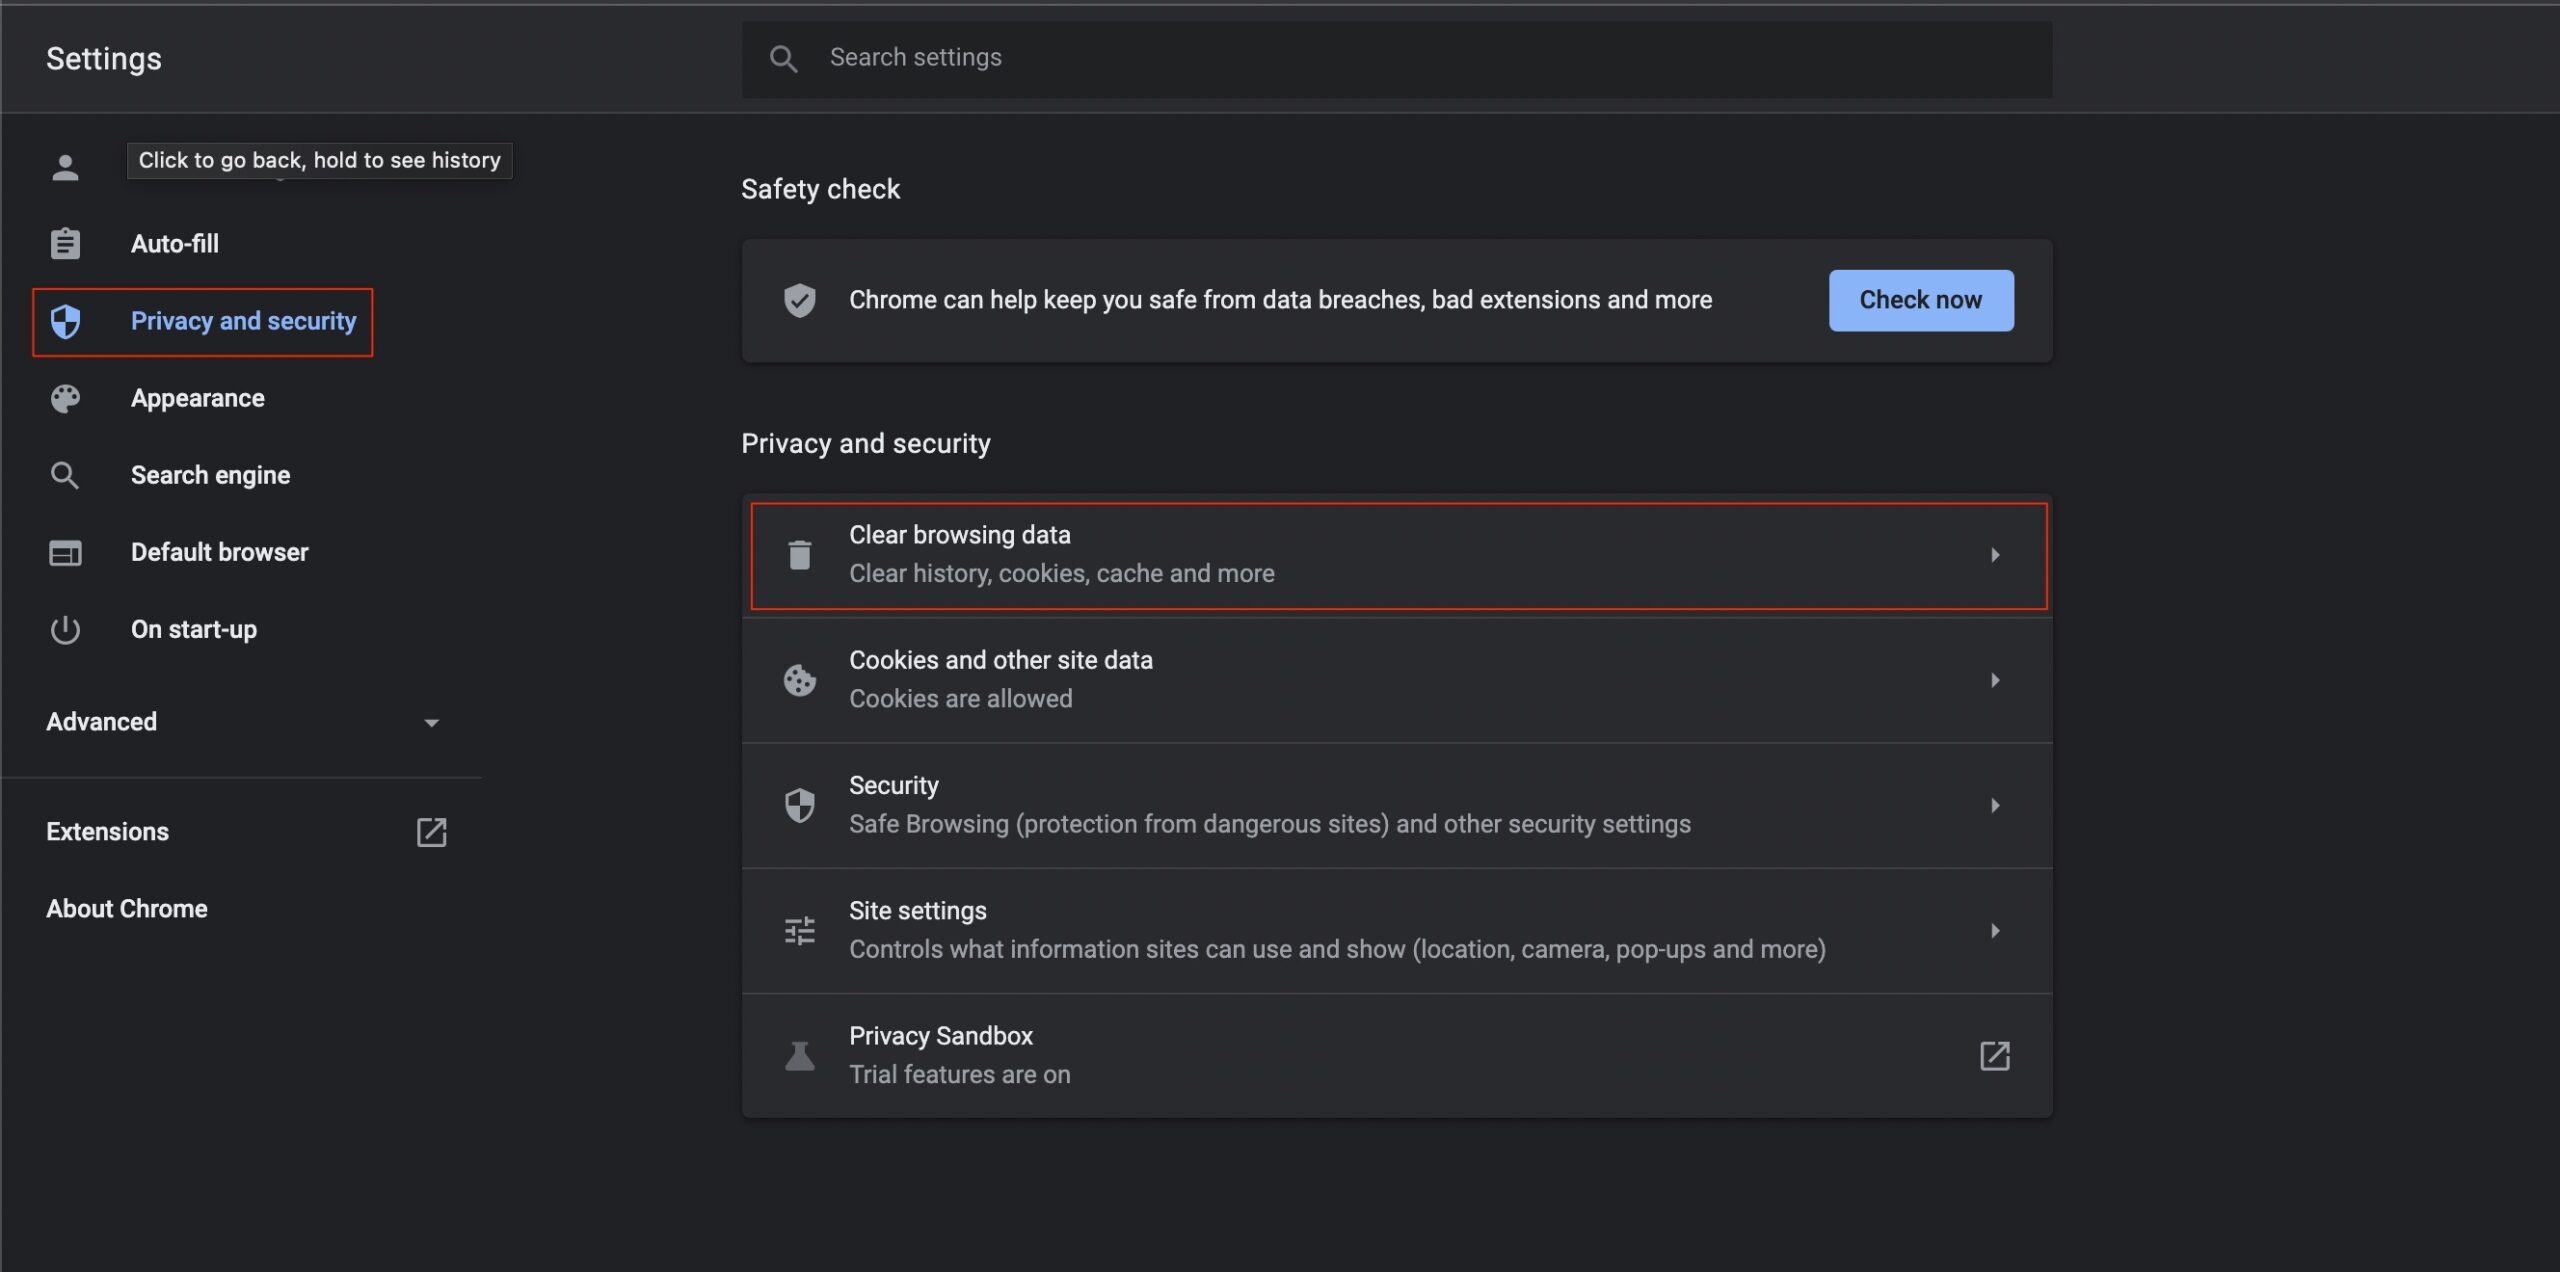
- In the Setting window, from the left pane select the Privacy and Security option.

- On the right side, under the Privacy and Security section, click on Clear browsing data.

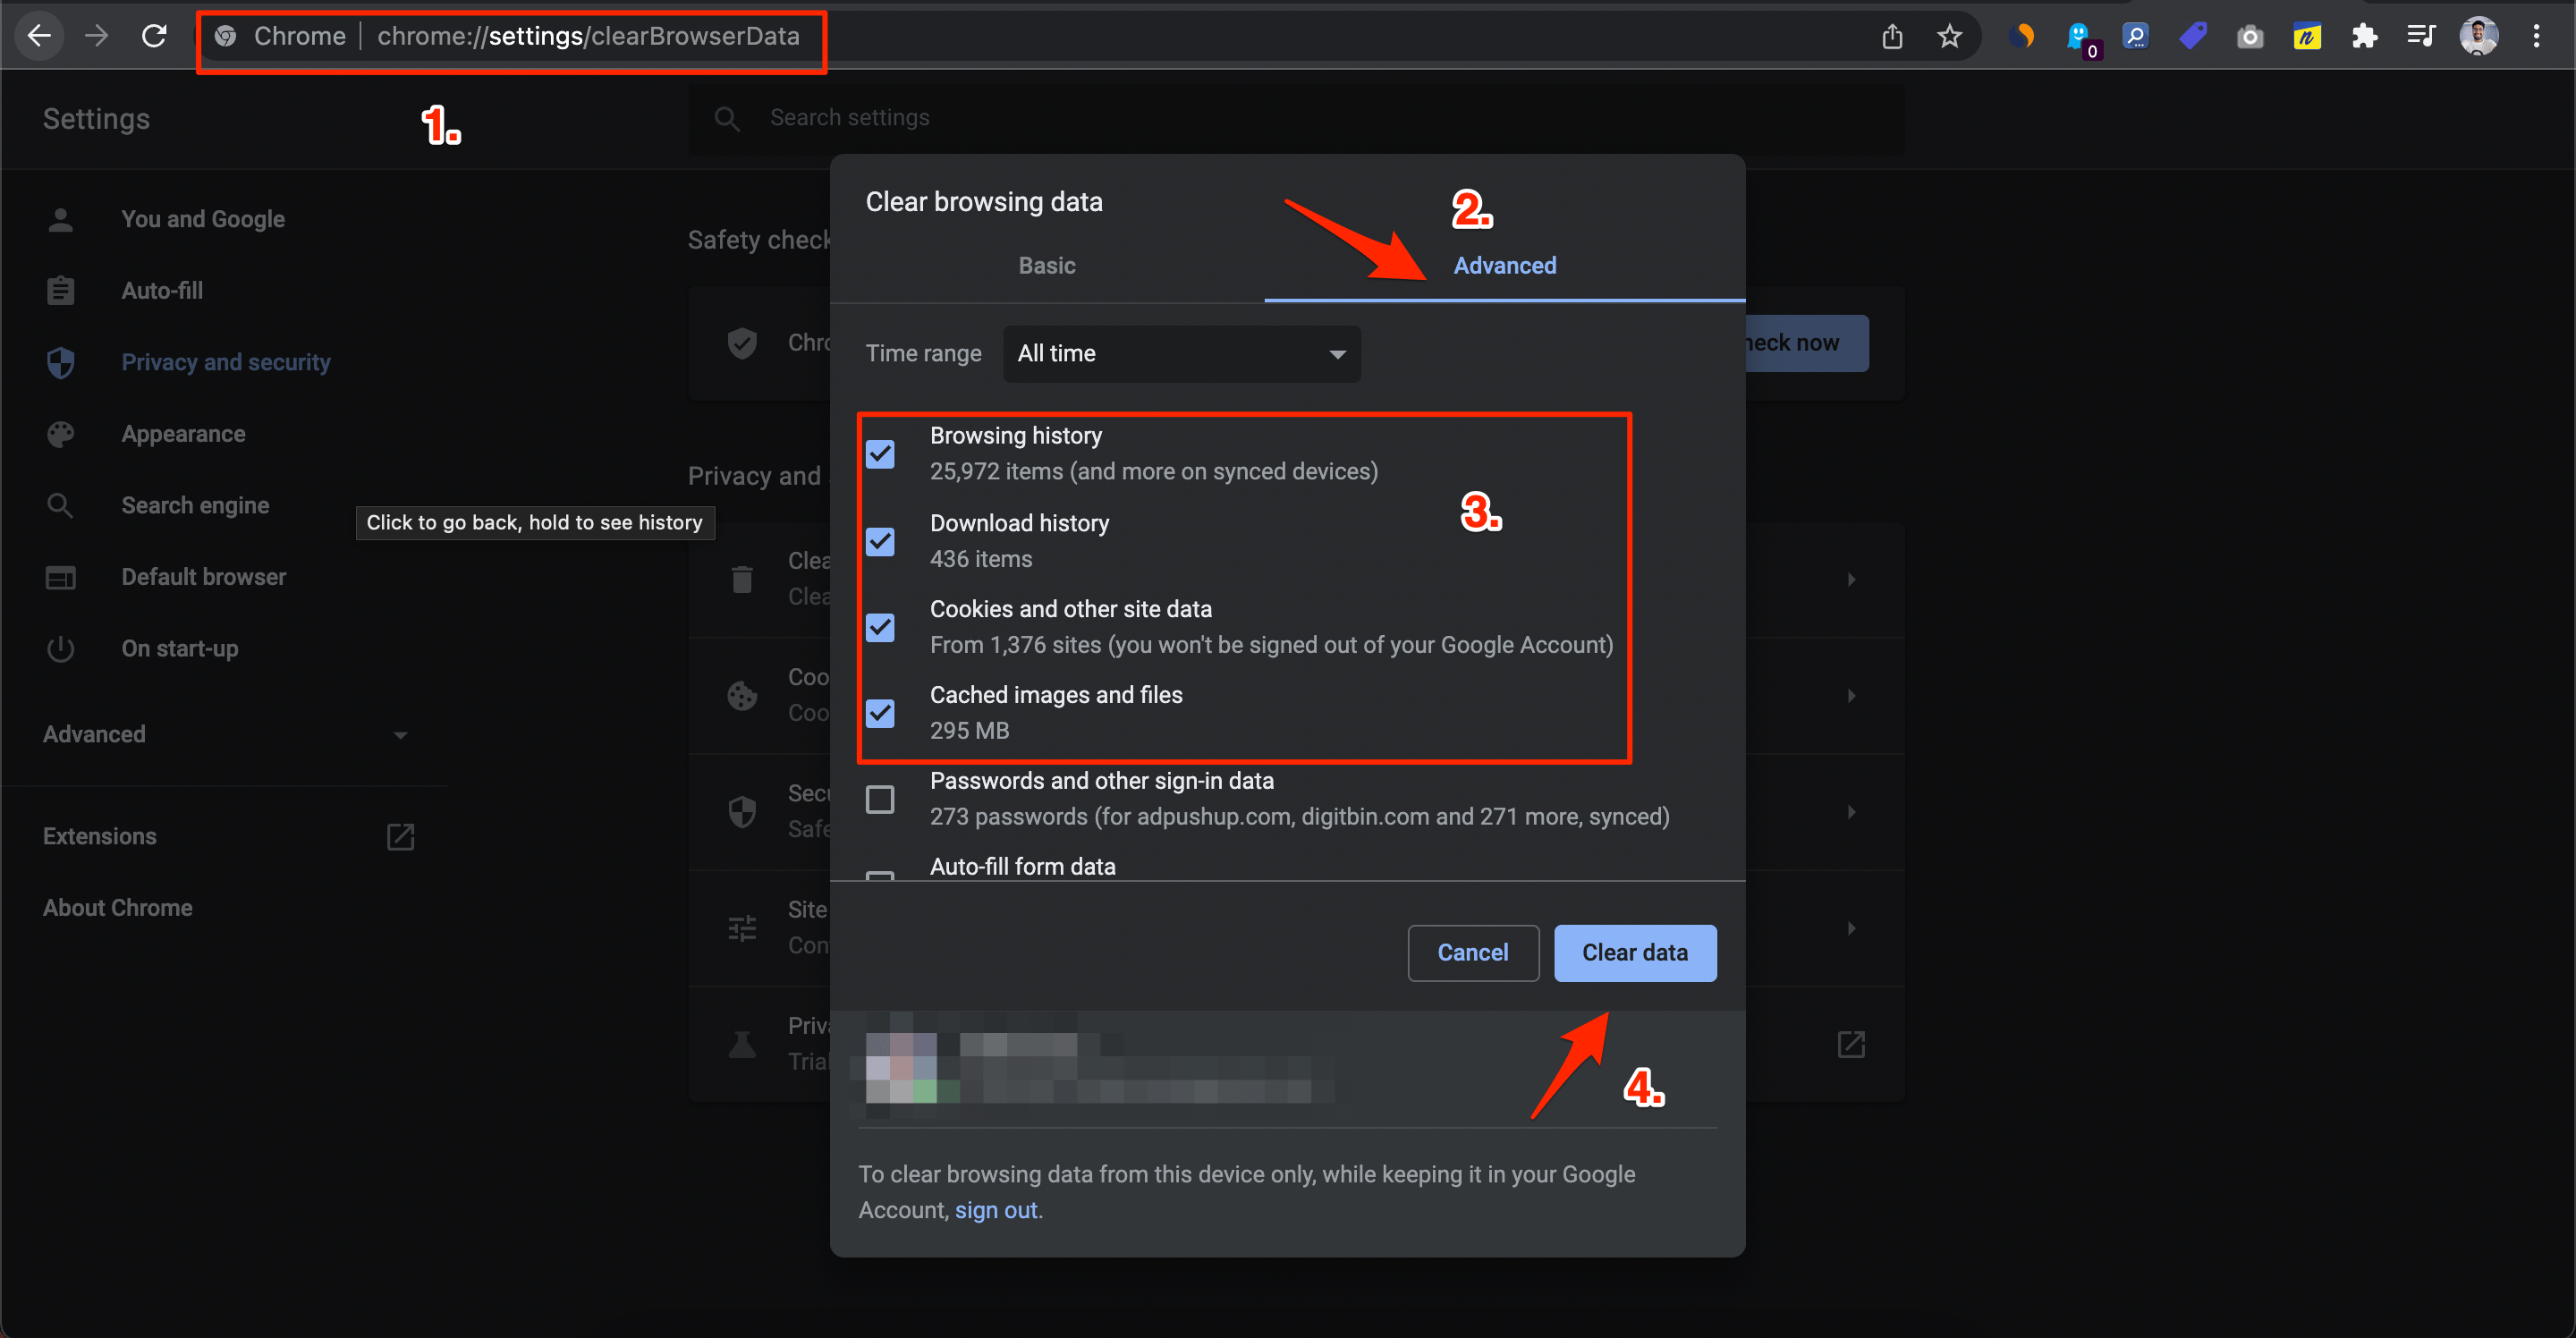
- Make sure to check the boxes next to Browsing history, Cookies and other site data, and Cached images and files. Once done, click on the Clear data button.
4. Change DNS Settings
DNS is a list of records that are fetched from ISP when requested. When you open the Facebook DNS will look for the IP address from its records. The PC automatically sets the DNS, this is where sometimes the ISP may not able to connect with the host server of Facebook.
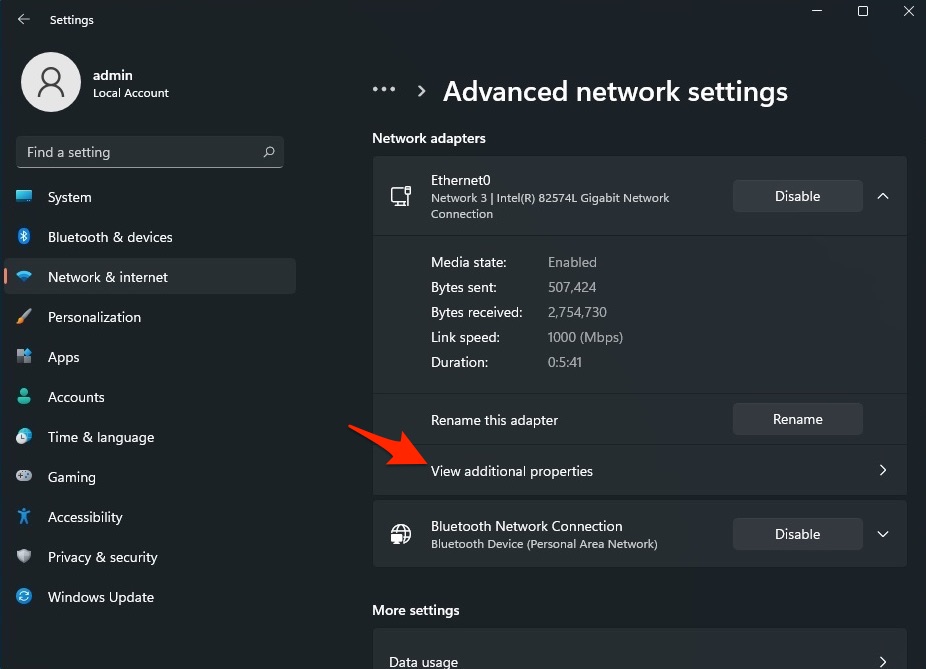
- Open Settings on your Windows 11 by pressing Windows Key + I shortcut.
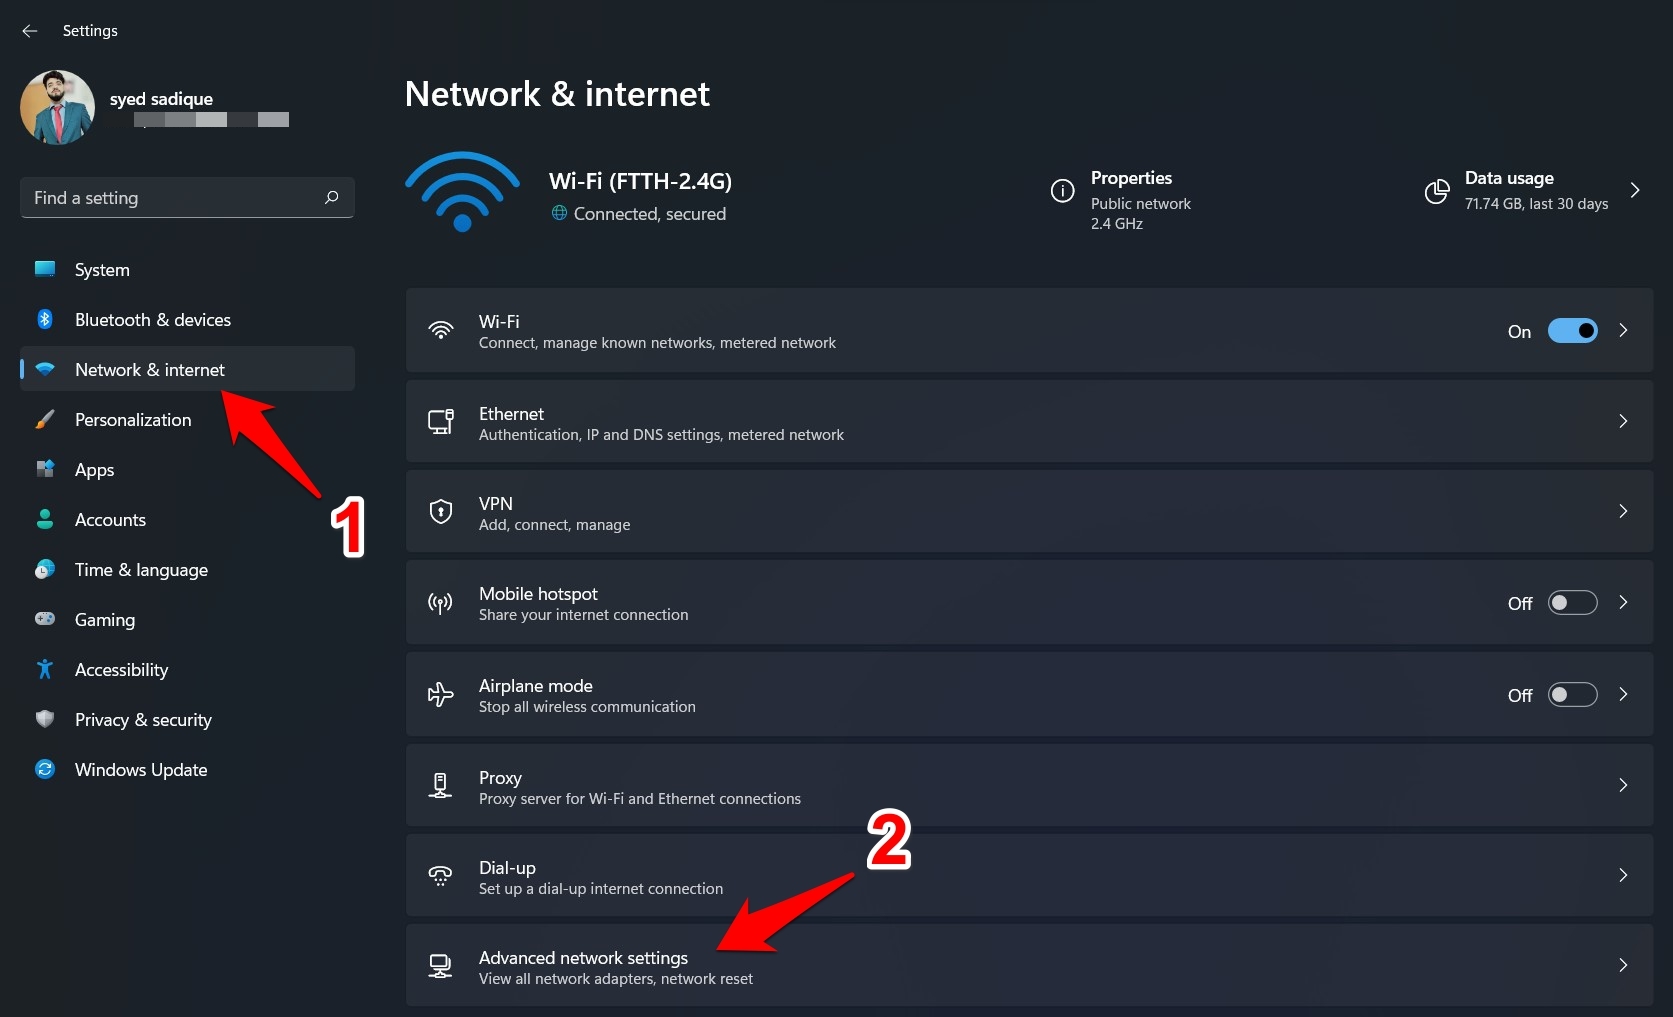
- Then select Network & Internet from the left menu bar and go to the Advanced network settings.

- Now select the network you are using for the internet, like Wi-Fi or Ethernet.
- Click on View Additional Properties.

- Click on Edit.

- Change the DNS to Google DNS or any other DNS protocol listed below.

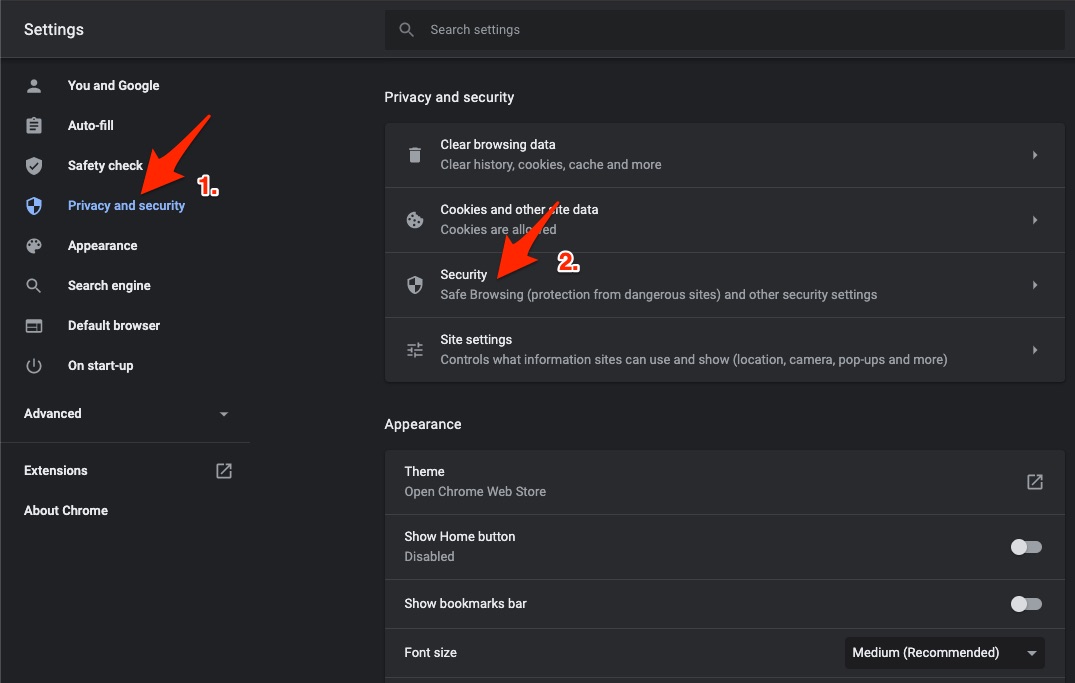
You can also change the DNS in Chrome settings, by following the simple steps below.
- Open Chrome Settings.

- Click on Security and Privacy.
- Click on the Security option.

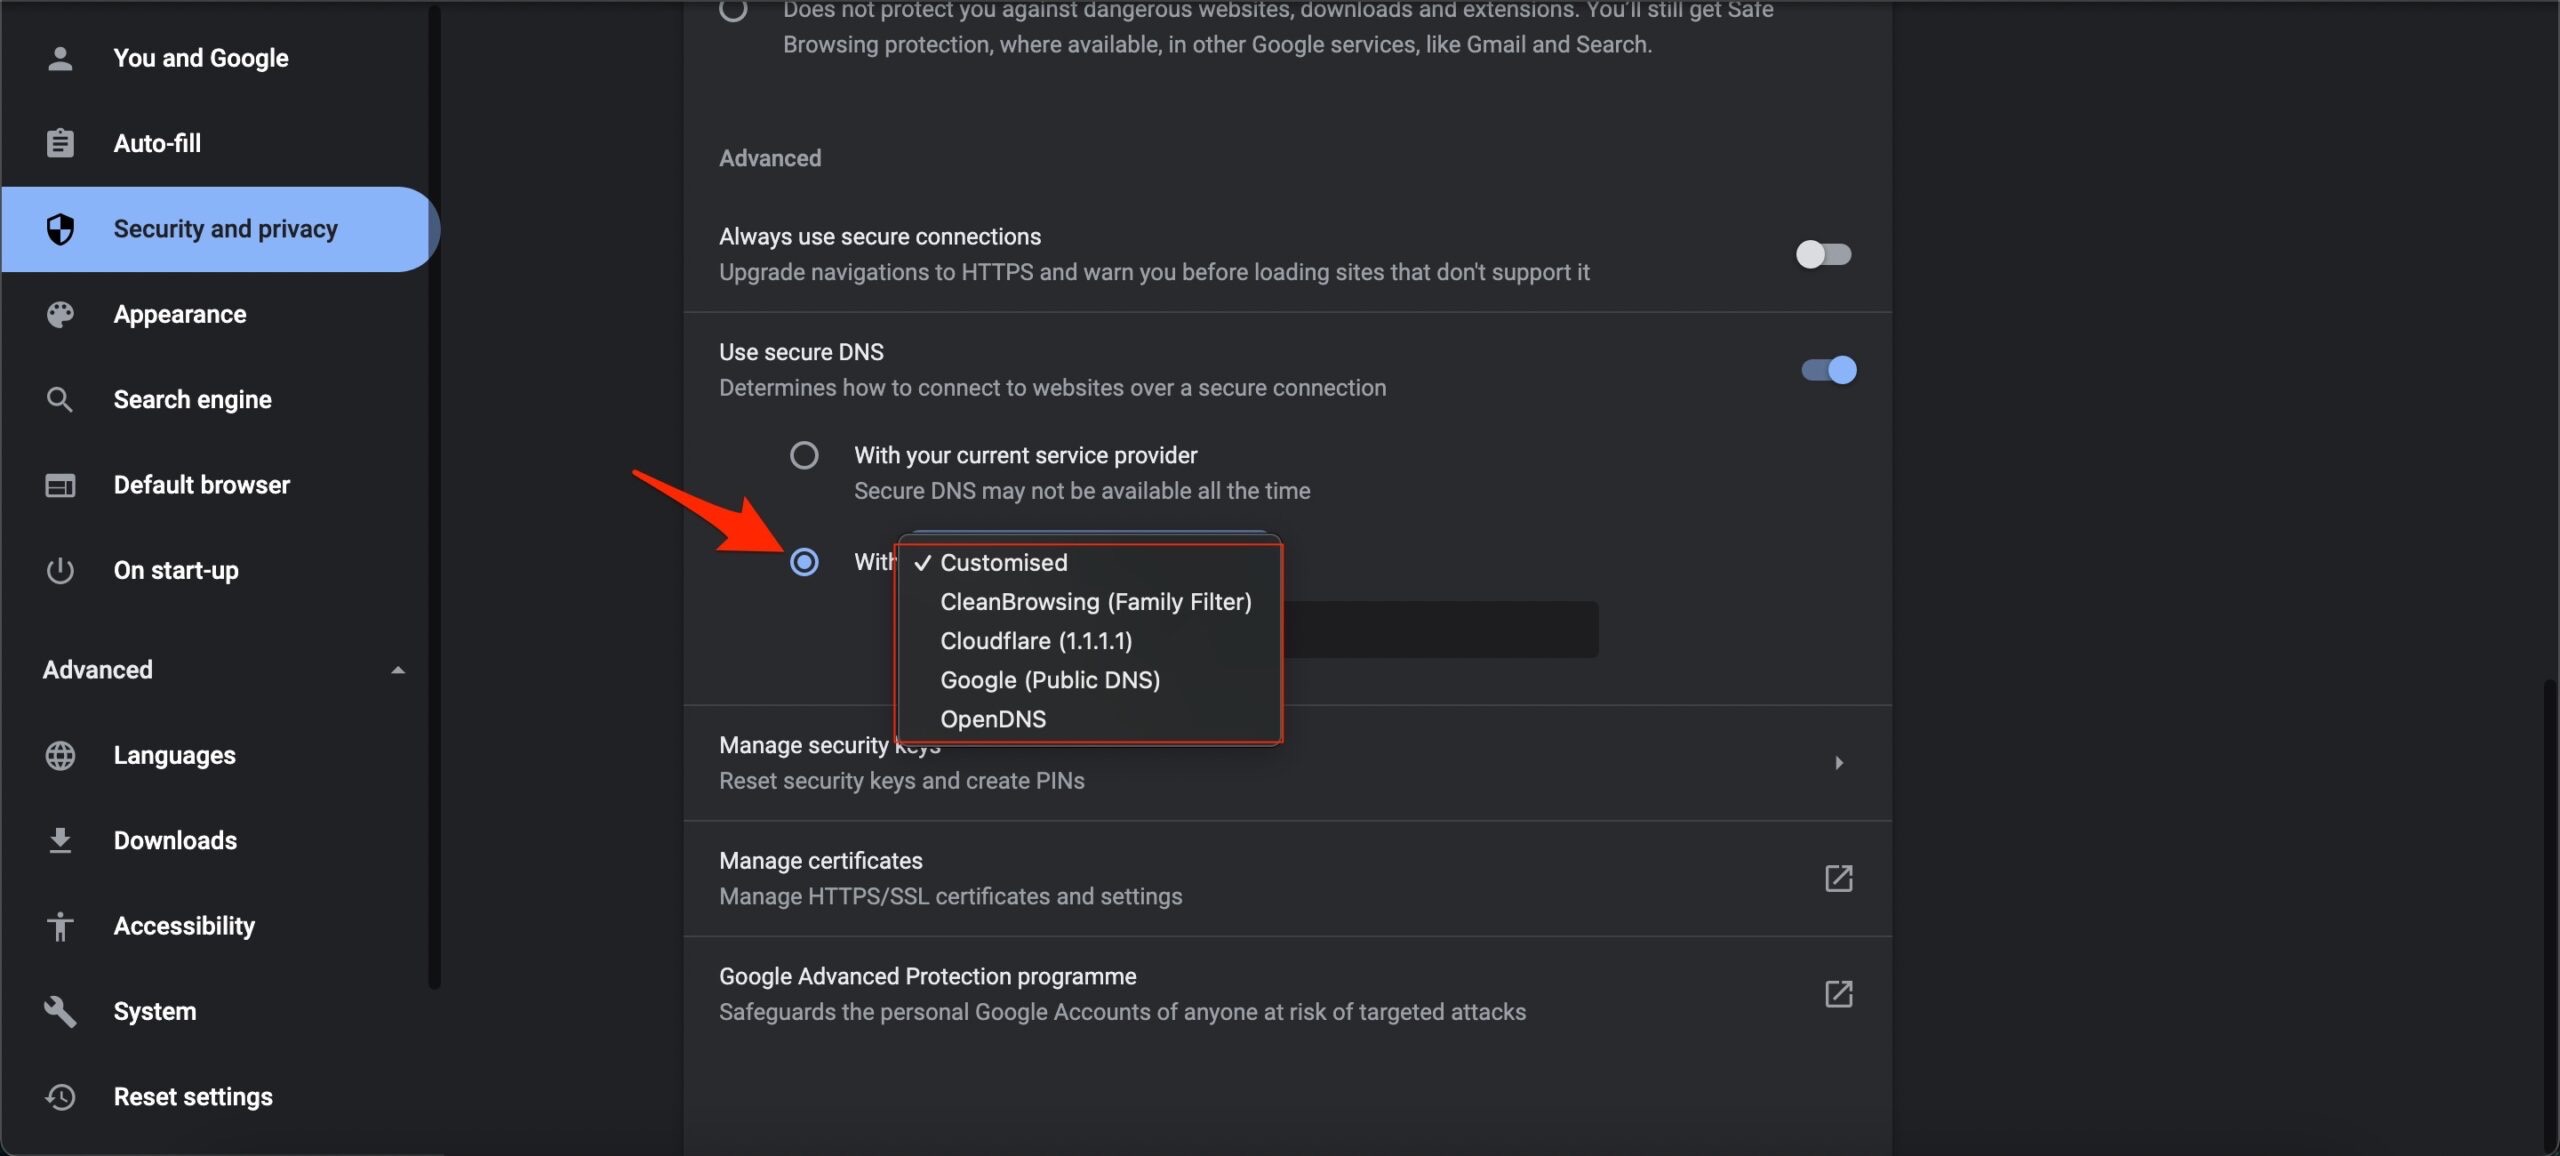
- Select customized DNS. You can add custom DNS or use any listed DNS from the dropdown menu.

| DNS Server | DNS 1 | DNS 2 |
|---|---|---|
| Google Public DNS | 8.8.8.8 | 8.8.4.4 |
| Cloudflare DNS | 1.1.1.1 | 1.0.0.1 |
| Quad9 DNS (IPv4) | 9.9.9.9 | 149.112.112.112 |
| Quad9 DNS (IPv6) | 2620:fe::fe | 2620:fe::9 |
| OpenDNS | 208.67.222.222 | 208.67.220.220 |
5. Disable or Uninstall Extensions
We make use of browser extensions to facilitate our web browsing tasks. However, these extensions may sometimes interfere with the actual functioning of the web browser and cause issues such as Facebook not working on Chrome browser.
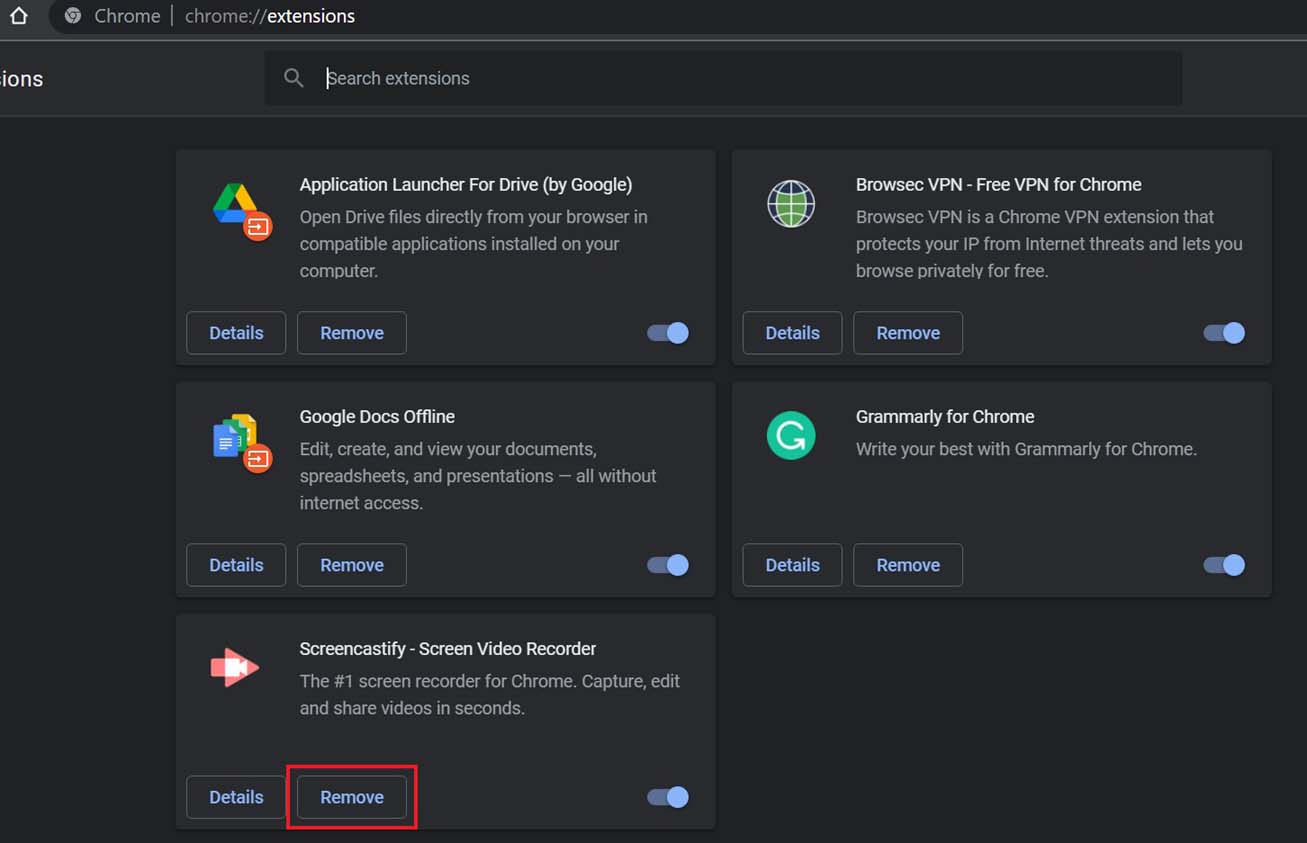
In such cases, the best method that you can follow to fix this problem is to either disable all extensions or uninstall them from your browser and install them one by one to see which one is causing the issue.
Here are the steps that you need to follow to disable or uninstall extensions from the Google Chrome browser.
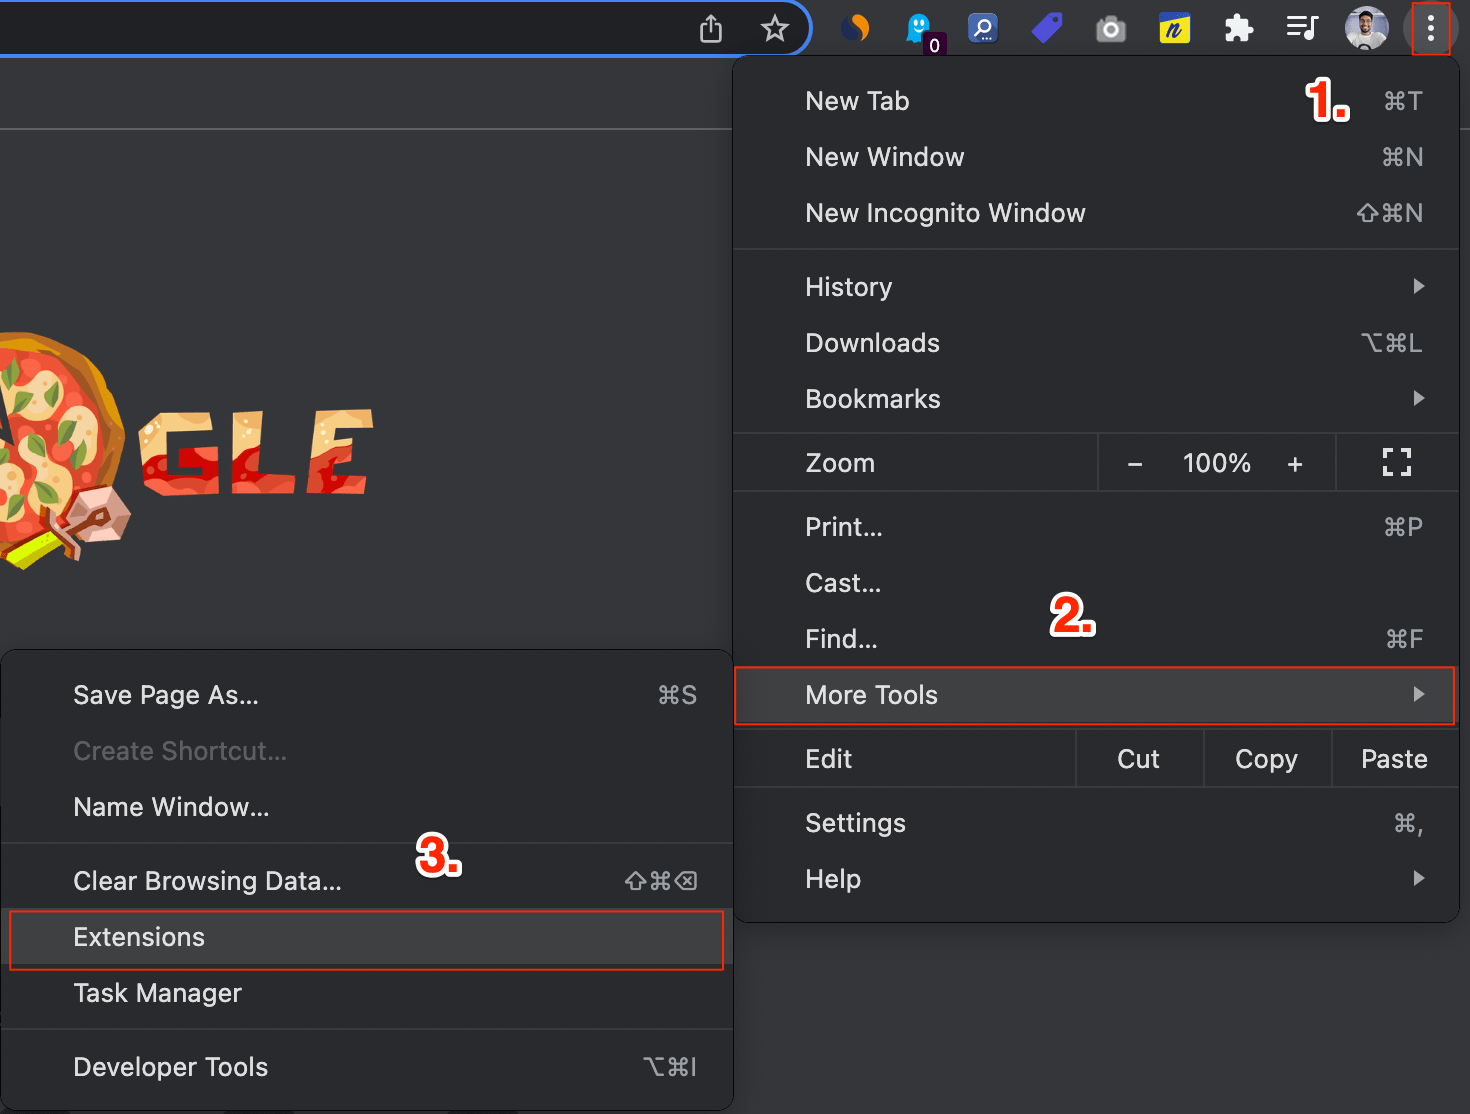
- Open Chrome browser and click on the 3-dot menu icon on the top-right.
- Select More Tools > Extensions.

- Once the list of extensions loads, you can turn off the toggle next to them to disable them or hit the Remove button to uninstall them from the browser.

6. Use Incognito Mode
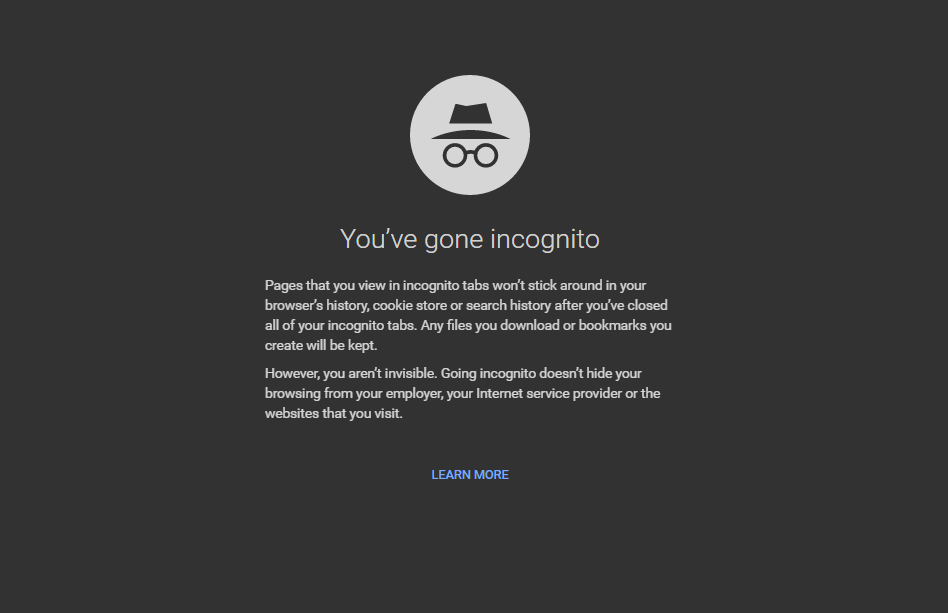
Another way of using the web browser without the interference of the installed extensions is to use it in incognito mode. Incognito mode not only prevents extensions from loading but also keeps your internet presence safe. To run Chrome incognito mode, simply click on the 3-dot menu button and select the New incognito window from the list of options. Or else, you can press Ctrl+Shift+N buttons together to open a new incognito window.
7. Reset Settings
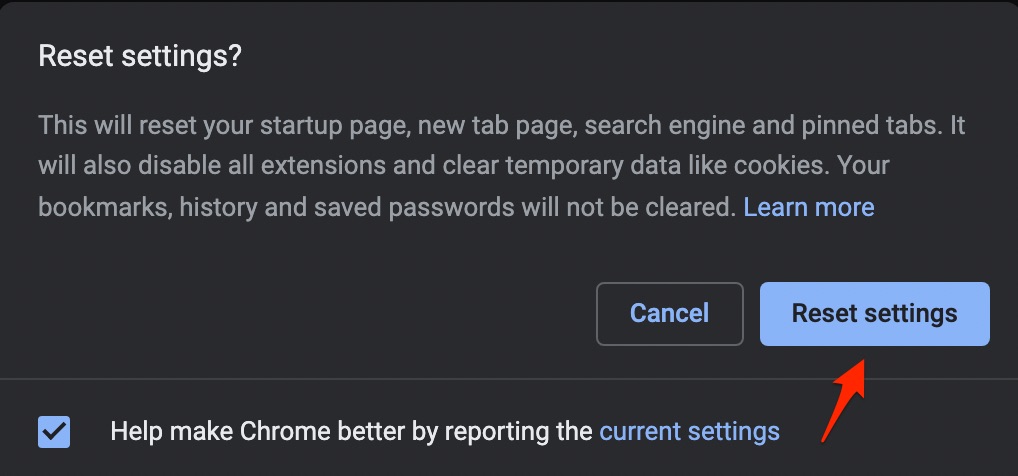
If none of the above-mentioned settings did the job for your in fixing Facebook not working on Google Chrome desktop, then you can try to reset the Chrome browser to its default settings. Do note that resetting settings would clear your startup page, new tab page, search engine, pinned tabs, clear temporary files, disable all extensions, and more. So, go ahead only if you are sure you are good with the mentioned changes after re-setting.
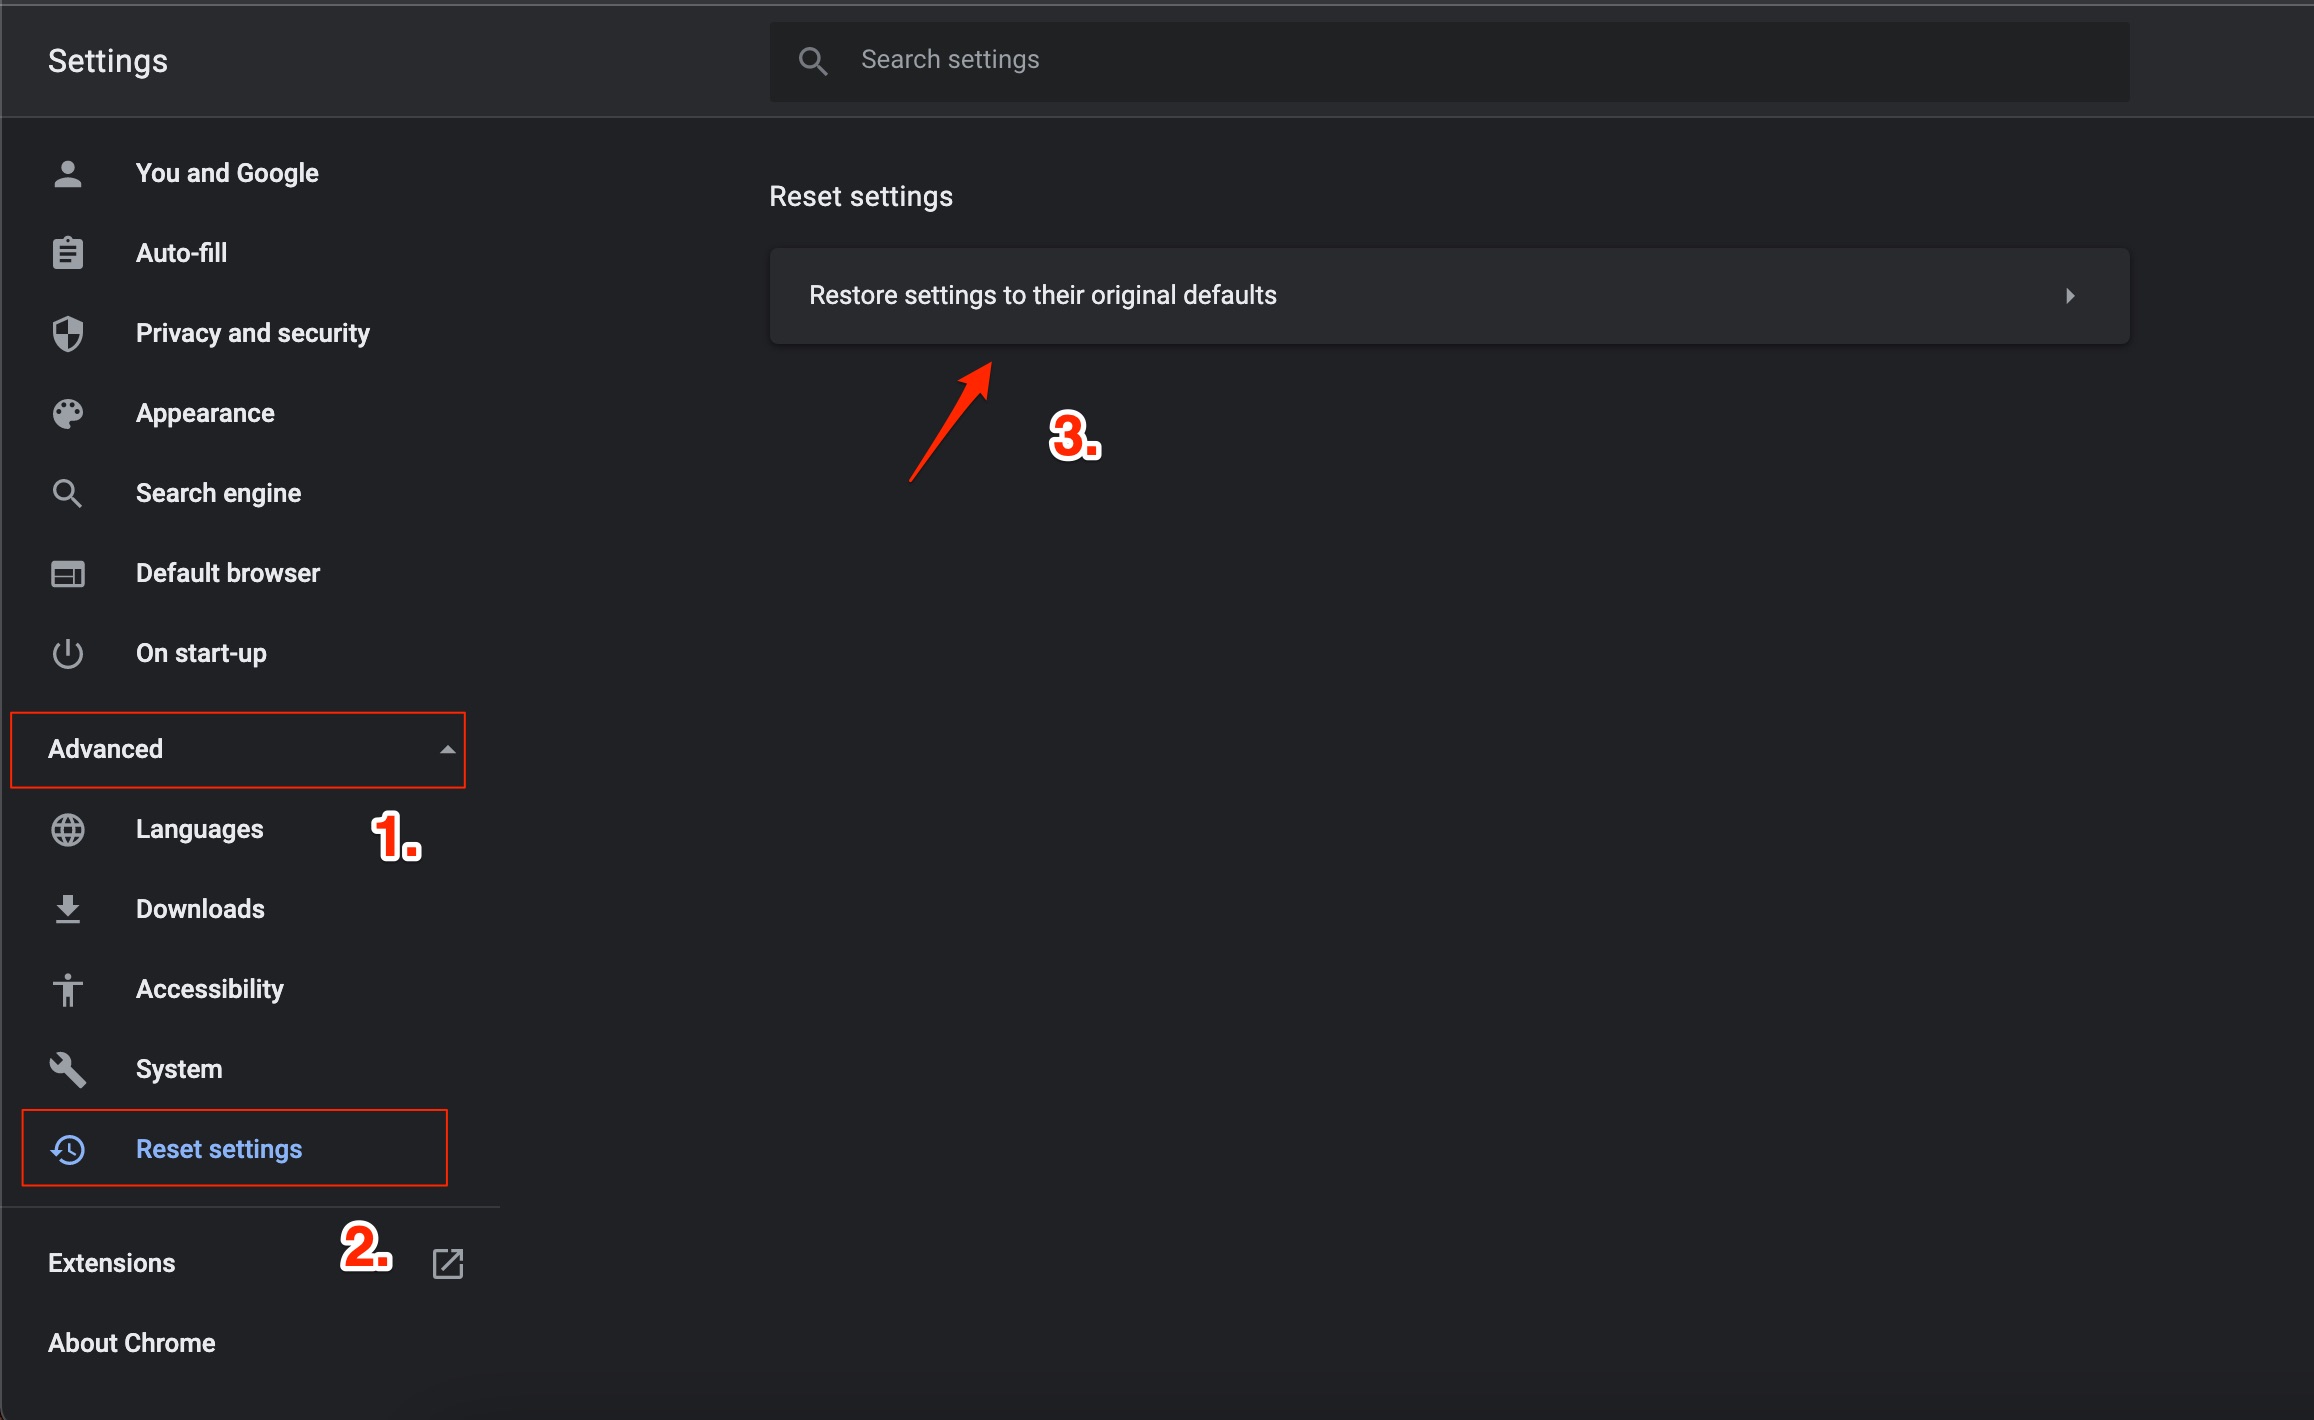
- Open the Google Chrome browser and click on the 3-dot menu icon. Select Settings from the list of options that appear.
- From the left pane, expand the Advanced menu and select Reset and clean up.
- On the right side, select the Restore settings to their original defaults option.

- A warning pop-up will show, and you need to click on the Reset settings button.

- Now open the Facebook and see if this fixes Facebook Not Working Issue.
8. Update Chrome Browser
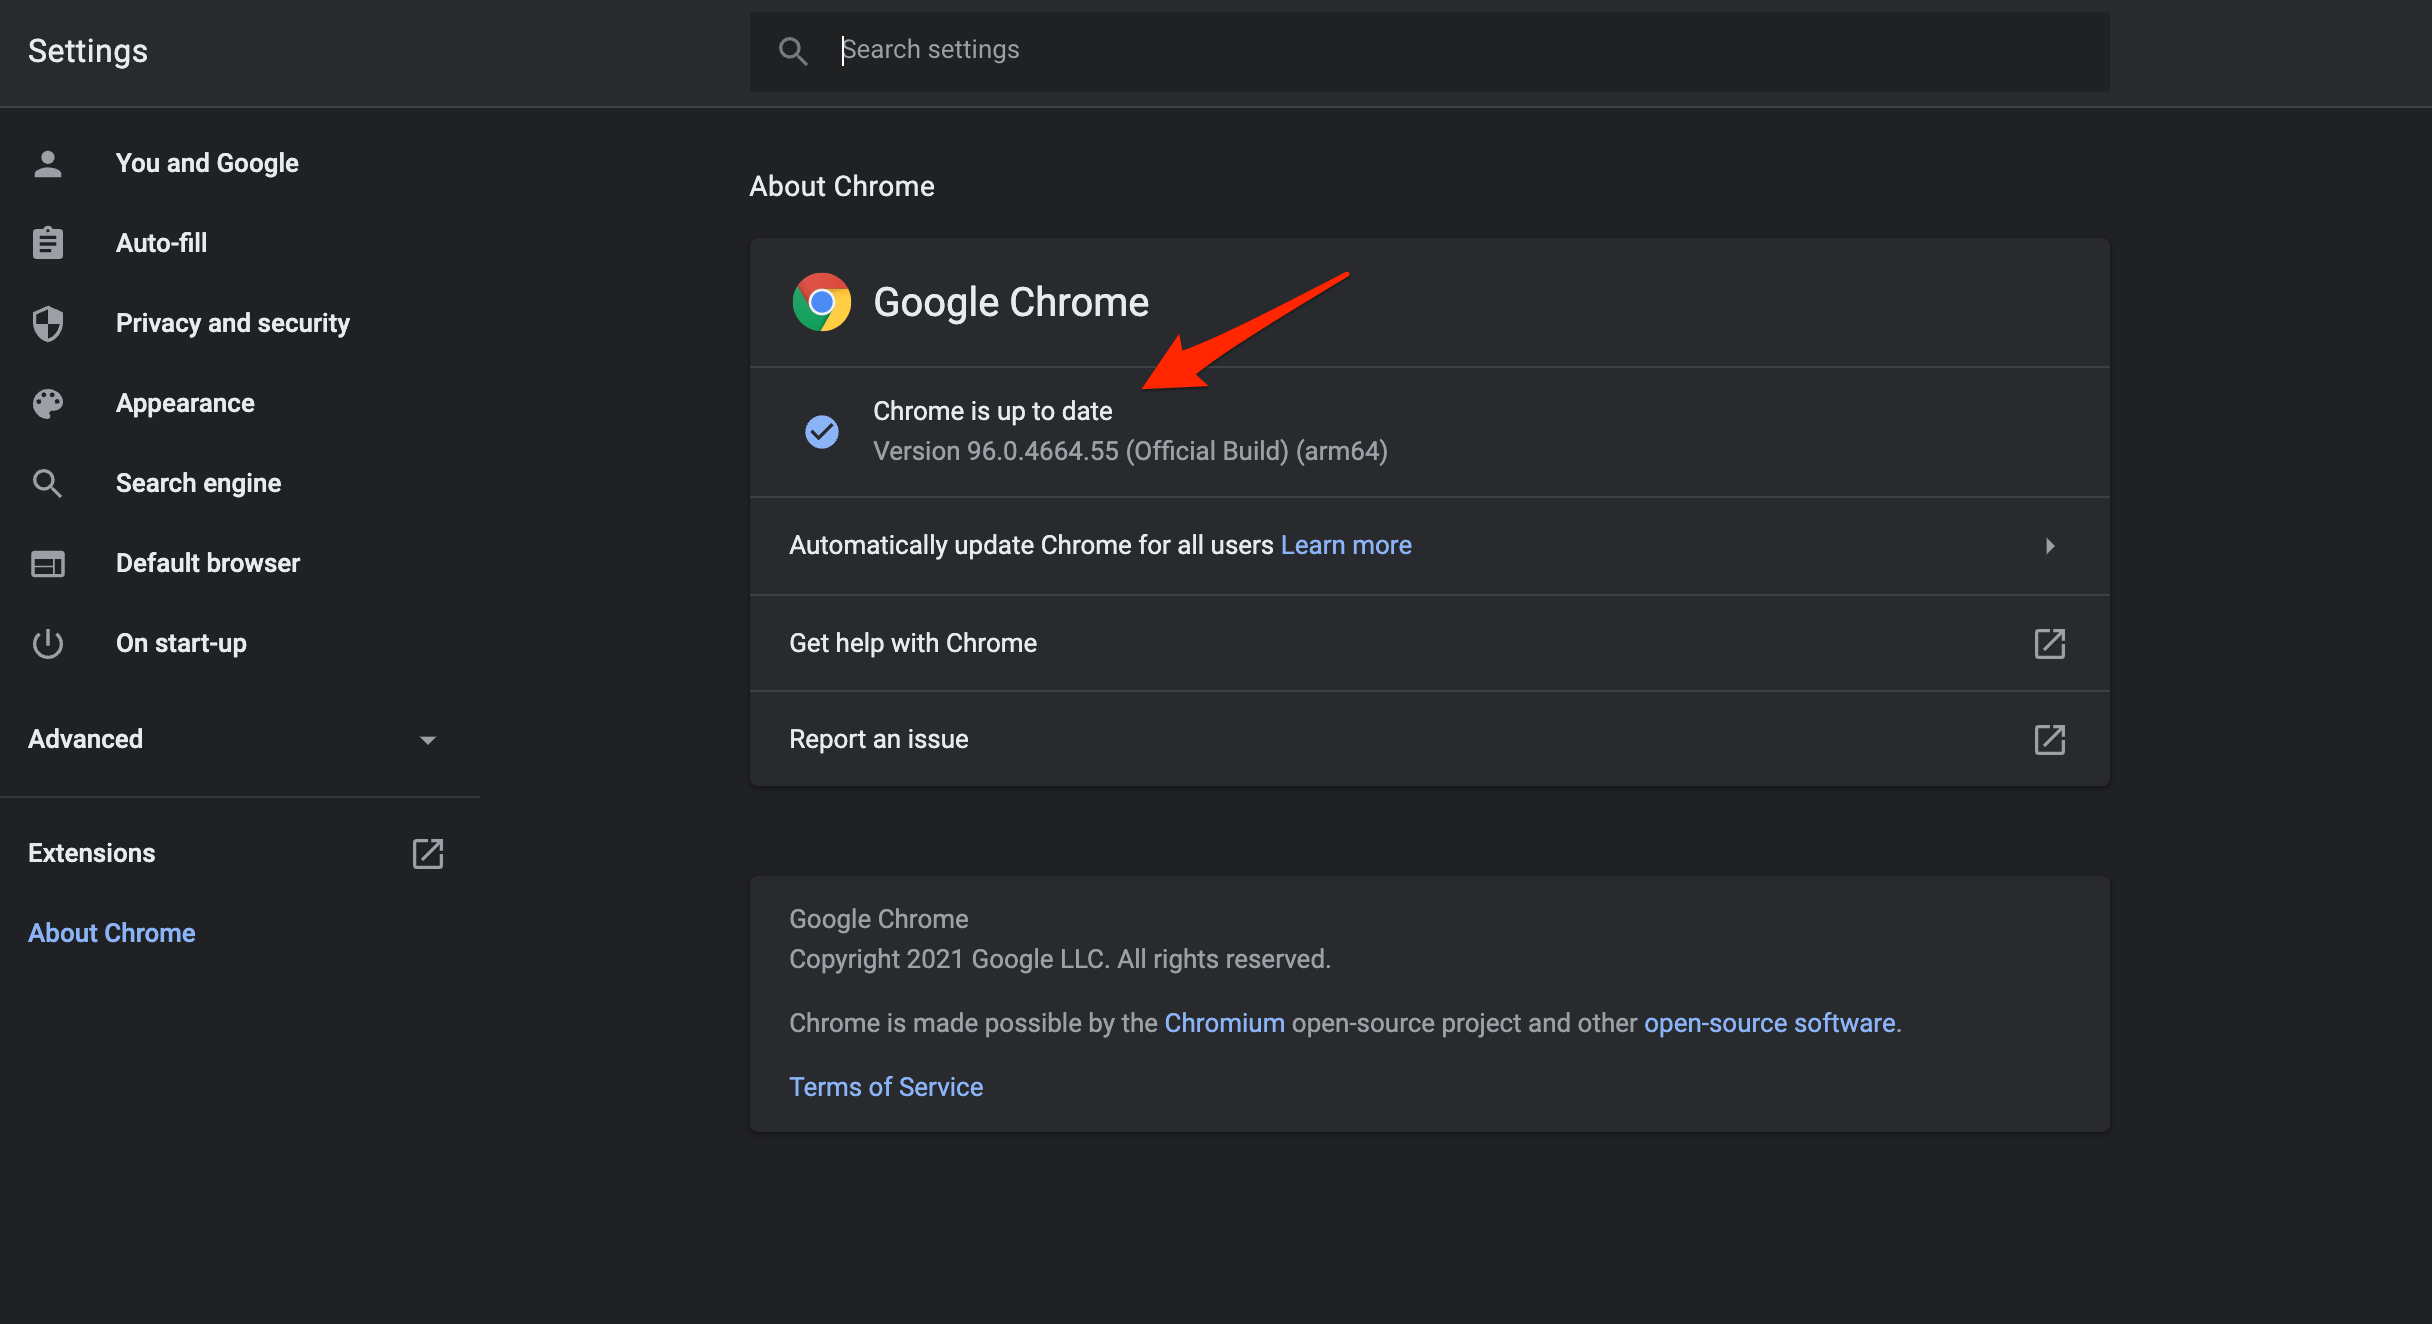
Sometimes, due to the presence of a bug, Google Chrome may not function optimally and throw up errors such as Facebook not working on it. It is recommended that you keep the browser up to date with the latest version. In order to do that, simply click the 3-dot menu icon and navigate to Help > About Chrome. The browser will automatically look for the latest update and, if available, will ask you to install it.
9. Check Your Internet Connection
Often slow or poor internet connection could result in multiple problems, one of which is Facebook not working on Google Chrome. So, it is advised that you check your internet connection by heading over to websites such as Fast.com or Speedtest to actually know if you are getting the optimal speed as per your data plan.
10. Try A Different Browser
Without the need to go over the multiple methods to fix the issue, you can opt for a different web browser and continue enjoying your Facebook time. If you feel Google Chrome is the culprit that is avoiding you to use Facebook and showing you different errors, you can try Opera, Firefox, DuckDuckGo, or any other browser of your liking. We have a dedicated guide of the 10 best web browsers for Windows 11 that you can check out that will help you with your decision of choosing a different browser for your desktop.
If you've any thoughts on How to Fix Facebook Not Opening on Chrome Browser?, then feel free to drop in below comment box. Also, please subscribe to our DigitBin YouTube channel for videos tutorials. Cheers!





I tried all of this with no luck until I randomly decided to go to Allow Cookies and customized cookies for Facebook using ‘Sites that can always use cookies’.. I added Facebook and it suddenly let me in. Hope this helps
Thanks for the tip, will add it to the list.
still not working😢
Thank you so much. this article helped me a lot