Microsoft Excel is the most used software application for entering the data of your firm or organization. When arranging the data cells in Excel sheets, the cell borders play a significant role that enhances the overall visual appeal of your tables, chart sheets, dashboard, and more. As you might know, the default color of the border is black, and the gridline color is the same.
If you ever feel bored with the black border color while organizing the data in Excel, don’t worry. You can tweak the changes in the Excel worksheet according to your preferences. In this guide, we’ll show you different ways to change border colors in Microsoft Excel. Let’s get started!
Ways to Change the Cell Border Colors in Microsoft Excel
Whether you want to customize the border color to blue, or a fancy rainbow color, you can easily change it according to your suitable colors. Before we get started, make sure you’re using the official and latest Microsoft Excel version on your Windows or Mac.
Here, we have outlined four different ways that should help you in changing the border color on your Excel sheet. Let’s dive into it one by one.
1. Change Border Color Using Format Cells Option
Microsoft Excel comes with an in-built function to customize the changes with border color and gridlines. One such tool is the “Format Cells” that you can use to change the color of the border and its outline. If you want to change the border color, you can use the format cells option. Here’s how to do it.
- Press the Windows Key to navigate to the search menu and type in Excel and hit Enter.
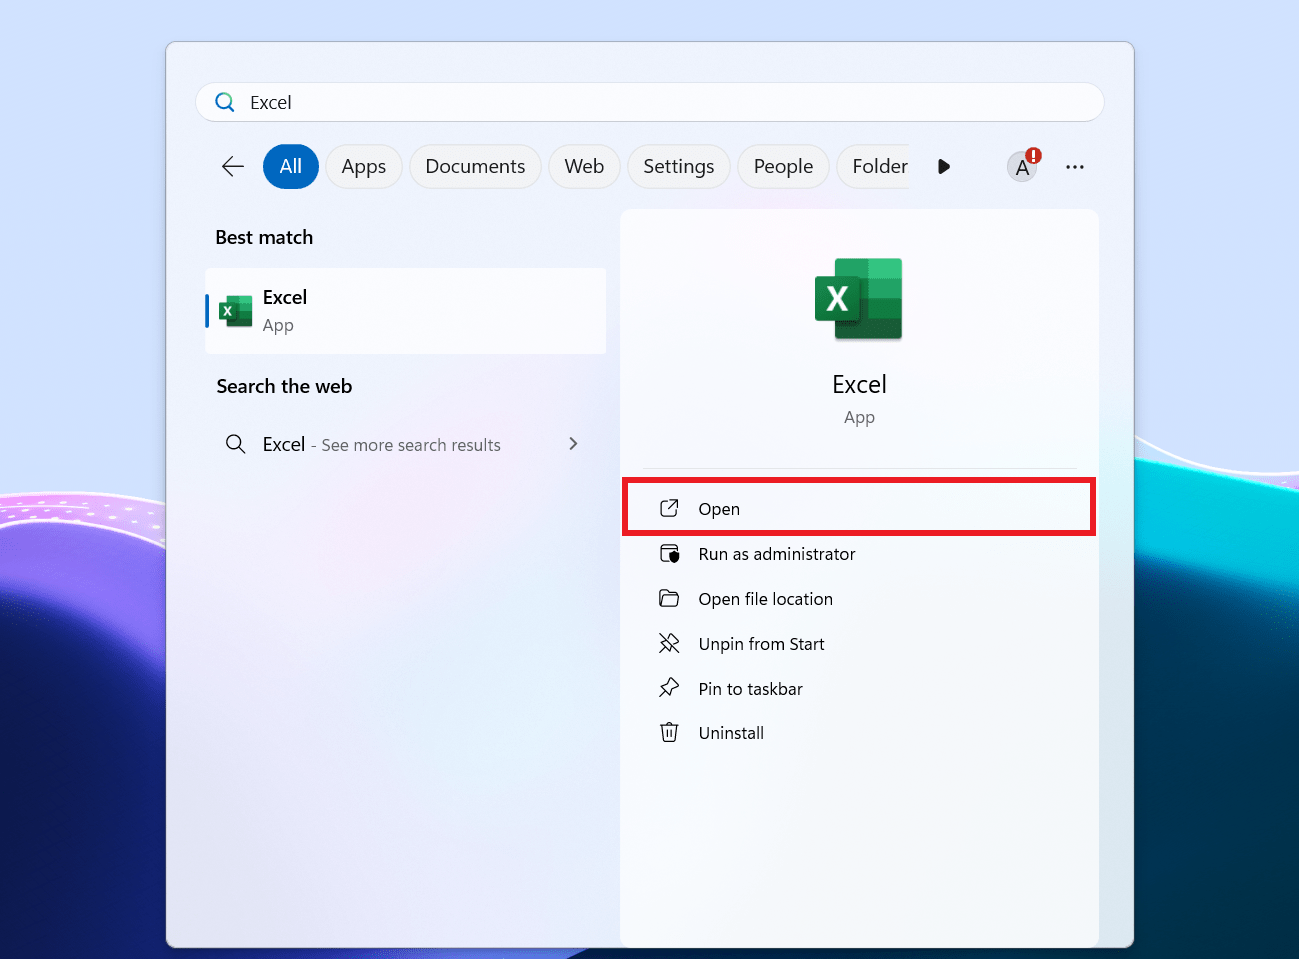
- Open the Excel sheet from which you want to change the color of the border.
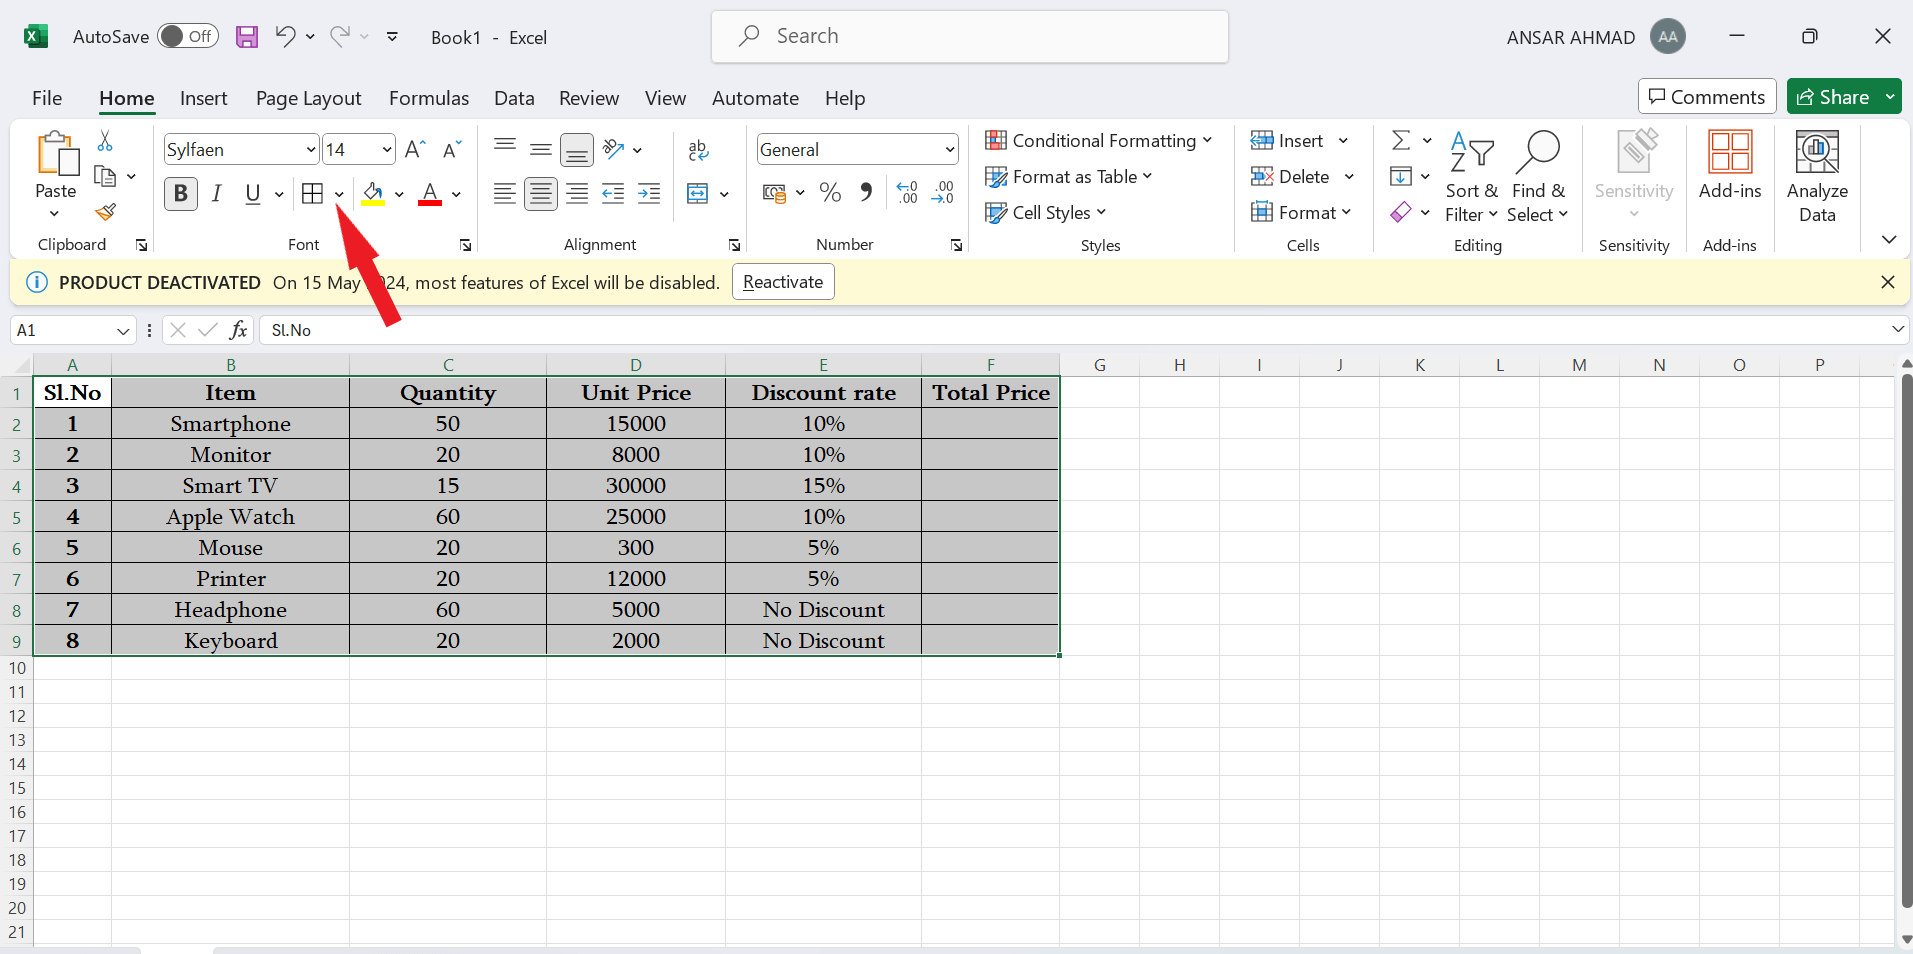
- Press Ctrl + A key simultaneously to select the data and click on the Border icon.
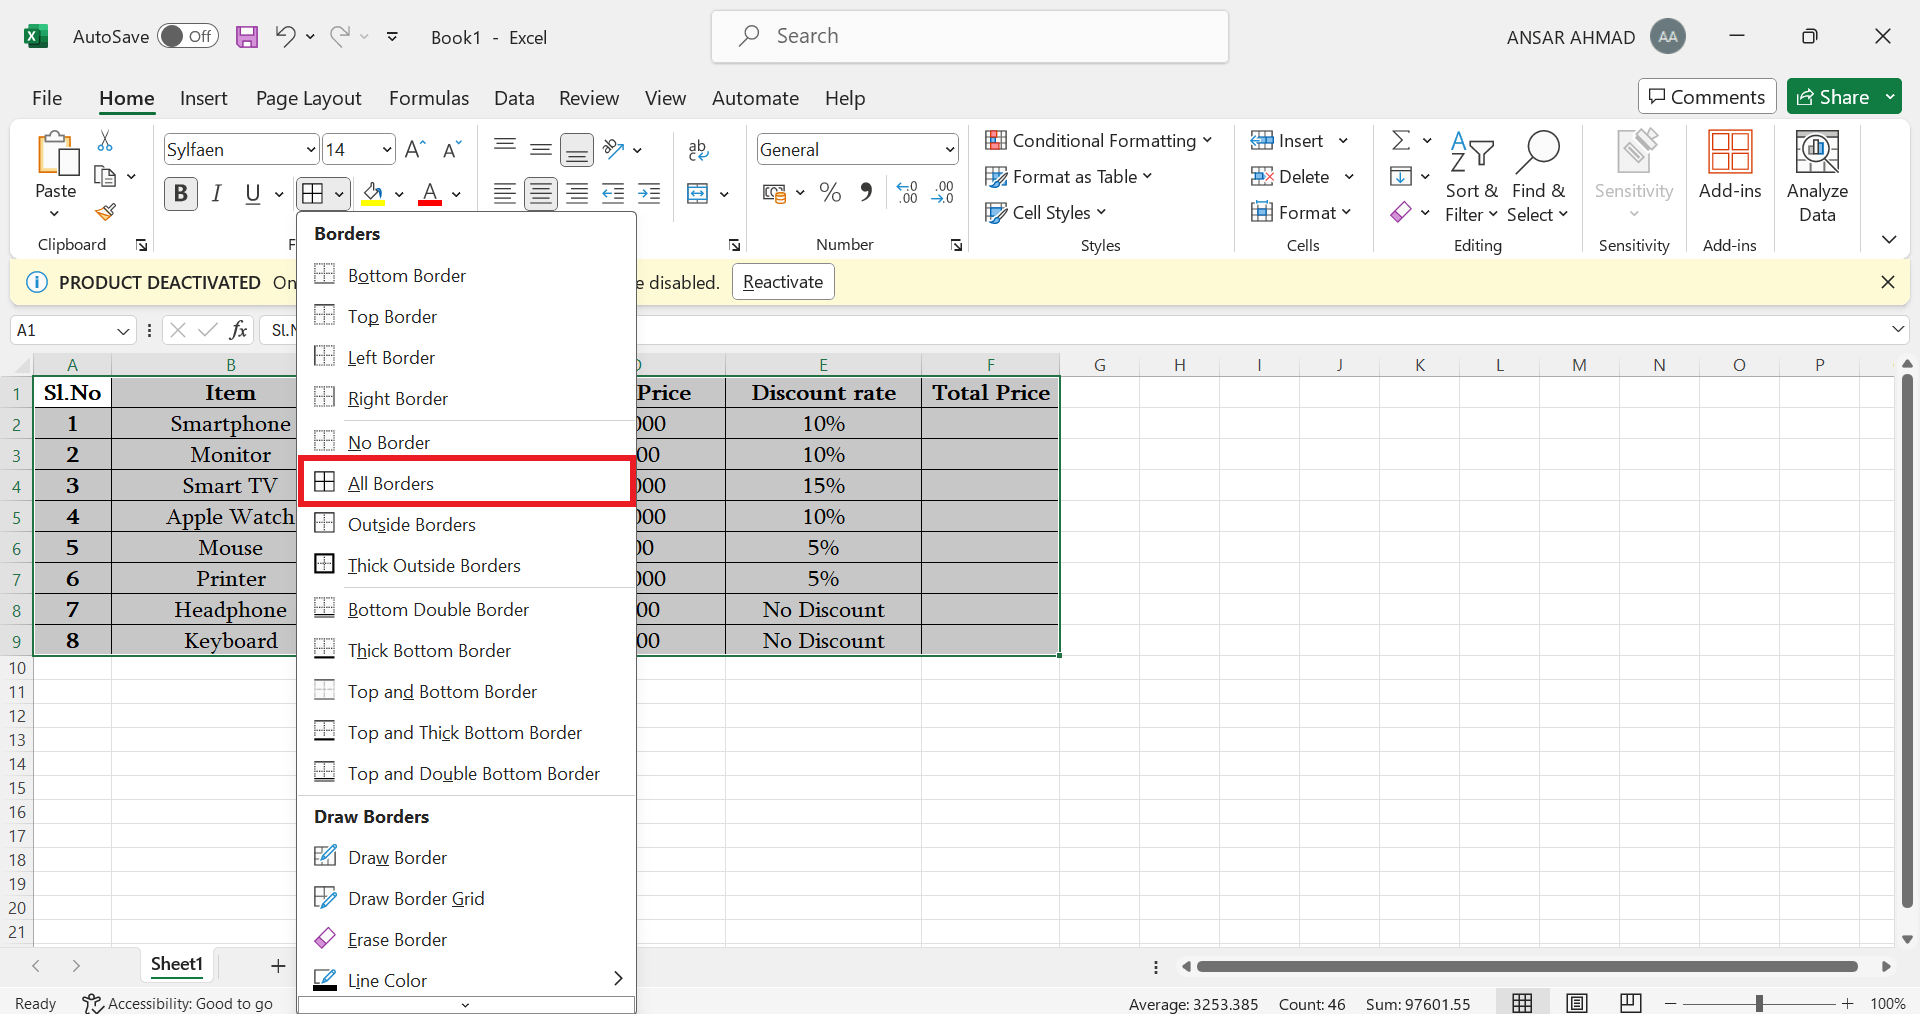
- Under the Borders list, select All Borders to add the border on your data sheet.
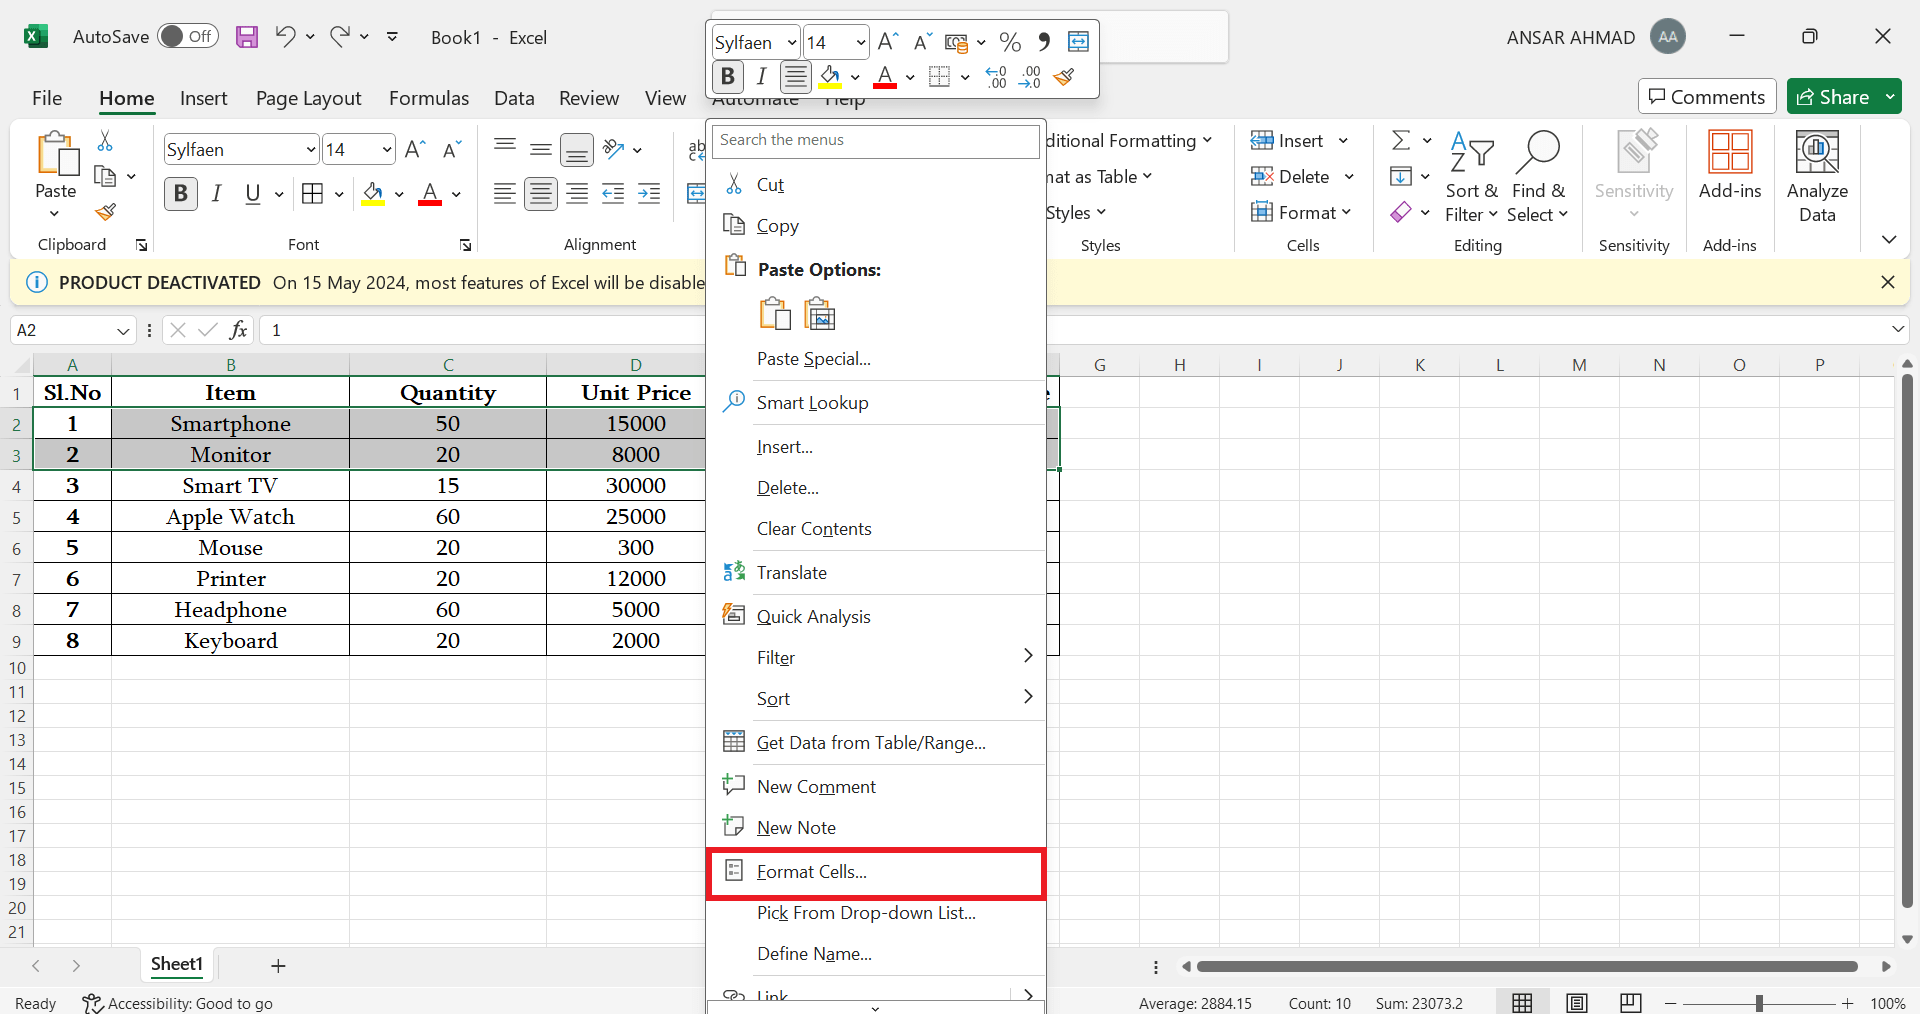
- Now, select the data for which you want to change the border color and right-click on the screen.
- From the context menu, select Format Cells option.
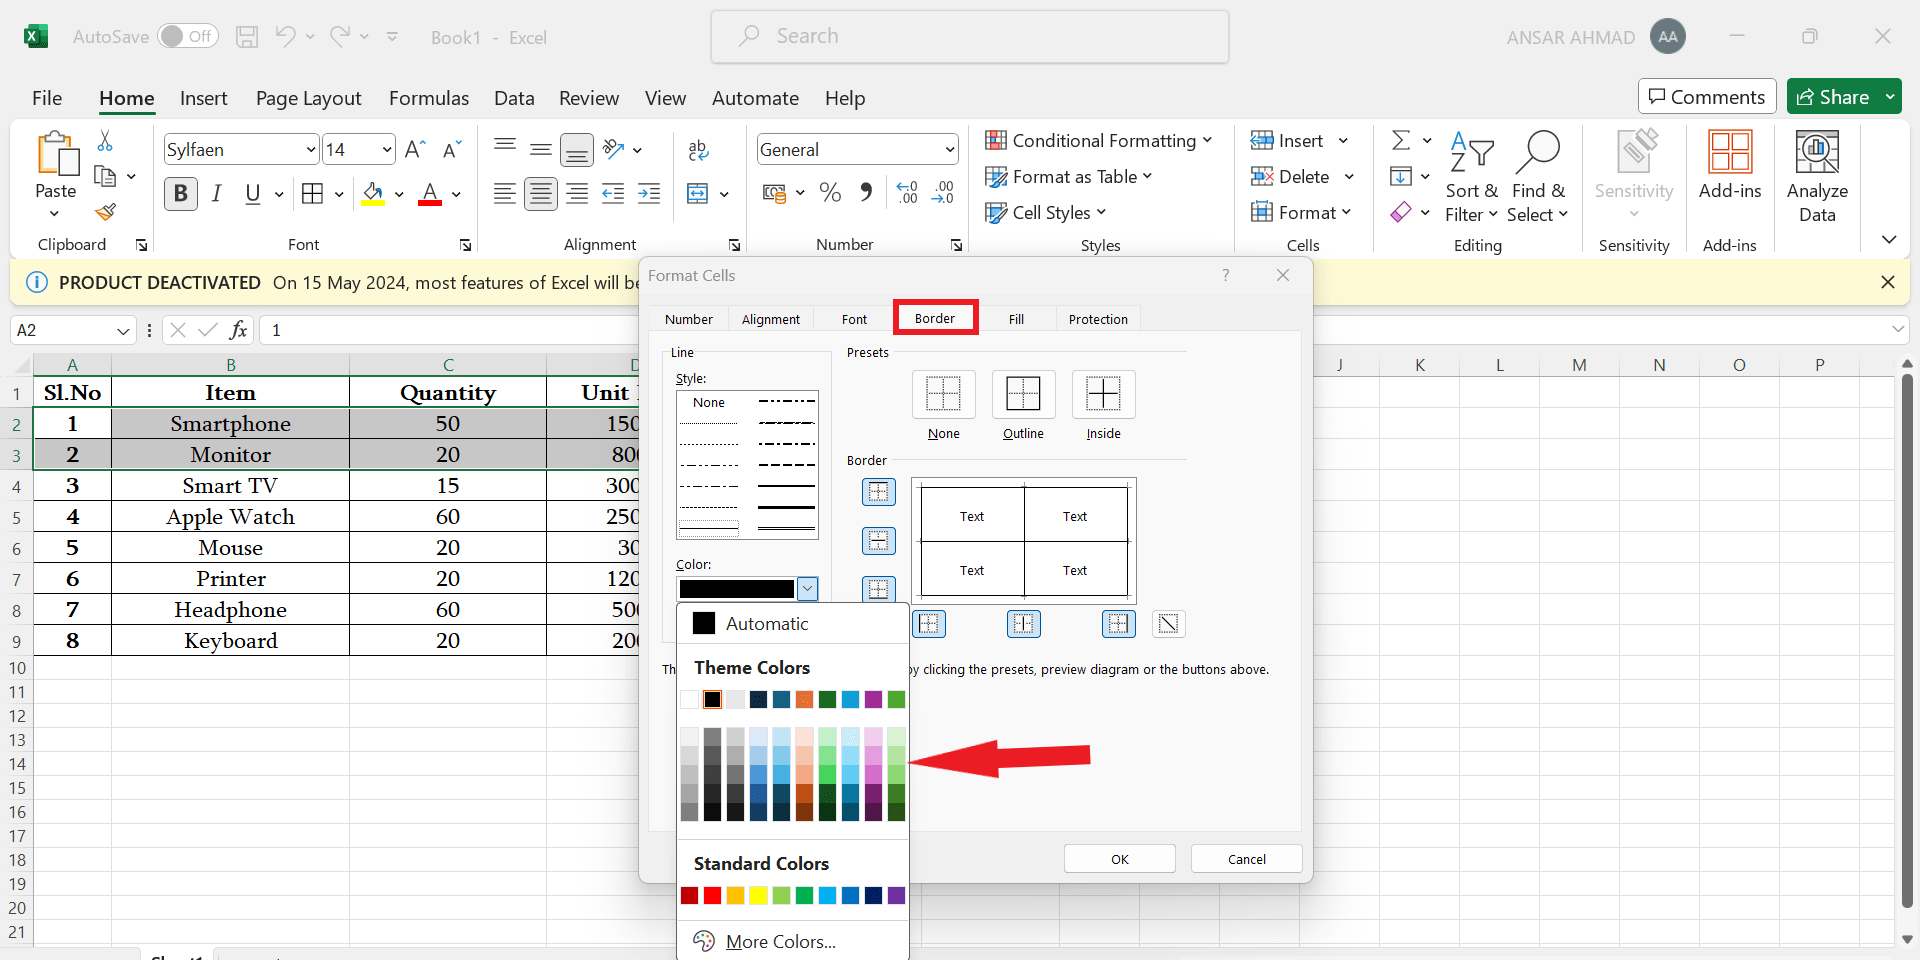
- In the Format Cells window, click on the Border menu at the top bar.
- Under the Color option, click on the drop-down arrow menu and select the color for which you want to change.
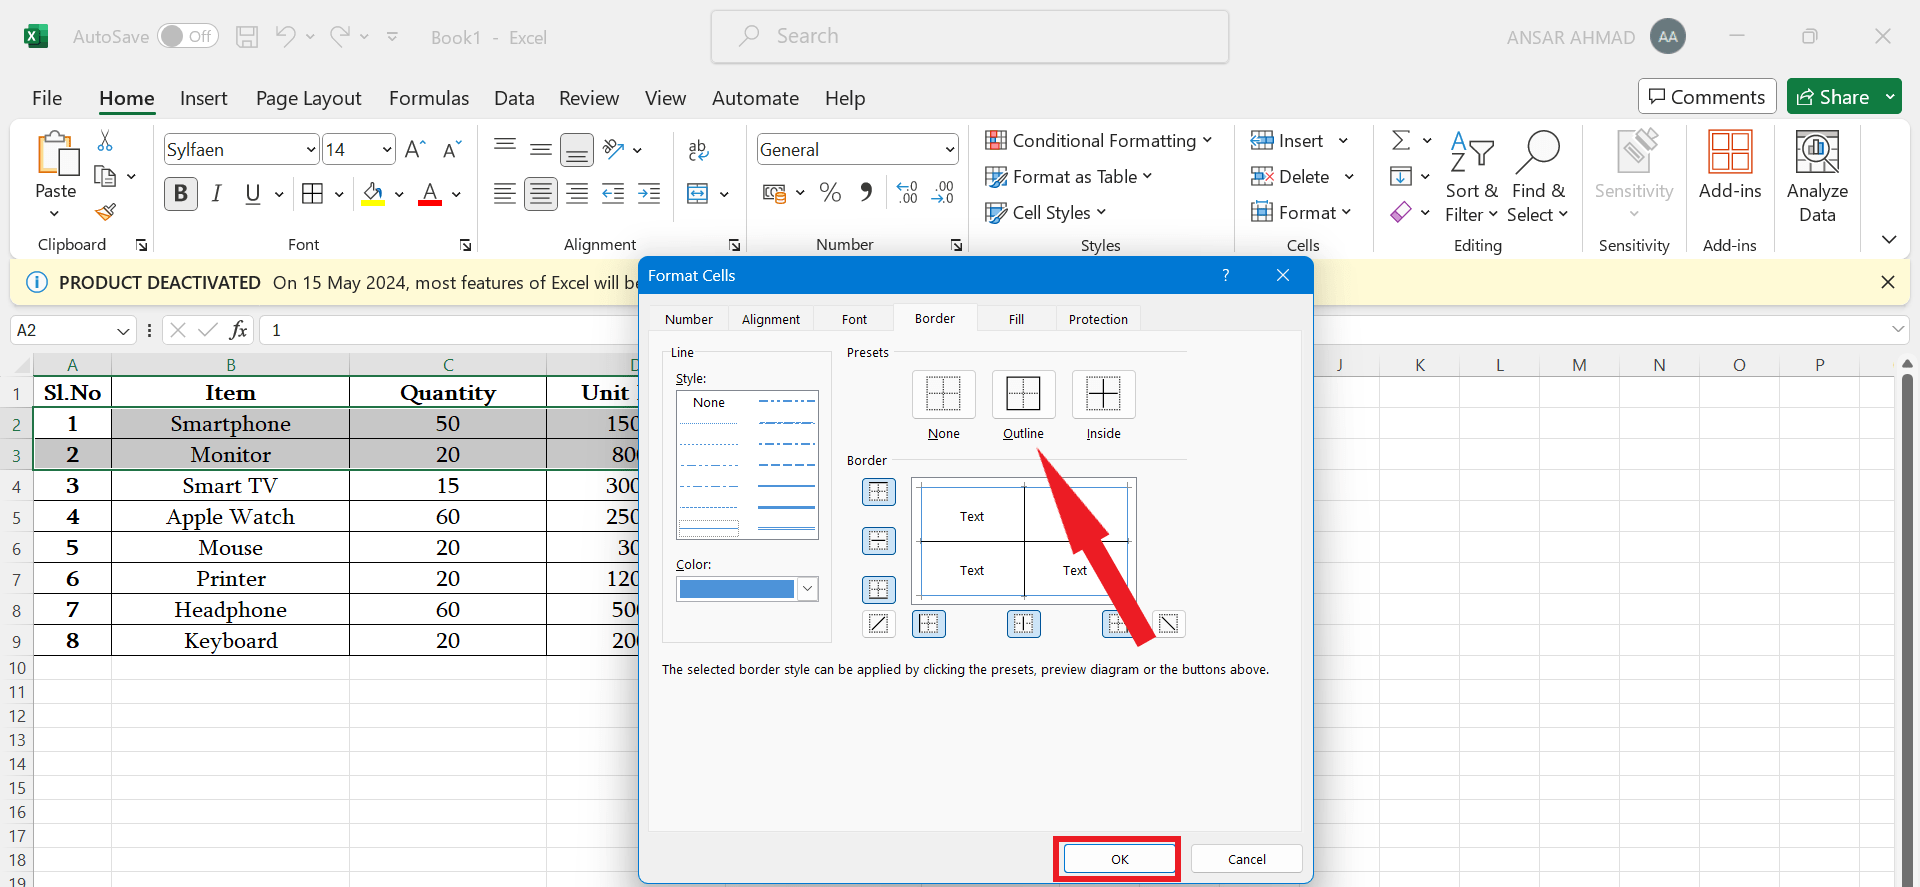
- Once you select the border color, pick the border style from the top presets.
- After choosing the border color and border style, click on the OK button to apply the changes.
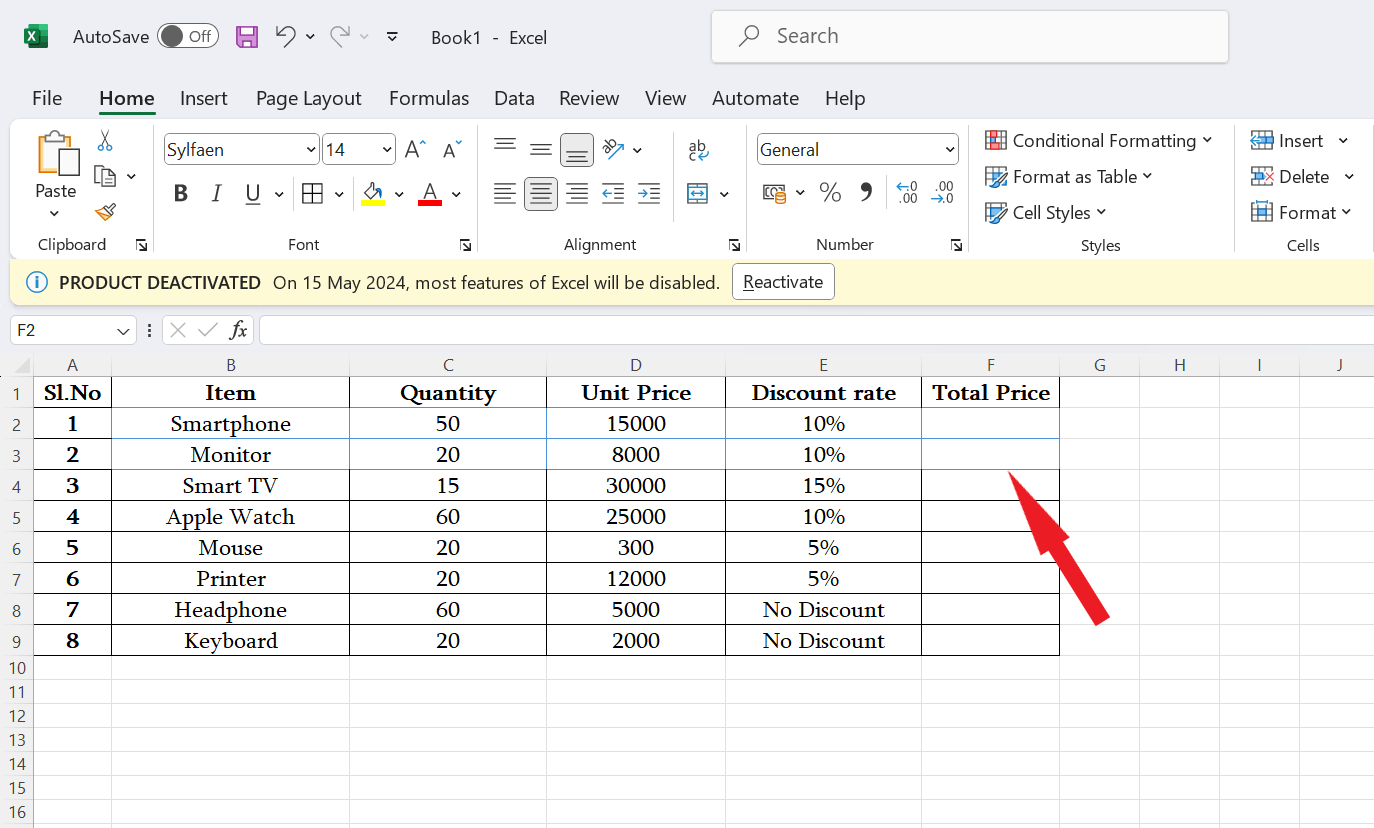
As soon as you select the border color and border style, the border color will change to your selected color. Here, you can see that the border color has changed from black to blue.
2. Change Border Color Using Ribbon
Another efficient way to change the border color is by using the Ribbon in your Excel document. You can do it from the drop-down border menu if you want to change the color to a specific border or cells on your sheet. Here’s how to do it.
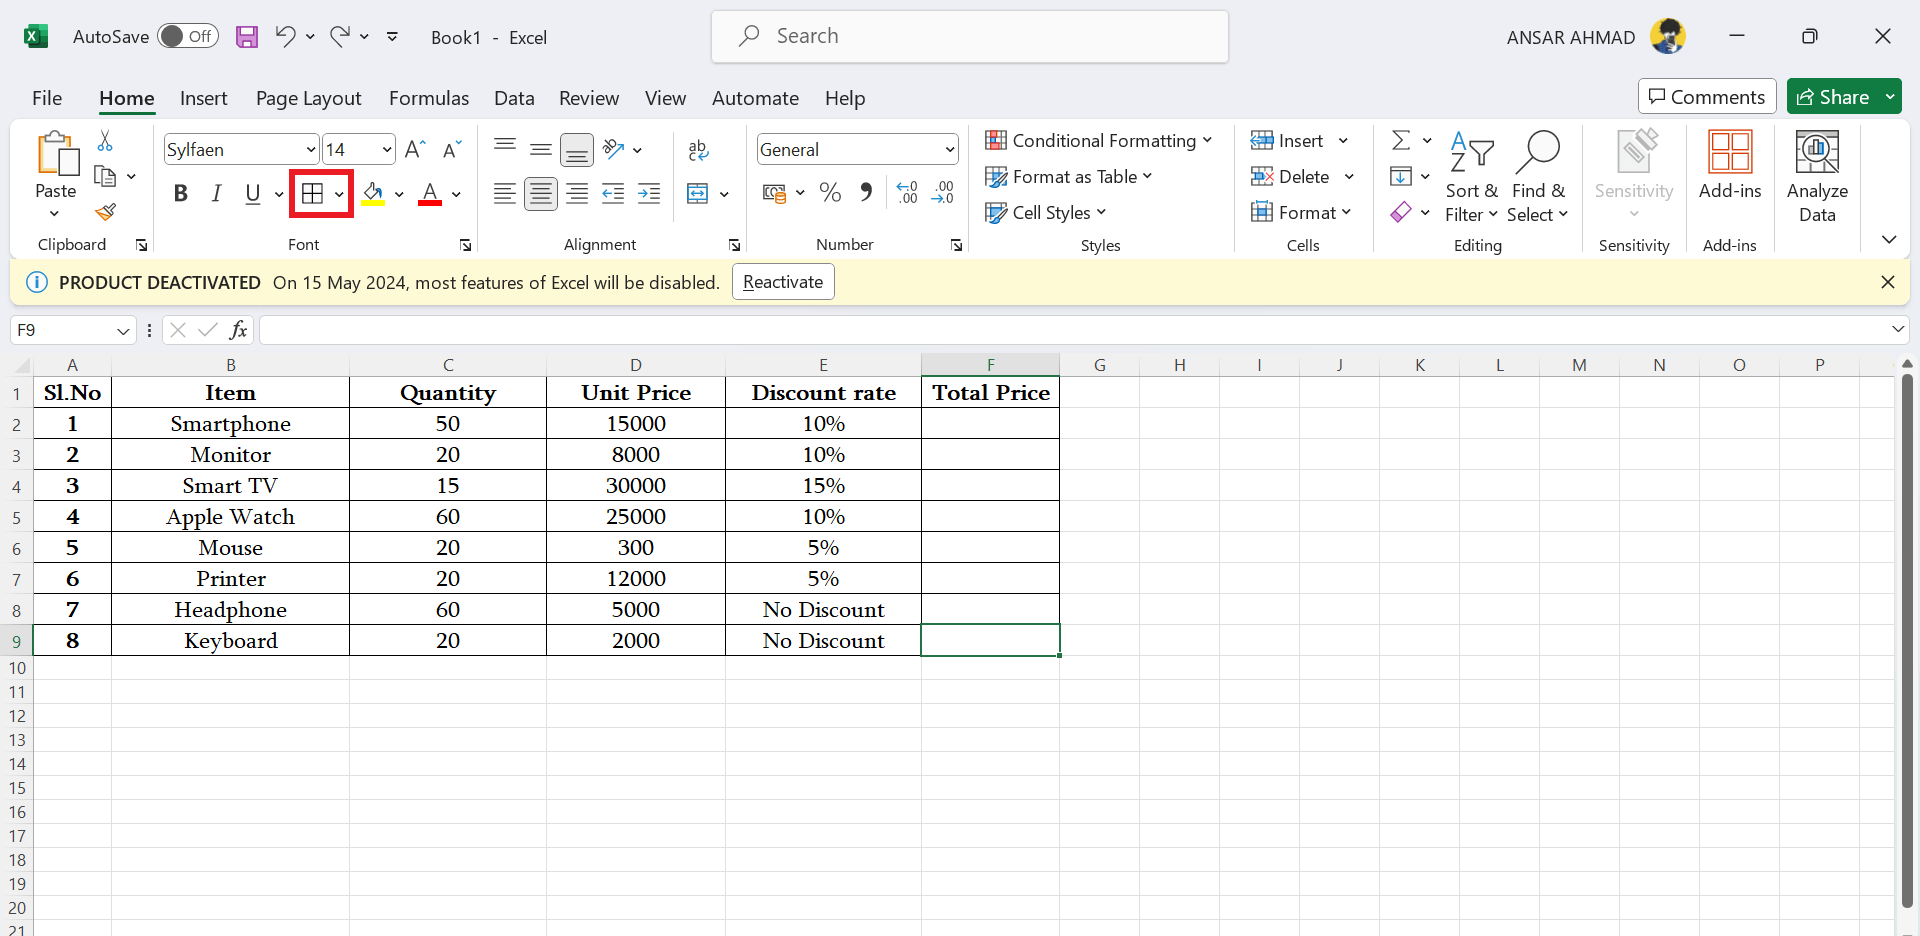
- Navigate to the Home tab on your Excel sheet and click on the little arrow icon next to Border at the top menu bar.
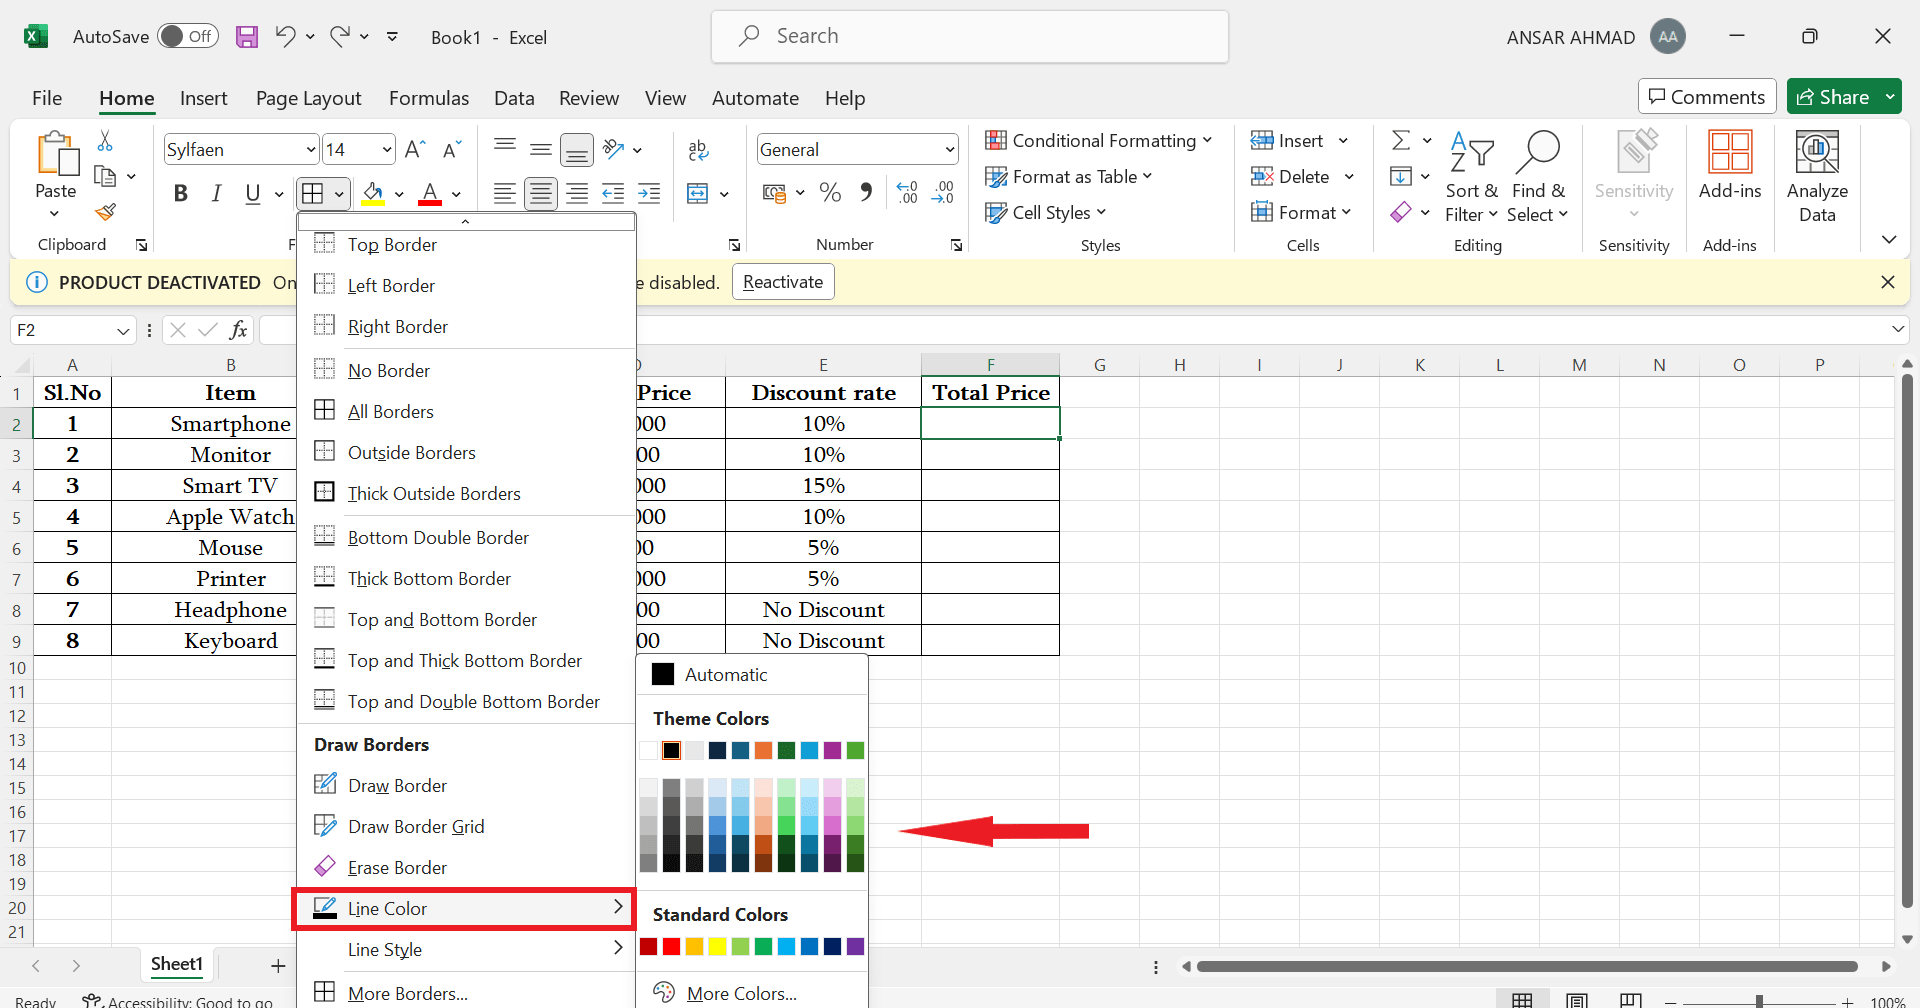
- From the drop-down menu, hover your cursor on Line Color and select the color that you want to add to the border.
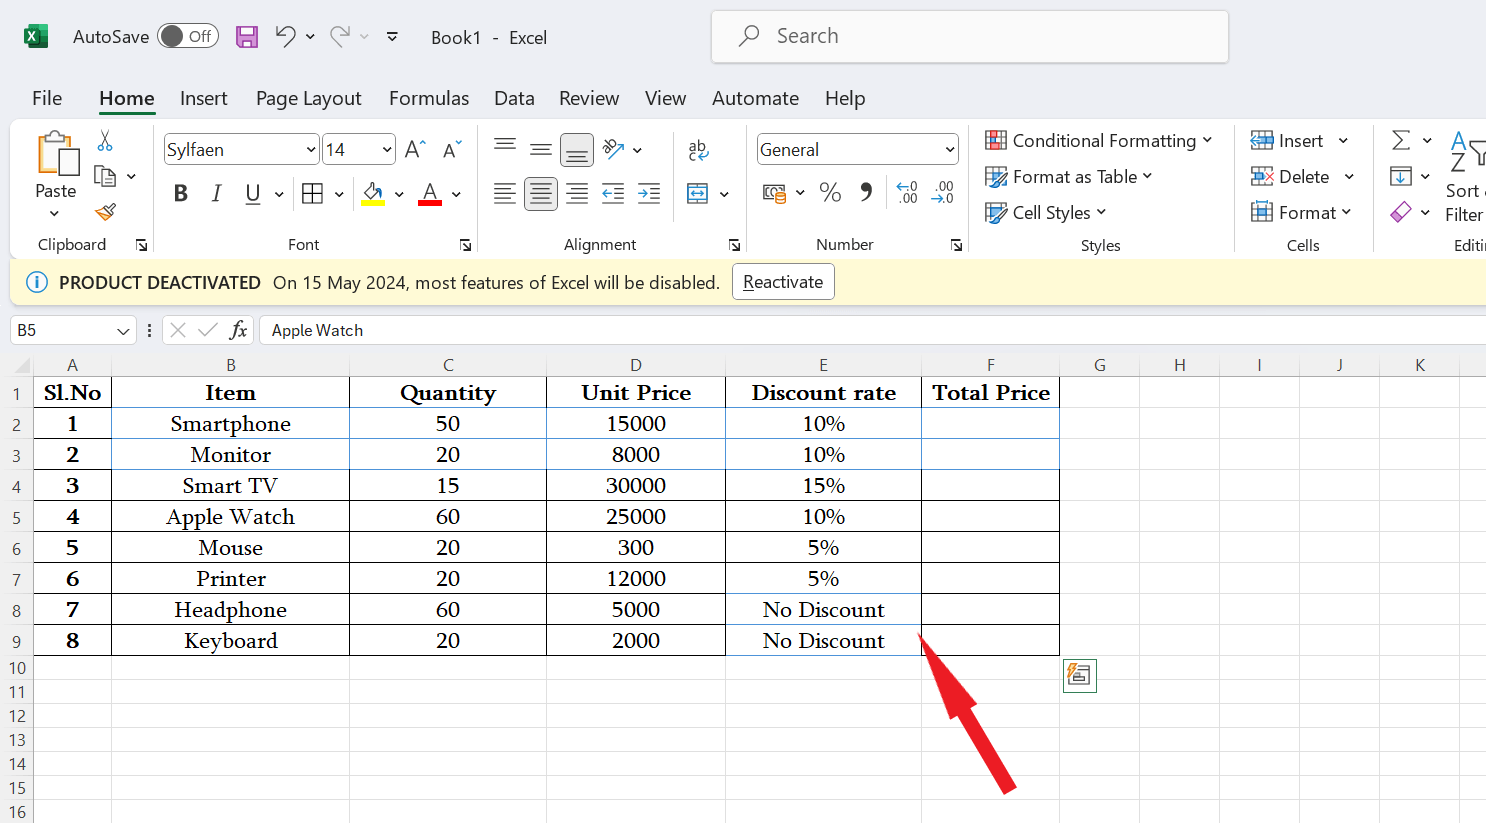
- Once you select the color, you will notice that the cursor is now turned to the pencil icon.
- Hover the pencil icon on the border you want to change the color and then click on it. Follow the same step for each border to change the color.

- After changing the color, press the Esc key on the keyboard to return to the original cursor.
- The pencil icon is not just utilized for color changing but it also acts as adding a new border on the sheet.
- To add a new border, simply click on the gridlines where you want to add borders with your selected color.
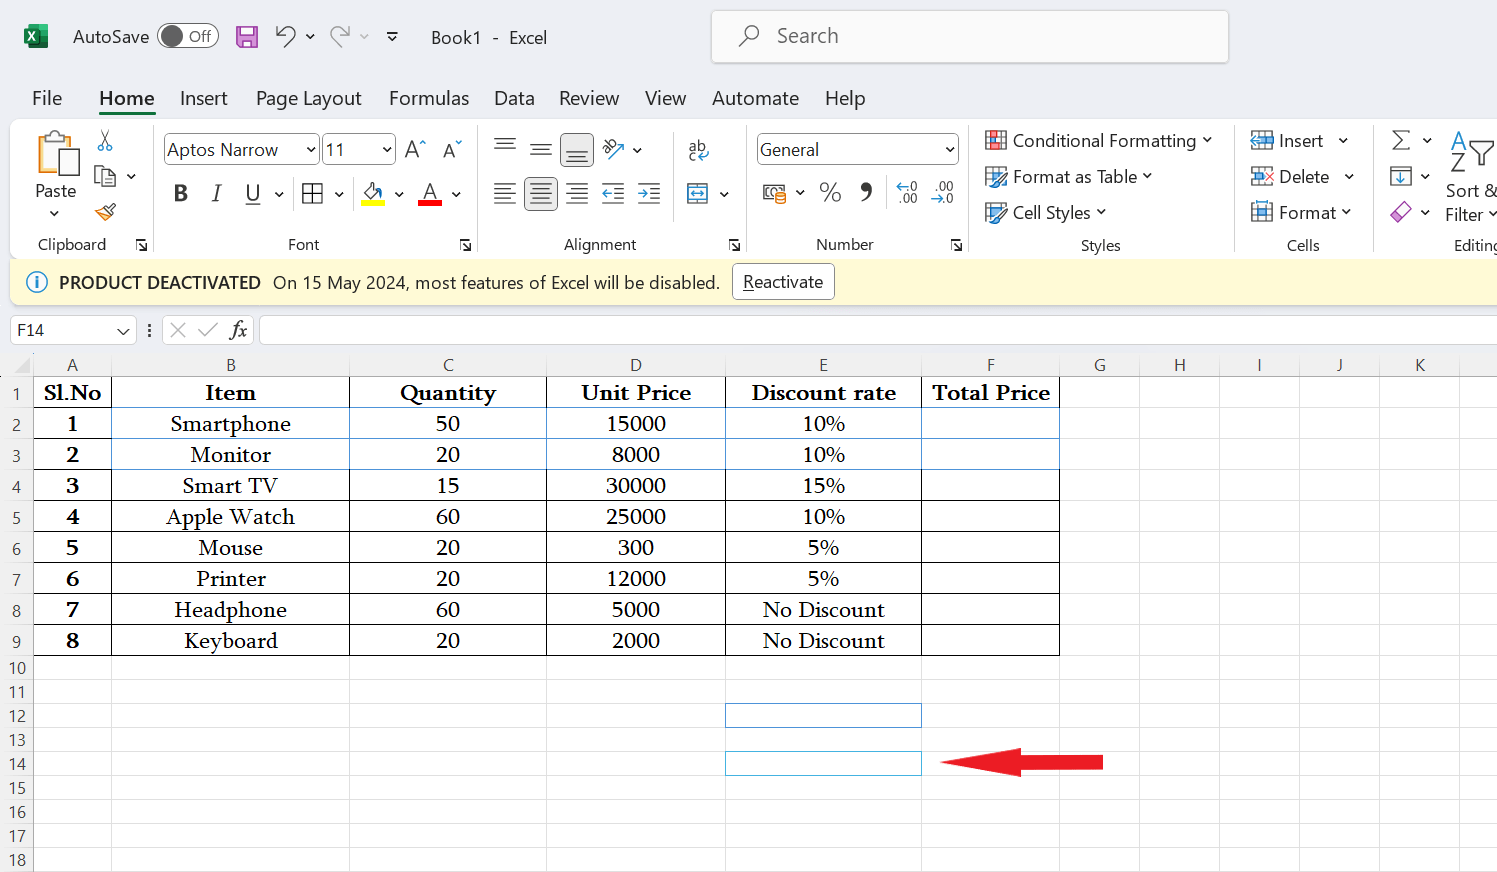
- You can also click and drag the pencil icon on the sheet, and it will add a square border.
Adding colors to the border is quite simple from the Ribbon option on the Excel sheet. You can also switch between the colors and border styles. In addition, you can add or erase borders anytime with a simple click.
3. Change the Border Color Using the Keyboard Shortcut
We have already outlined the two most efficient ways to change border color on Microsoft Excel. However, there is another way that you can utilize the color change, thanks to the keyboard shortcuts.
The shortcut keys for changing the border color are Alt, H, B, I. Here, you must enter the keys one after one by pressing the Alt key (Not together). Before we jump right to it, take a look at the shortcut keys function:
- Alt: Displays the shortcut keys for the Ribbon tabs.
- H: Select the Home tab.
- B: It opens the Border menu.
- I: It opens the Line Color menu.
Here’s how you can change the color of the border on an Excel sheet using the keyboard shortcuts:
- On your Microsoft Excel, press the keyboard shortcuts Alt + H, B, I one after the other.
- Choose the border color from the Line Color menu.
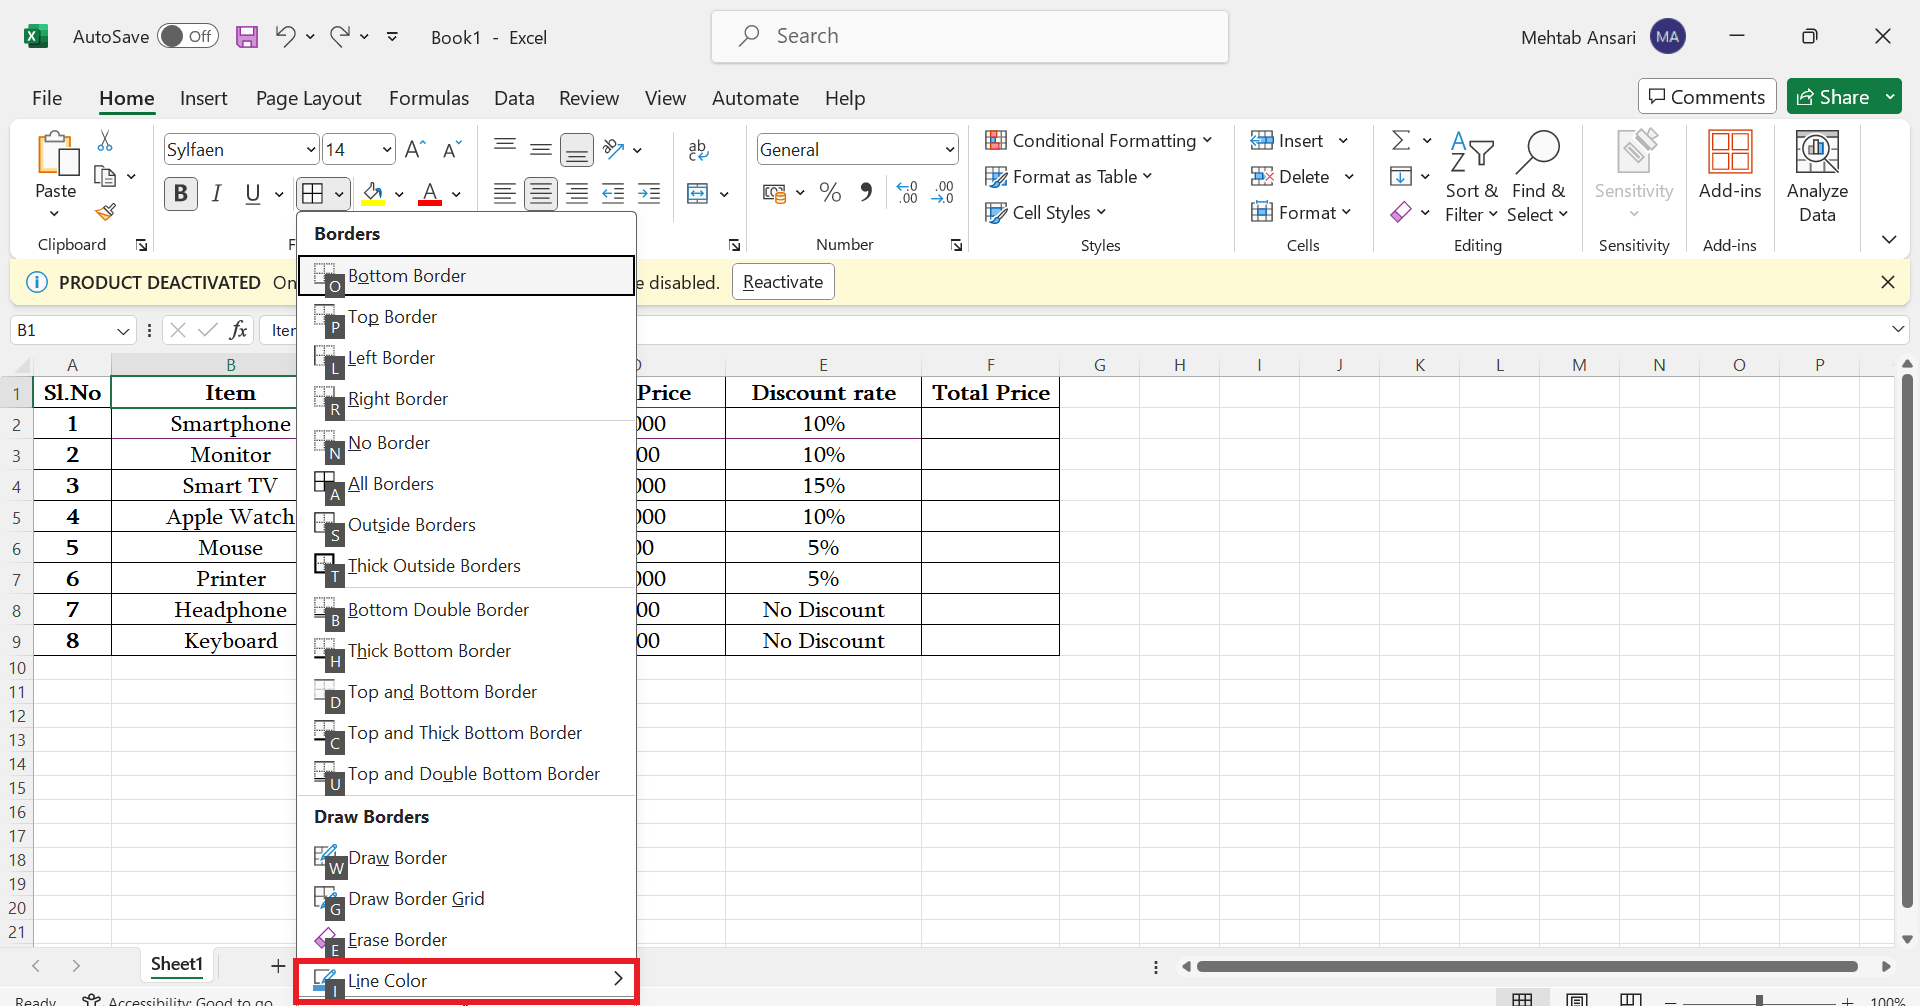
- As soon as you select the color, the cursor will automatically change to a pencil icon.
- Click on the border to change the color.
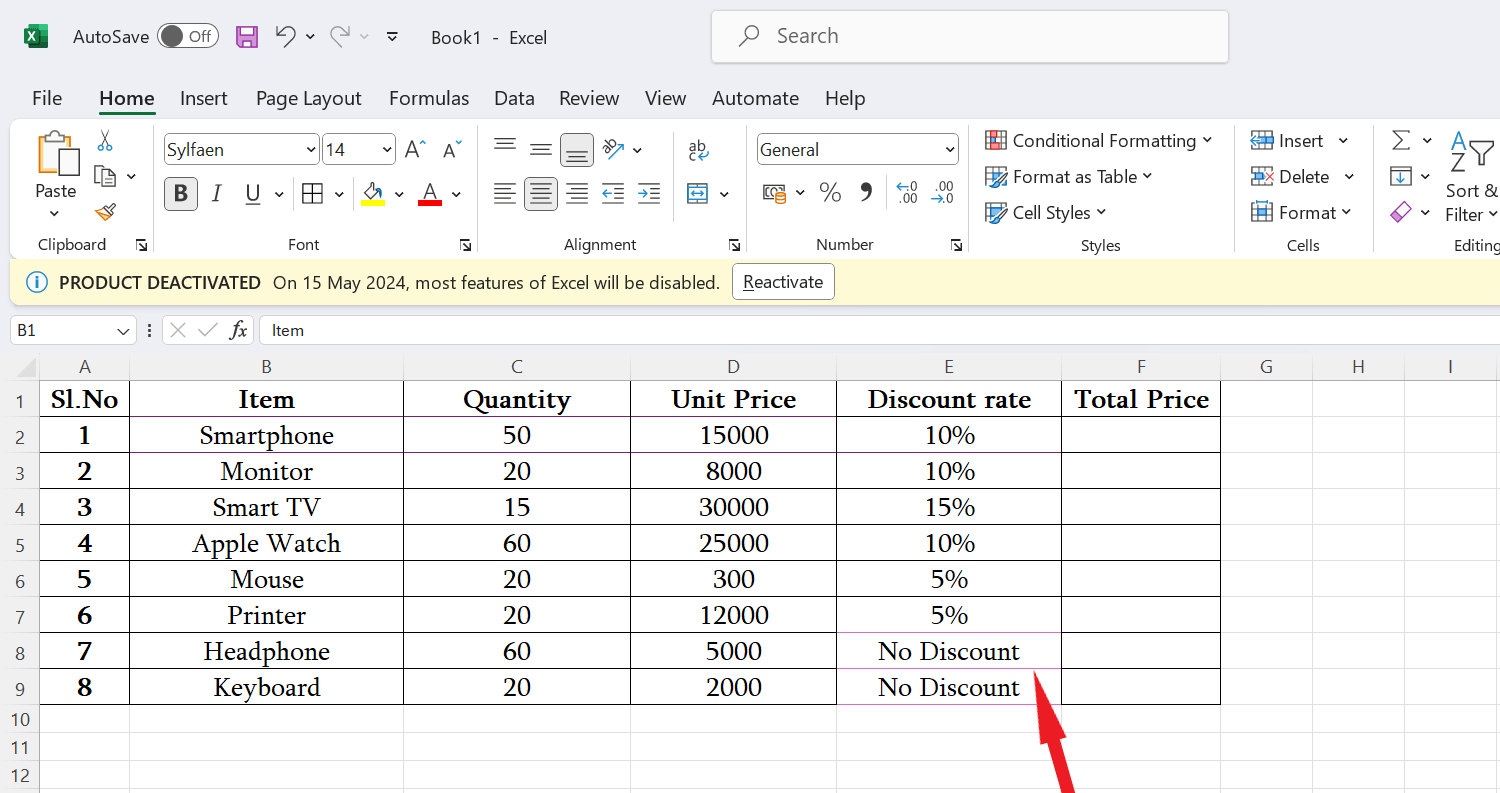
- You can also select the border style from the Border menu.
- Now you can see that your border color has been changed from black to your selected color.
4. Change the Gridlines Color Using the Advanced Option
You can also change the gridlines color of the Excel sheet using the Advanced option. While the default color of the gridlines is black, you can change to any other color. Therefore, if you want to change the gridlines color on the Excel sheet, be sure to follow the below steps:
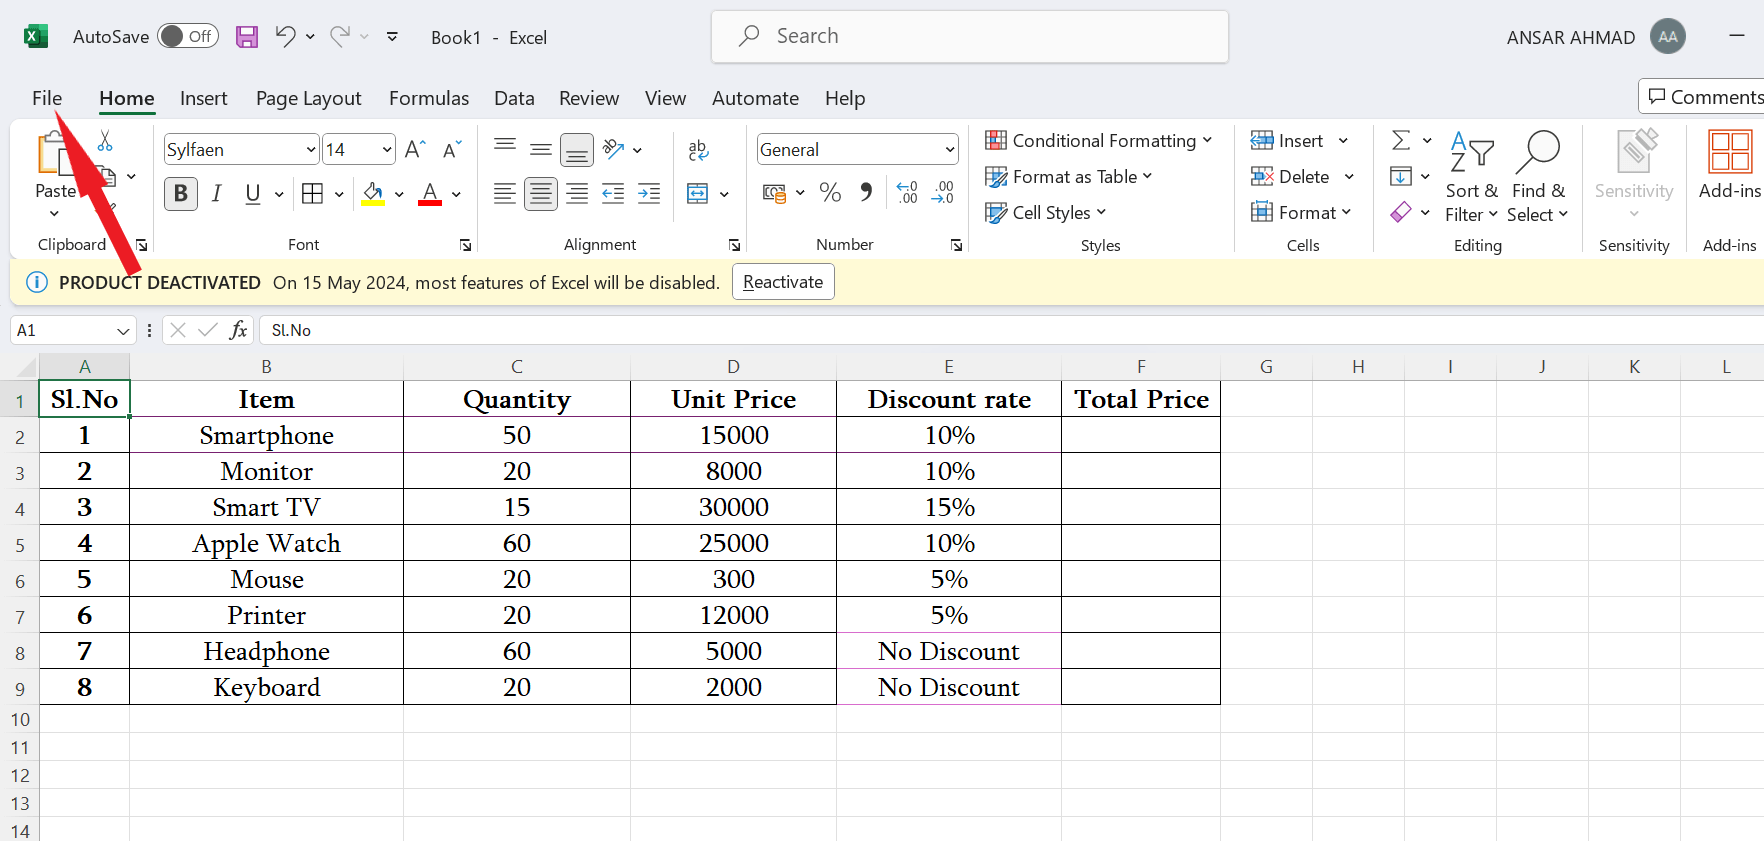
- On Microsoft Excel, click on the File menu tab located at the top left corner.
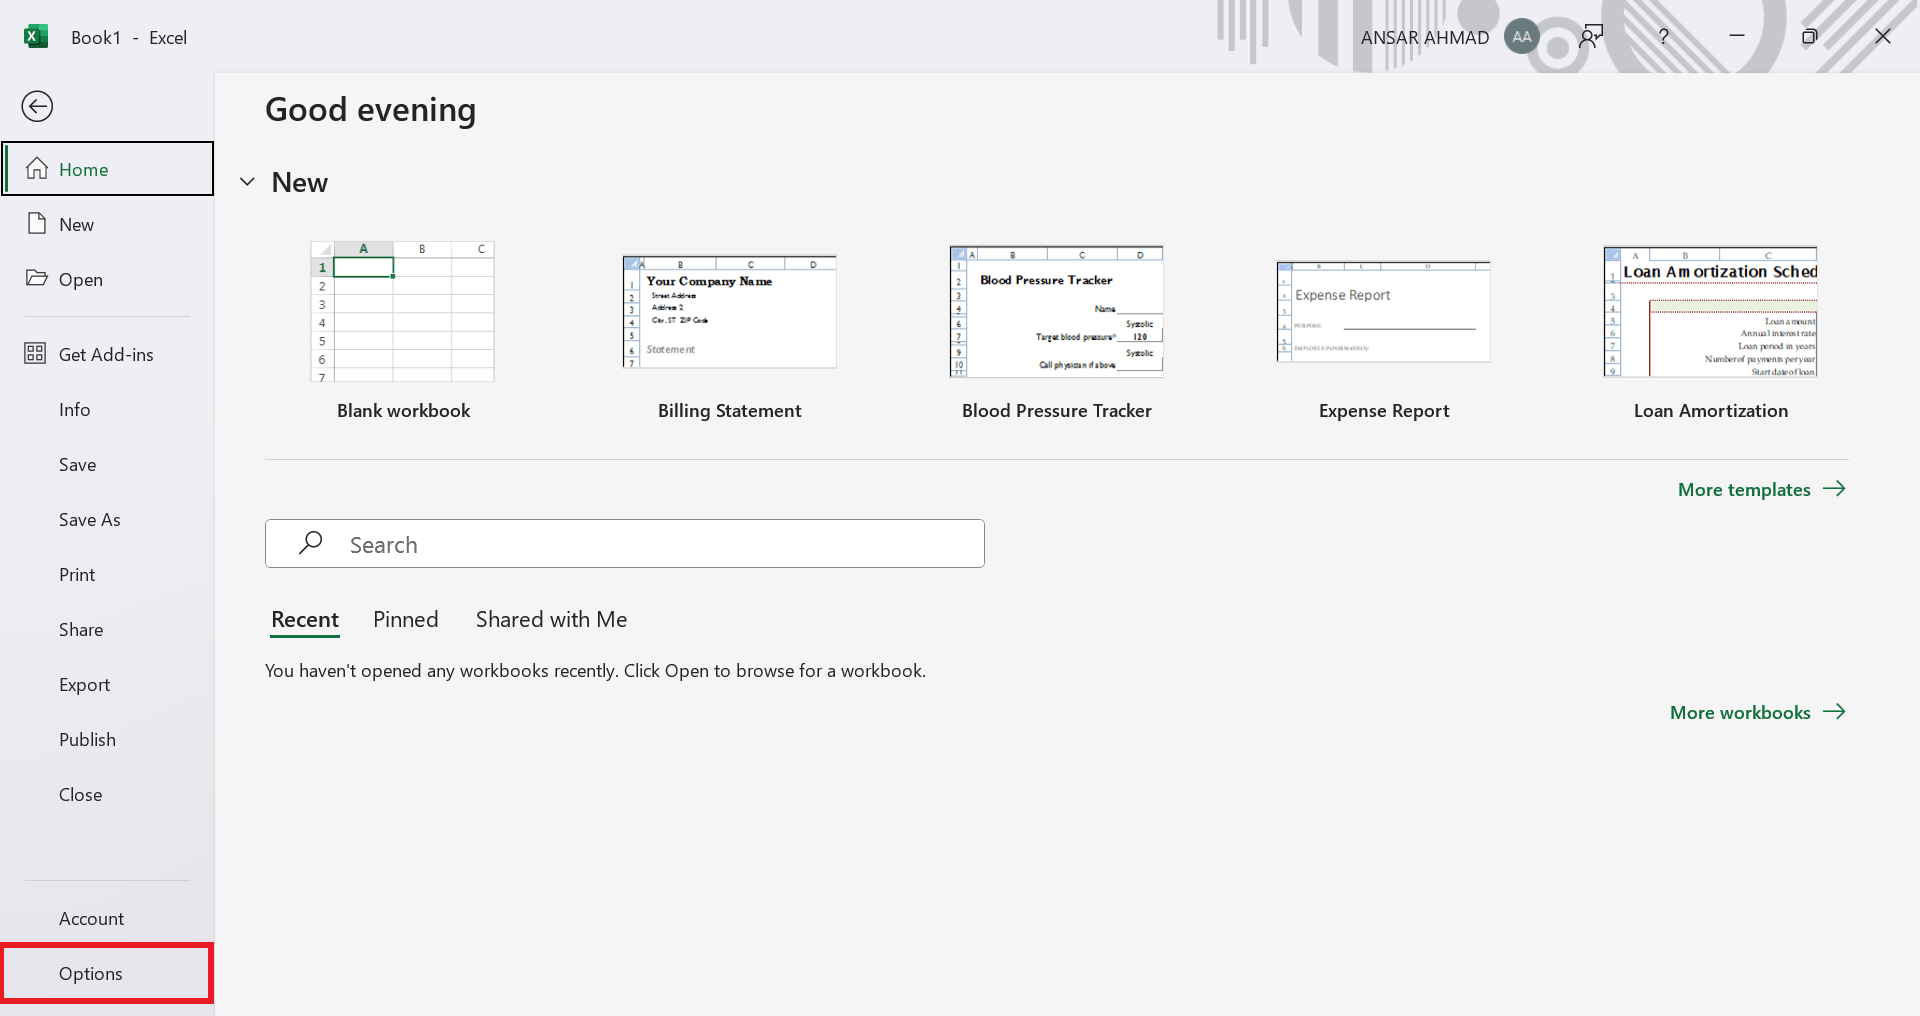
- Select Options from the bottom left pane.
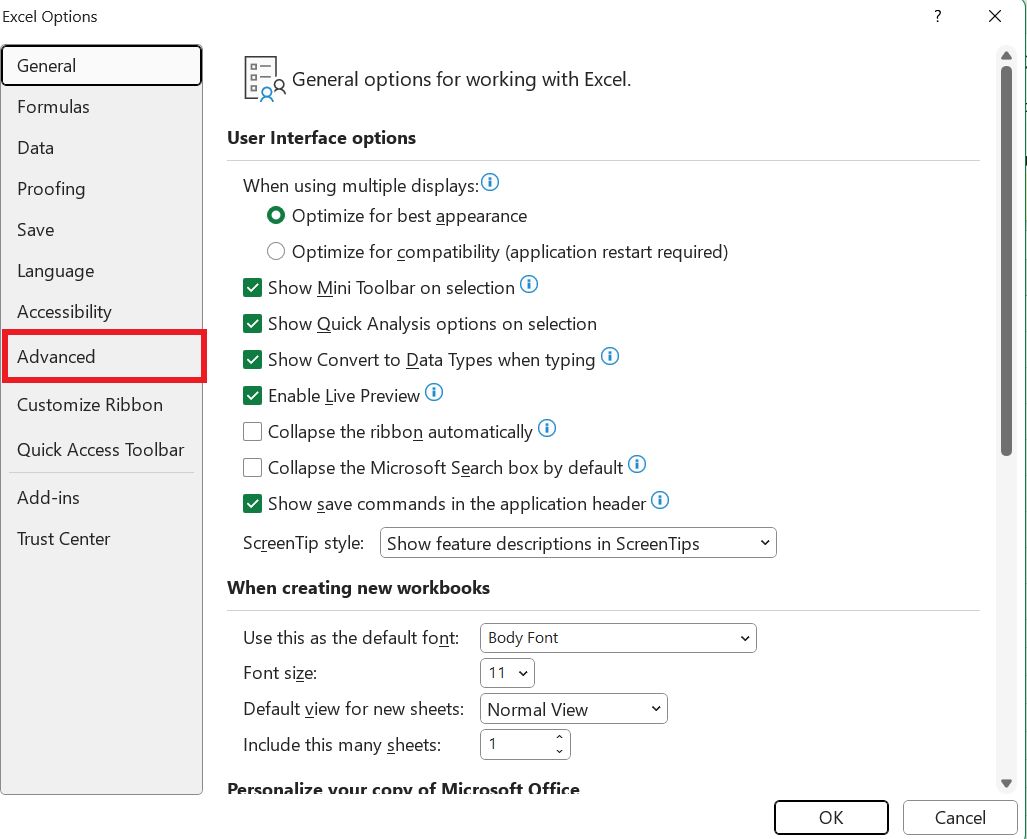
- Under the Excel Options window, choose Advanced.
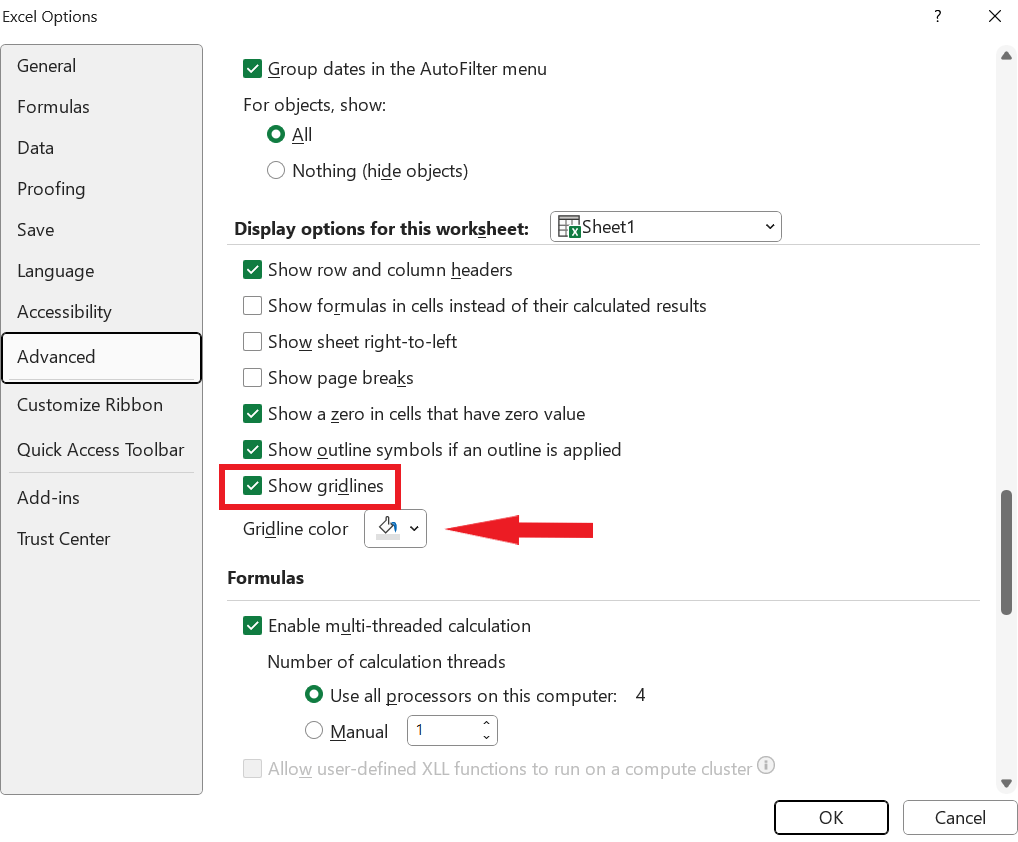
- Scroll down to the Display options for this worksheet section and tick mark the Show gridlines option. Then, click the drop-down menu next to the Gridline color.
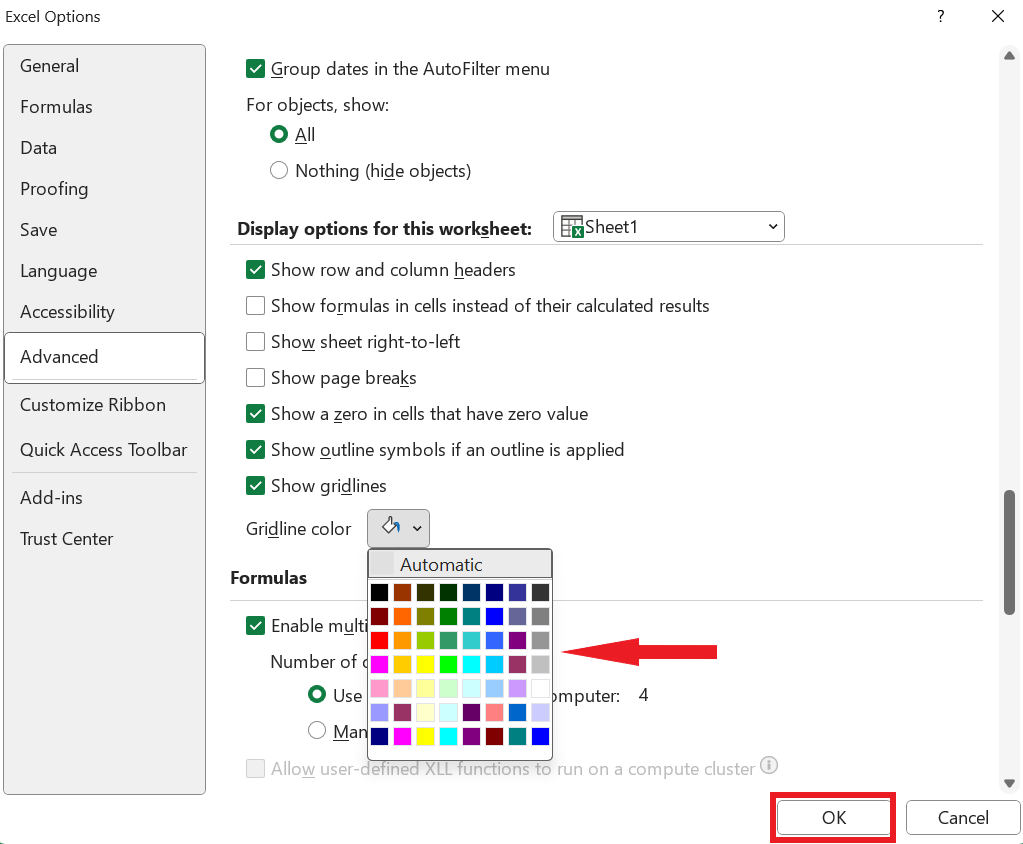
- Then, choose the color for which you want to change the gridlines and click Ok.
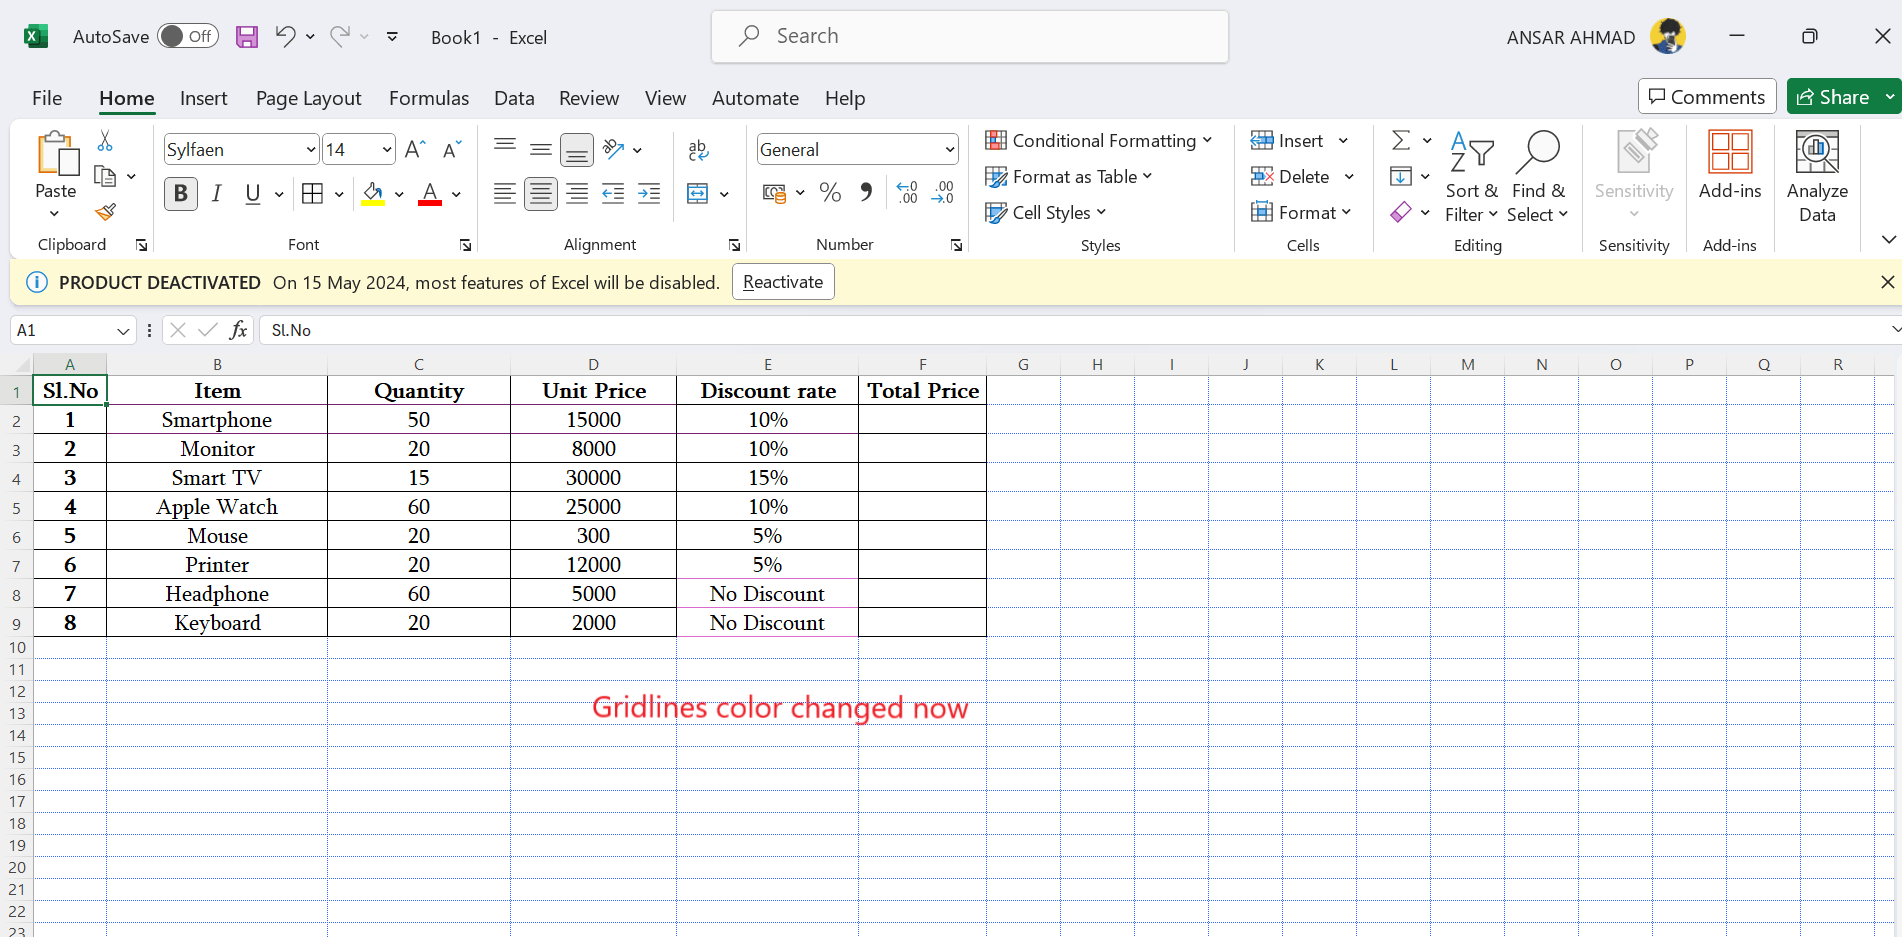
- Now the color of the gridlines will be automatically changed.
In case, if you want to change the gridlines color back to normal then simply select the Automatic option from the gridlines color. It will change the gridline color back to the default state.
Final Words
Microsoft Excel is a great way to organize your data, especially when you’re preparing the sheet for your organization. However, if you want to make your Excel sheets more attractive, you can change the border color instead. And we have outlined the different ways that you can read to change the border color in Excel.
If you've any thoughts on How to Change the Border Colors in Microsoft Excel, then feel free to drop in below comment box. Also, please subscribe to our DigitBin YouTube channel for videos tutorials. Cheers!
