Microsoft frequently issues updates for Windows 11 to ensure its optimal performance and security on your device. The decision of whether to install these updates rests entirely with you. There are instances when these updates can prove to be troublesome.
Occasionally, Windows updates may not go as planned, and instead of resolving issues, they might introduce further complications.
Fortunately, Windows 11 provides multiple methods for uninstalling an update. In the following sections, we will outline these approaches.
Top Way to Downgrade Update on Windows 11
Here is a Simple Guide Detailing the Best Methods to Uninstall Updates on Windows 11
1. Using the Windows Settings App
The Windows 11 Settings application includes a specific area for Windows Update. This section lets you observe, download, and control Windows updates, including the option to uninstall them.
Here are the steps to do so.
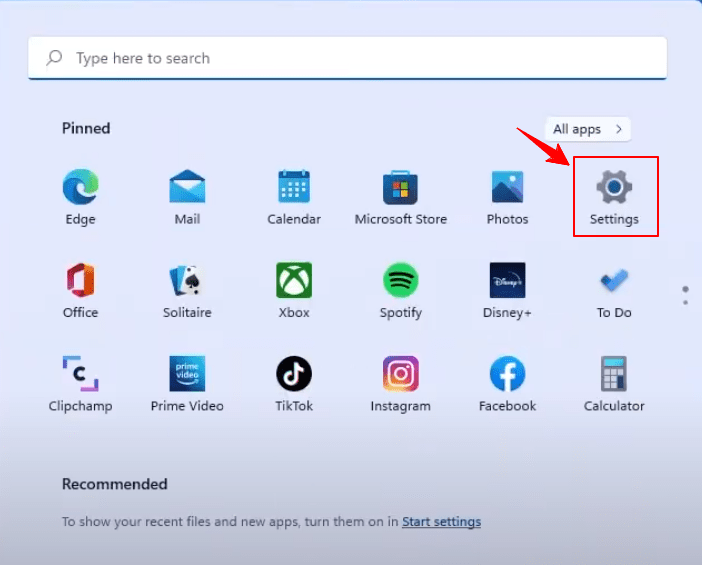
- Right-click on the Start icon, and pick Settings from the list that appears.

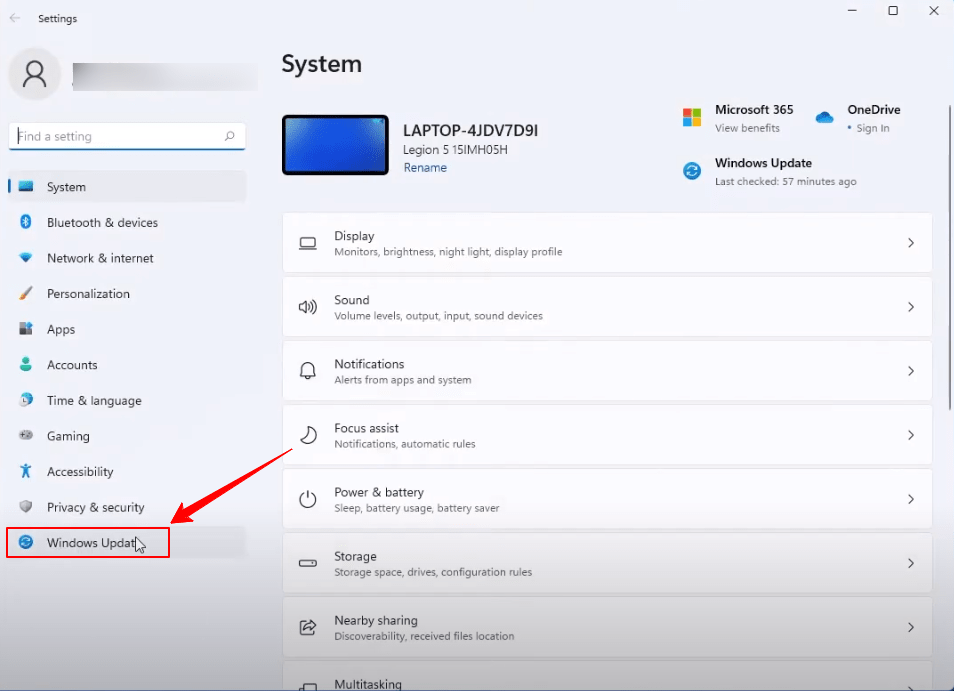
- Go to Settings, and on the left side, click Windows Update.

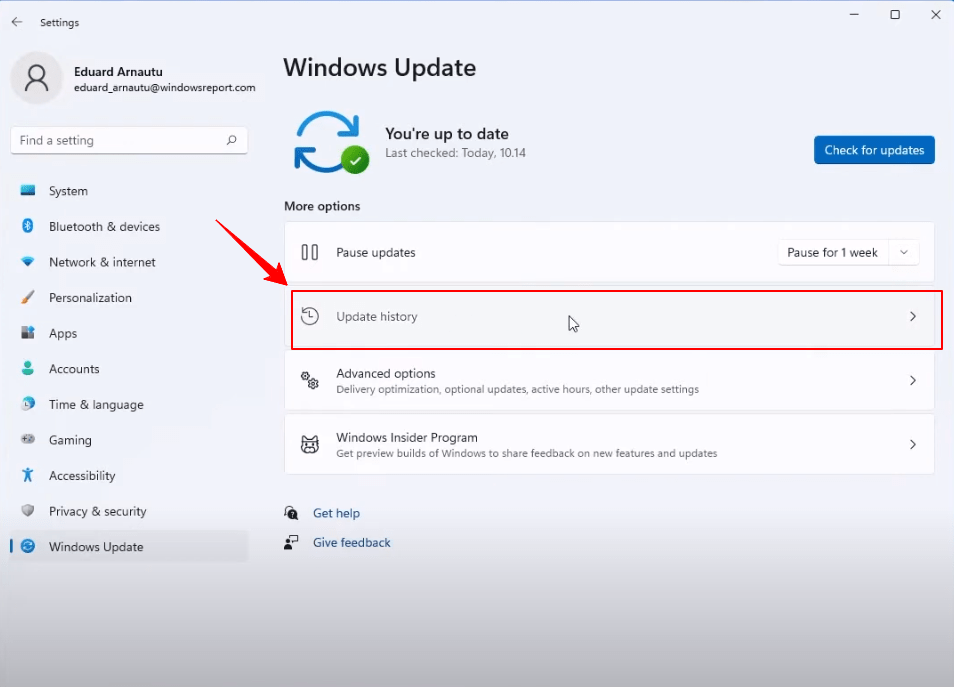
- Go to the Windows Update page and choose Update History.

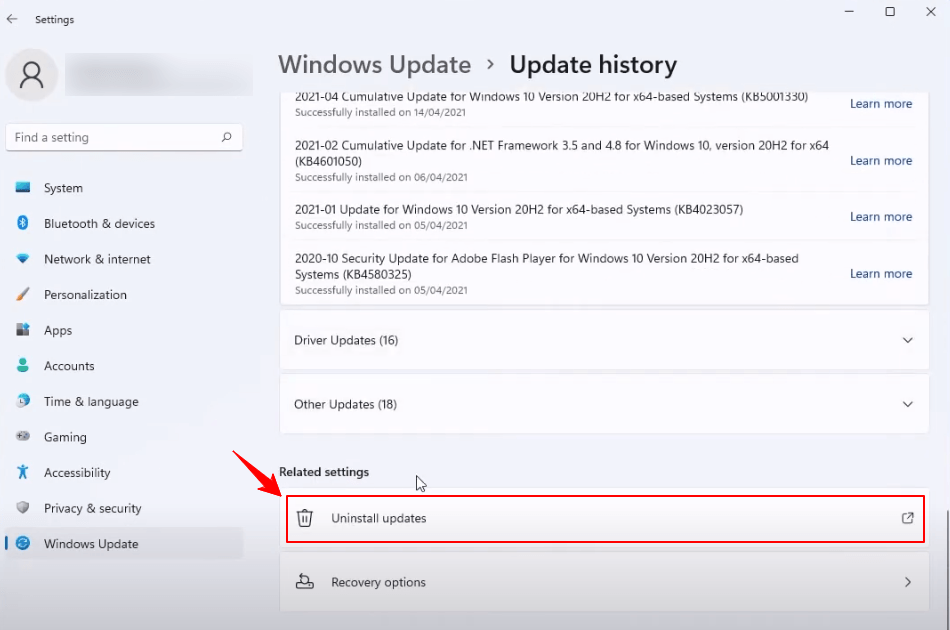
- In the Update History menu, click Related Settings and Uninstall Updates.

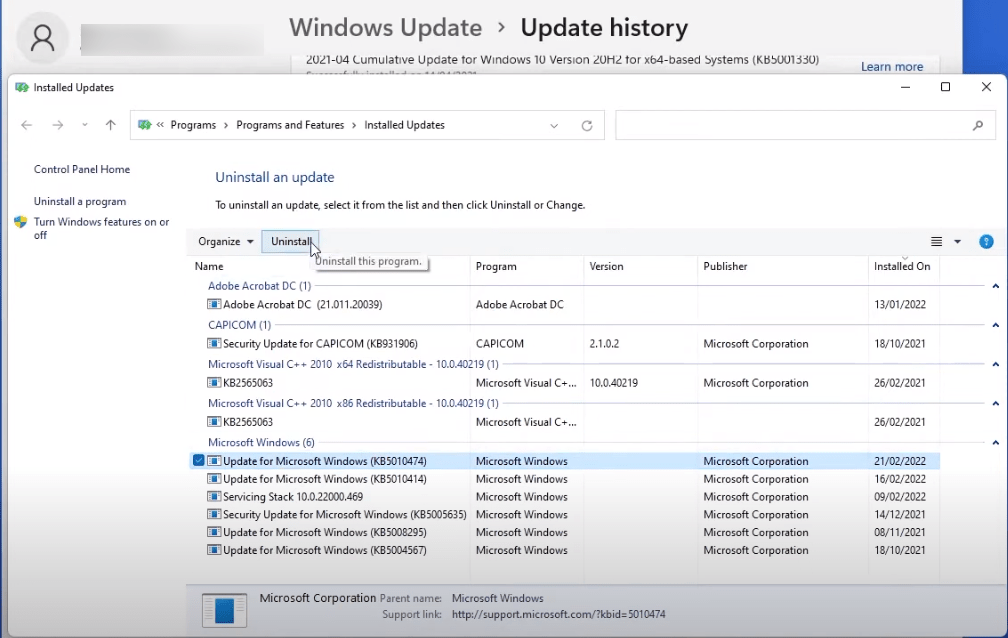
- You’ll find a list of updates that are installed on your computer. To delete one, pick it from the list and press Uninstall at the top.

2. Using Command Prompt
You can uninstall a Windows update if you know how to use Command Prompt on your Windows computer. Just follow a few steps using some commands.
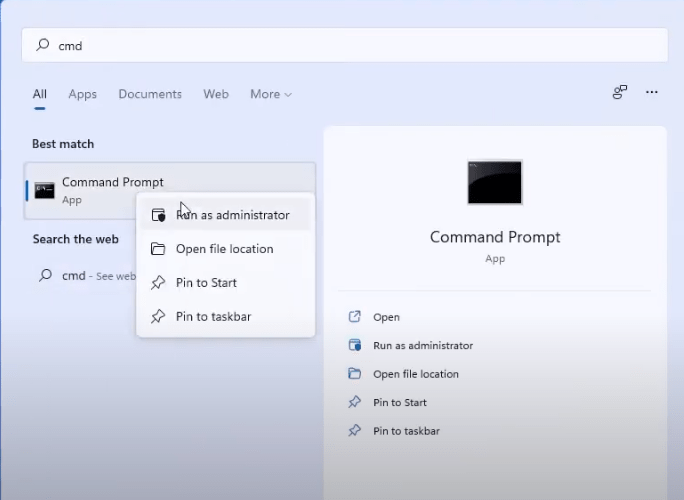
- Tap the search icon on the Taskbar, enter Command Prompt, and select Run as administrator.

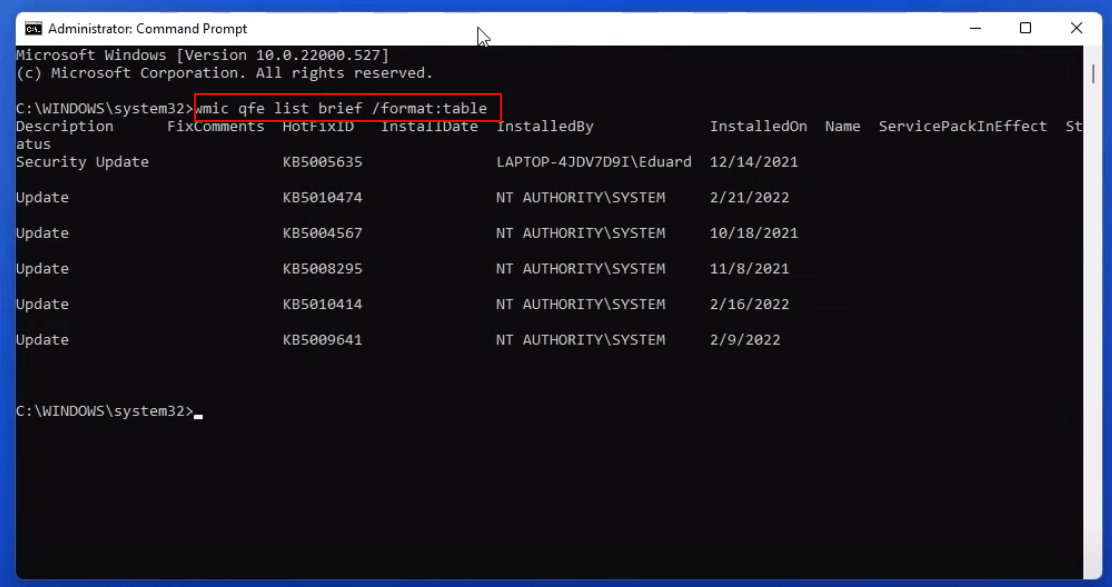
- In the command prompt, copy and paste the following command to see the history of Windows updates:
wmic qfe list brief /format:table

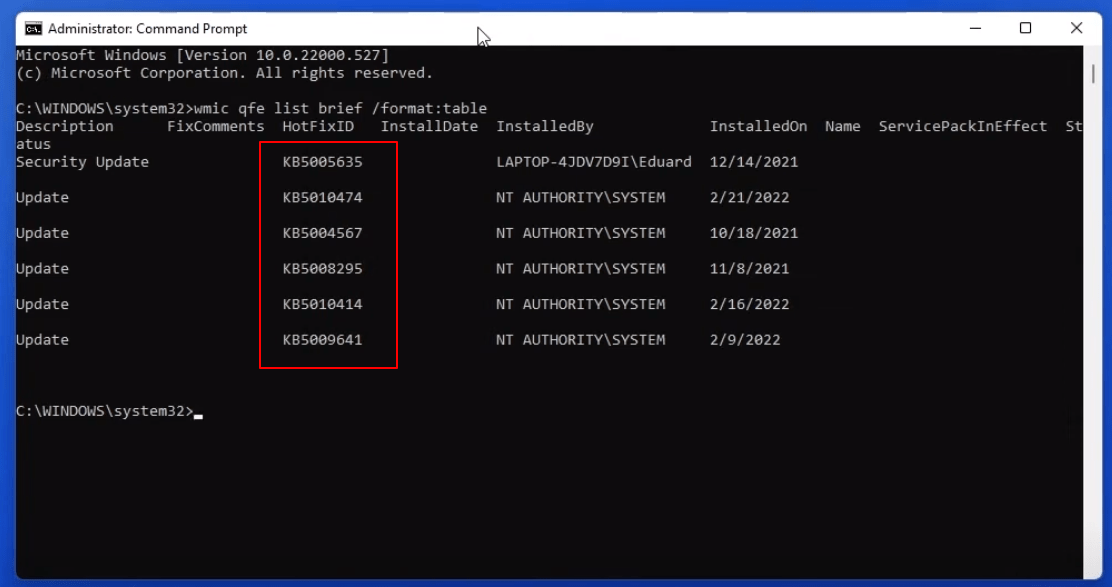
- Write down the KB number of the Windows update you want to delete.
- Execute the subsequent command to remove a Windows update:
wusa /uninstall /kb:number

Substitute ‘number‘ in the previous command with the KB number you see after applying the command in the prior step.
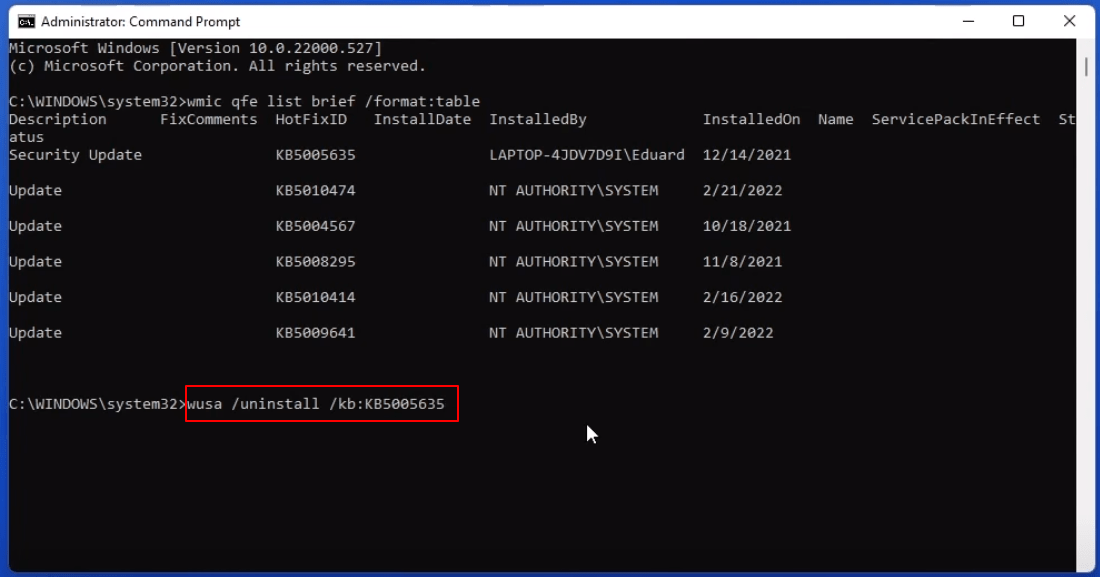
- Choose Yes to continue when the dialog box labeled ‘Windows Update Standalone Installer’ appears. Wait for a few minutes, and Windows will delete the indicated update.
3. Uninstall the Windows Update Using Windows Recovery Environment
Sometimes, when a Windows update doesn’t install correctly, it can mess up important computer parts. This might make Windows get stuck when starting up.
You must start your computer in a Windows Recovery Environment special mode to fix this. From there, you can remove the update that’s causing the problem. Let me show you how.
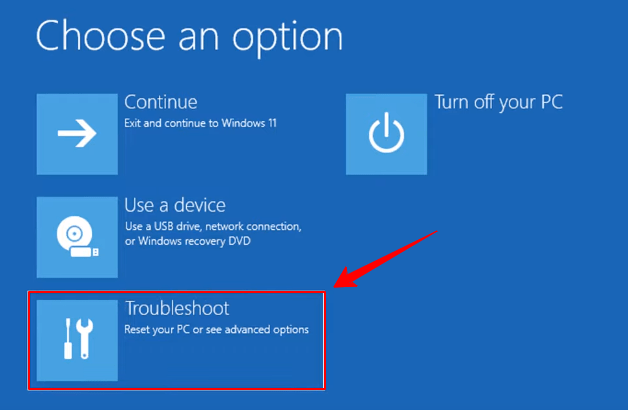
- Reboot your system while pressing and holding the left shift key. Maintain your fingers on the left shift key throughout the restart, not releasing it. This action will lead you to a menu called “Choose an option,” where we can uninstall the software.
- In the “Choose an option” section, select the Troubleshoot option.

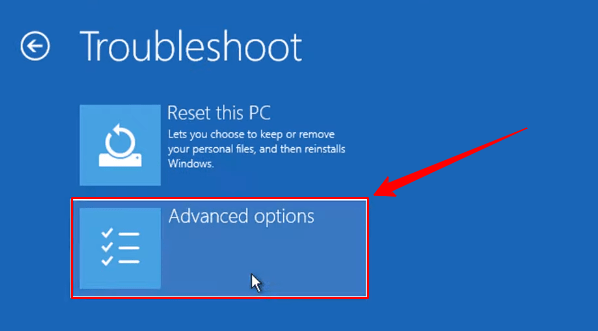
- Go to Advanced options.

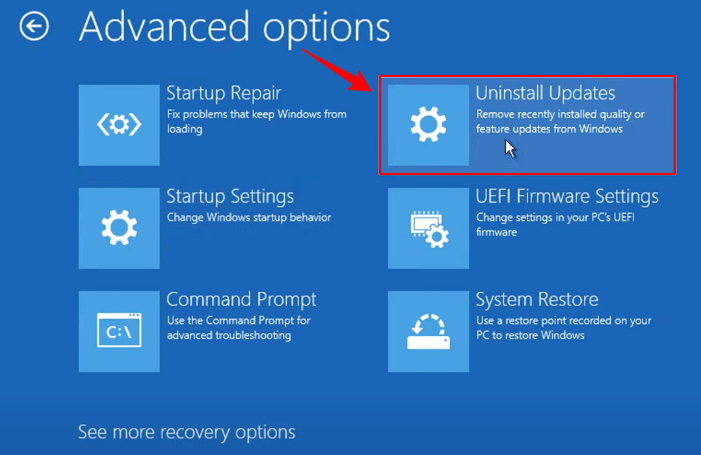
- Navigate to the Advanced options menu and select the option labeled Uninstall Updates.

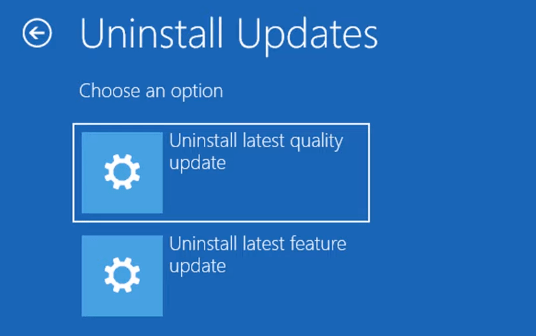
- You will come across two options: ‘Uninstall latest quality update’ and ‘Uninstall latest feature update.

- Choose the update you wish to remove, input your password to confirm your identity, and click the Continue option. Once you’ve uninstalled the update, Windows 11 will usually start up.
4. Use the Control Panel
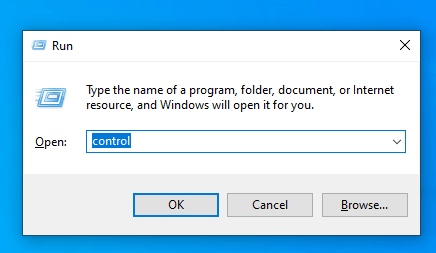
- Hold down the Windows key and press the letter ‘R’ to open the Run box. Then, type in ‘control‘ and hit Enter.

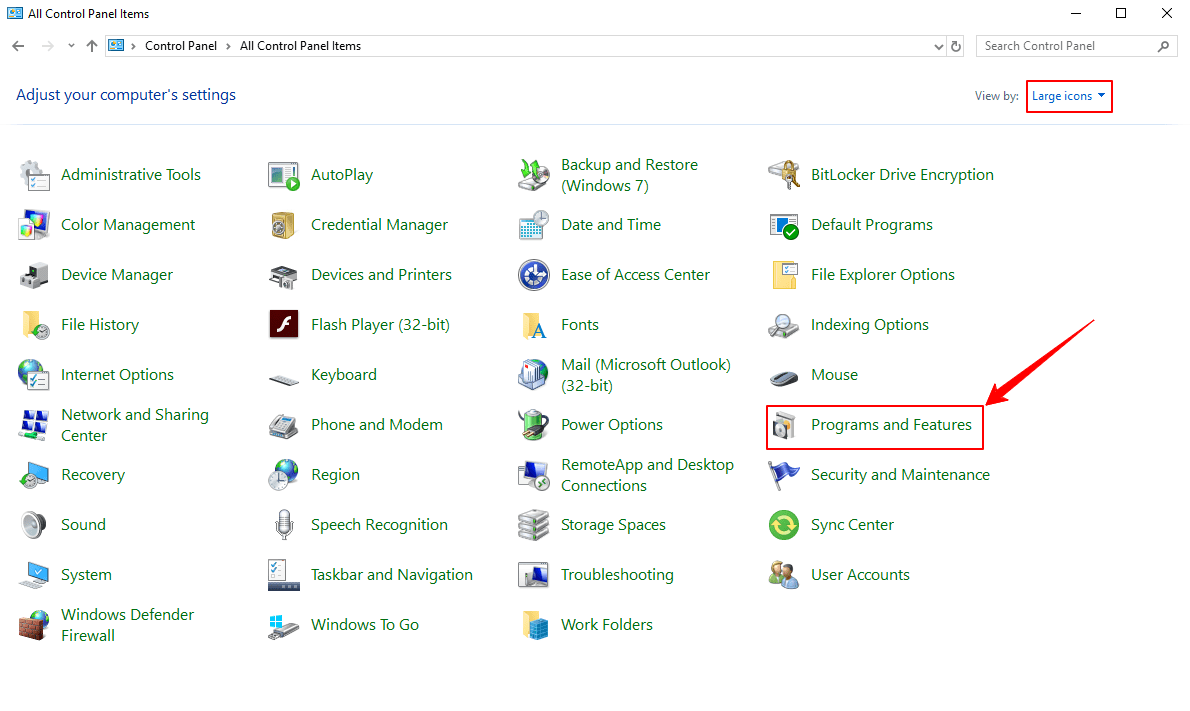
- In the upper right corner, use the dropdown menu to switch the view to Large icons. After that, navigate to Programs and Features.

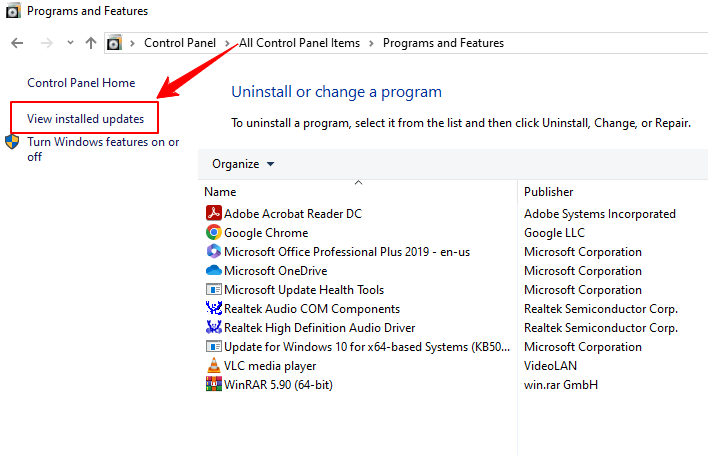
- Select “View installed updates” on the left side.

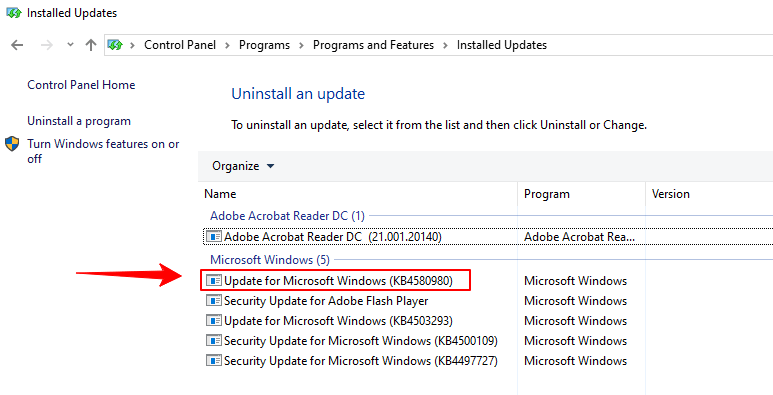
- If there’s an update you want to get rid of, just right-click on it and choose “Uninstall.” After that, click “Yes” to ensure you want to remove it.

Reasons to Uninstall Updates on Windows 11
Here are some of the reasons that can lead you to uninstall your Windows updates:
- Compatibility Issues: An update could result in compatibility issues with specific software or hardware elements, resulting in crashes or other related problems.
- Driver Problems: At times, updates may introduce fresh drivers that clash with current hardware drivers, leading to malfunctions or a decline in performance.
- Performance Degradation: Updates might result in performance challenges, like delayed boot times, heightened resource consumption, or decreased overall system responsiveness.
- Blue Screen Errors: Specific updates could bring instability, leading to frequent blue screen errors or system crashes.
- Network Connectivity Issues: Updates have the potential to create issues with network connectivity, resulting in internet connections that are either sluggish or unreliable.
- Battery Life Reduction: Updates could unintentionally reduce battery life for laptops and portable devices due to heightened power consumption.
Frequently Asked Questions
Is it safe to uninstall updates in Windows 11?
Yes, you can remove updates on Windows 11 via the Windows Update settings, by employing commands in Command Prompt or PowerShell, or by accessing the Advanced options recovery environment.
Can I uninstall Windows 11 after an update?
Yes, you can uninstall Windows 11 and revert to your previous operating system if you have upgraded from an earlier version of Windows.
When you upgrade to Windows 11, your system keeps a copy of your old operating system for a limited time, typically around 10 days. During this time, you can roll back to your previous version of Windows, whether it was Windows 10 or another version.
How do I manually uninstall Windows 11?
Access the Settings panel and scroll until you see the Recovery section on the right-hand side. Proceed to click on Recovery.
As the Recovery menu emerges, you will be presented with an array of System Settings alternatives. Identify and opt for the Go Back option within the Recovery section to return the operating system to its previous state of Windows 10.
Why is Windows 11 so slow?
Numerous elements play a role in this, such as excessive background tasks, automated updates, non-essential third-party functions, improperly set notifications, and privacy configuration.
Similarly, neglecting to remove unnecessary files or improperly adjusting power management preferences can also result in decreased device speed.
Conclusion
Being familiar with the process of uninstalling a Windows update can be valuable when you’re dealing with Windows-related issues. The above methods provide practical ways to remove a Windows update when needed.
If you've any thoughts on How to Roll Back Updates on Windows 11?, then feel free to drop in below comment box. Also, please subscribe to our DigitBin YouTube channel for videos tutorials. Cheers!

