Are you encountering the “Error in WSClient.dll Missing Entry: RefreshBannedAppsList” pop-up on Windows? This message usually appears when you boot up your PC and is commonly seen on Windows 10 and 11. In this guide, you can find useful troubleshooting tips to fix the problem.
Normally, this WSClient.dll Missing Error on startup happens due to various reasons. The primary one of that can be the Windows version currently running on your PC. There may be serious bugs on it that may need fixing. Along with that, the presence of corrupt system files or a cache filled with junk data can trigger the WSClient.dll Missing Error on startup.
Corrupted installation of applications and de-registered WSclient.DLL files are often attributed to the theWSClient.dll Missing error on Windows 11. Network inconsistency issues related to the DNS can also cause the Error in WSClient.dll Missing entry: RefreshBannedAppsList warning to show post bootup.
Top Ways to Fix WSClient.dll Missing Error on Startup in Windows 11
Let us begin with the troubleshooting. The WSClient.dll Missing error can be temporarily averted by clicking OK on the pop-up whenever it shows up. Strangely, when you restart the PC next time, the error pop-up will appear again. So, it should be tackled duly with proper technical fixes.
1. Update the Windows to the Latest Build
Always make sure that your PC is running on the latest build of Windows OS. Microsoft regularly drops software updates to optimize performance and fix bugs in the system. Do not miss out on these updates.
- Go to the settings of your PC by pressing Windows +I.
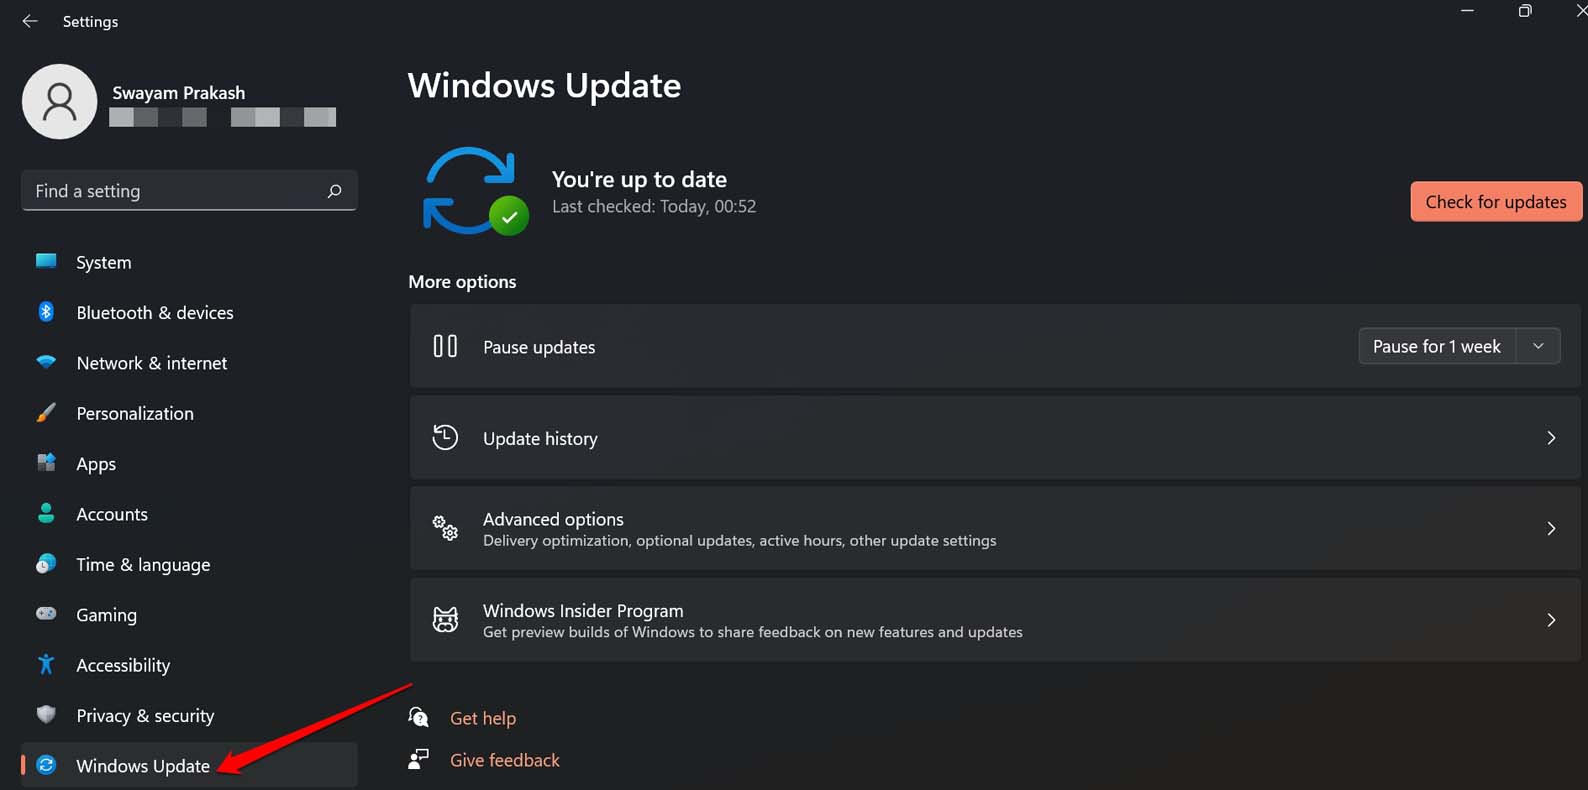
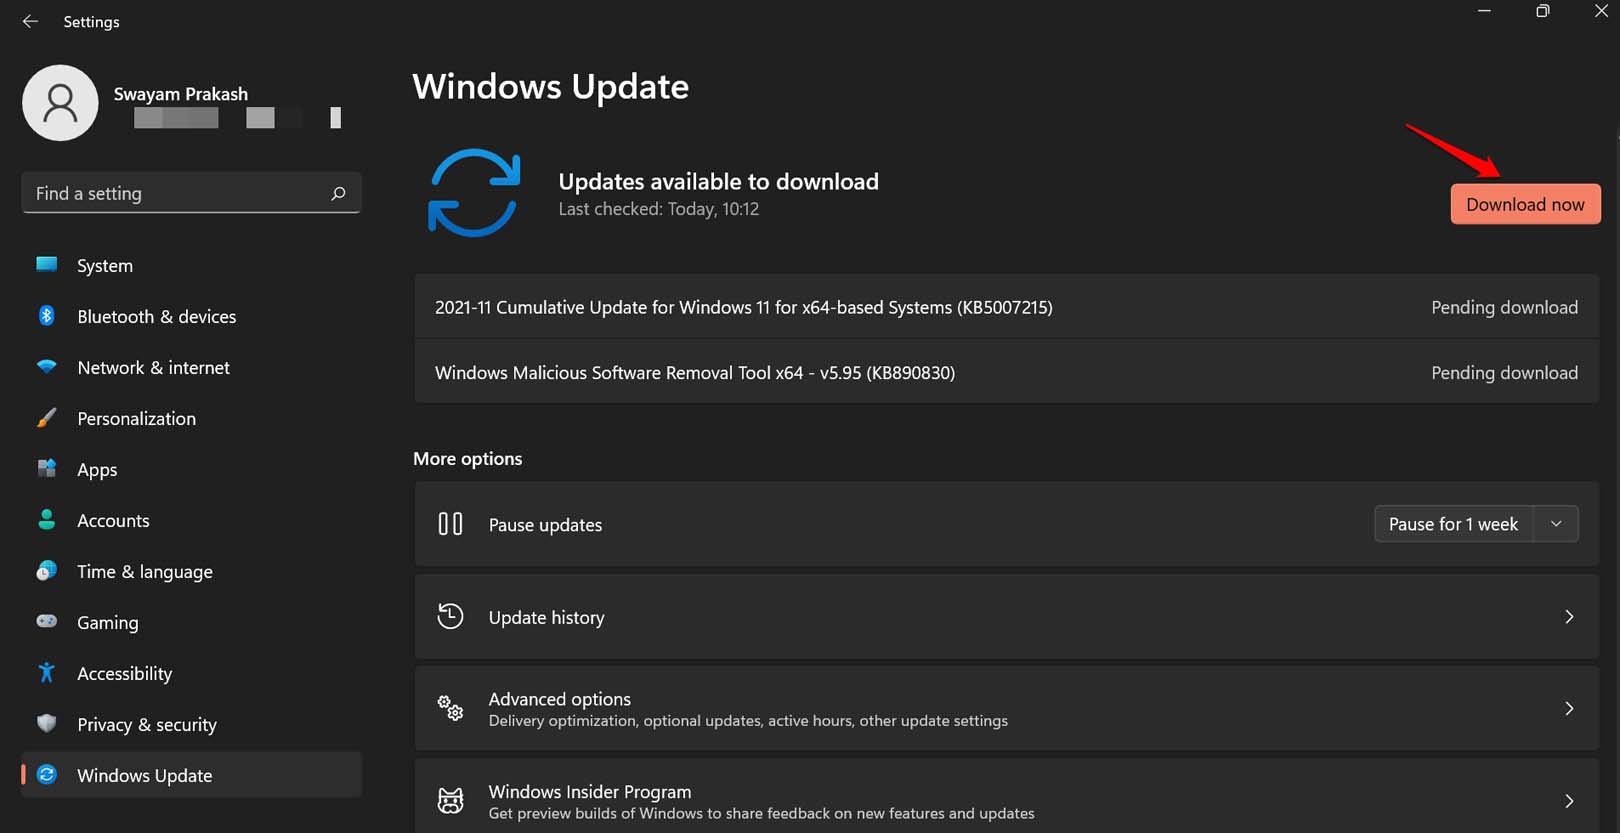
- Click on the Windows Update tab which you can see on the left-hand panel.

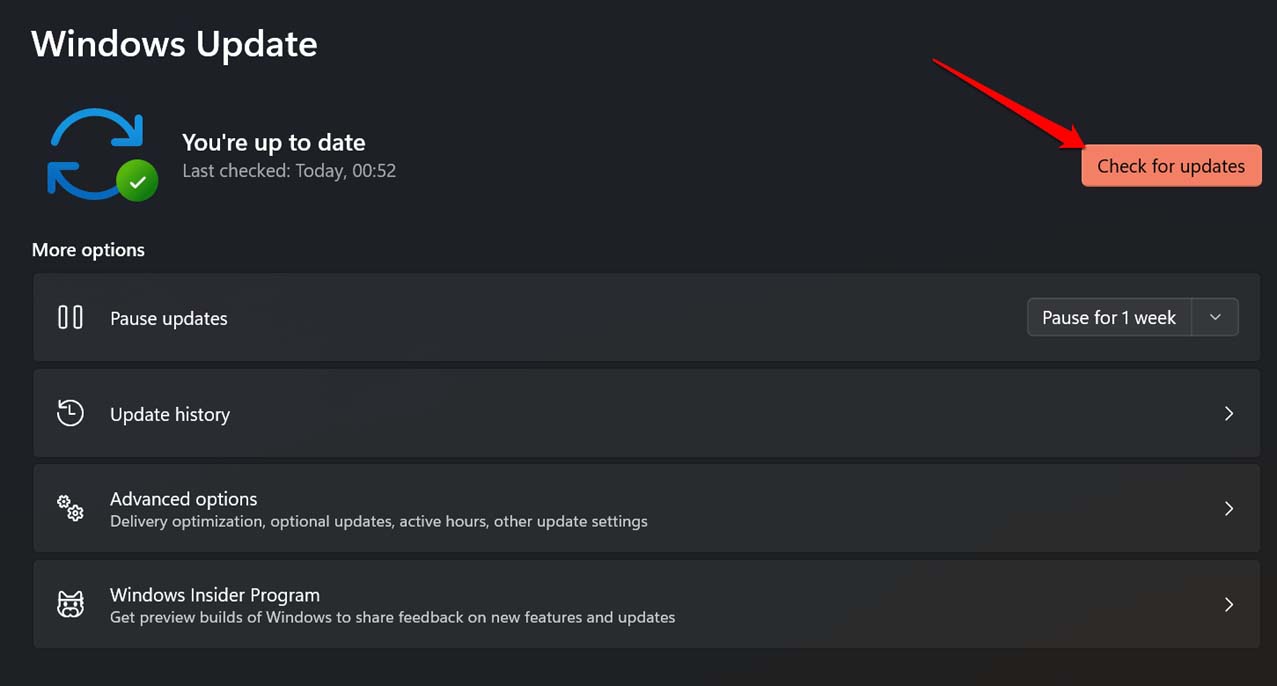
- Then click on Check for Updates.

- If a new build of Windows OS is available, click on Download Now to start the download and installation.

With bugs fixed on the new operating system, you should not encounter the WSClient.dll Missing error at the startup.
2. Uninstall Suspicious Apps from the PC
Often when you install an app, a secondary app may also get installed with it. This problem mostly arises when you visit untrusted websites and download some apps from these sites. Due to malware or other technical incompatibilities, the secondary app causes various errors on Windows OS.
To deal with that, you must check through the Control Panel and uninstall the apps that you have installed unintentionally. You could also uninstall the apps you do not require at all.
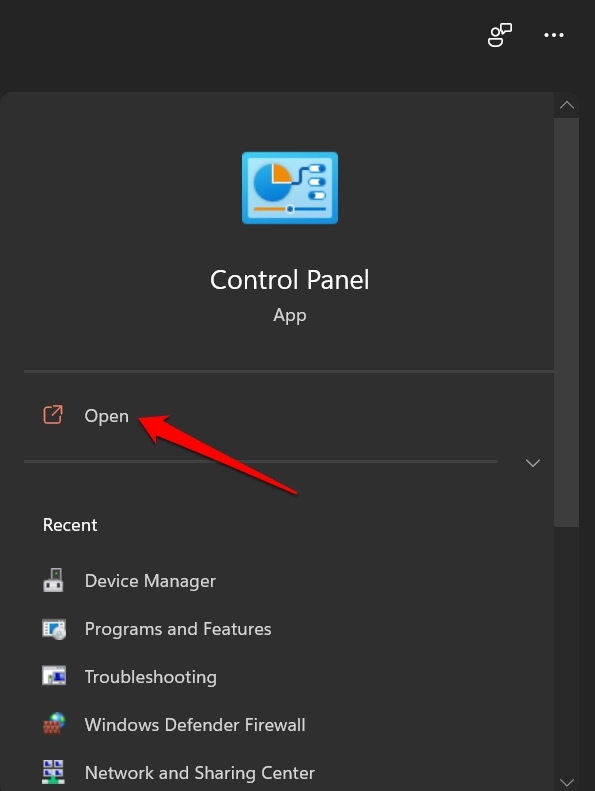
- Launch the Control Panel using Windows + S.

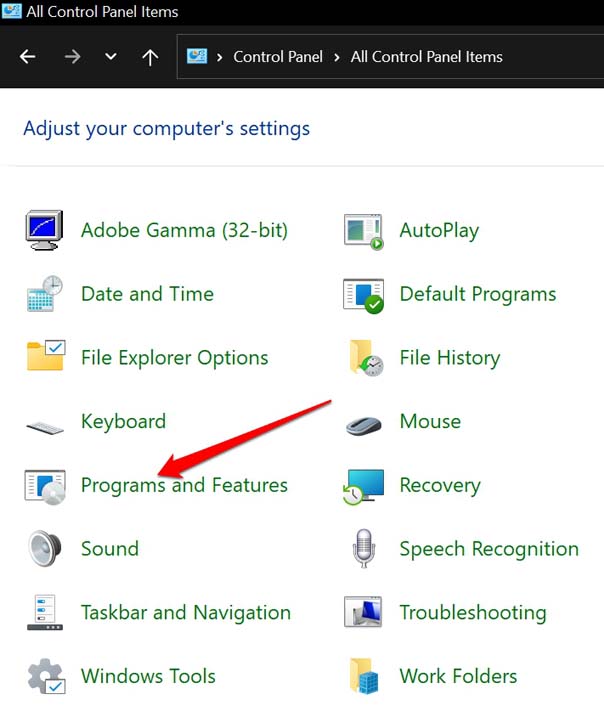
- Go to Programs and Features.

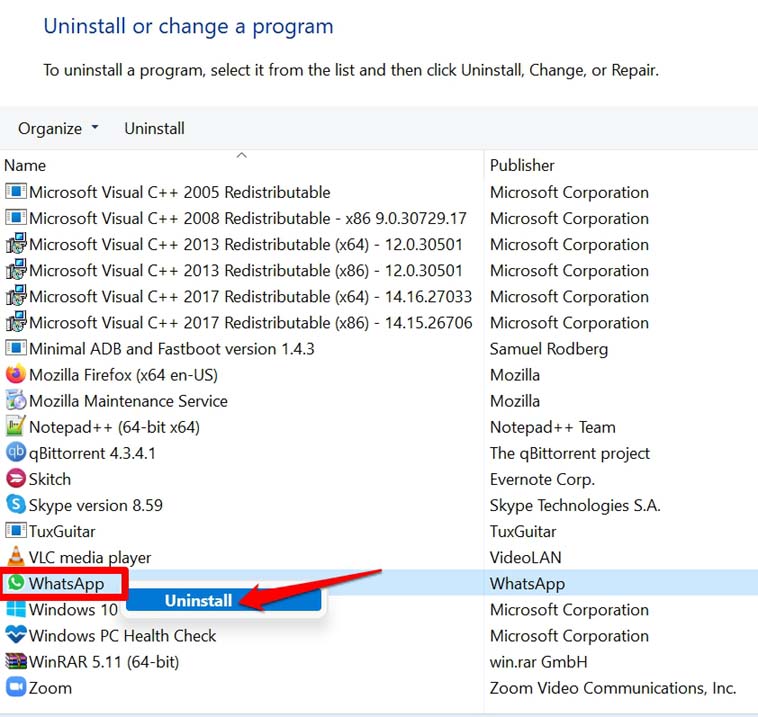
- Now, scroll through the list of installed programs.
- To uninstall any program, right-click on it and select Uninstall.

With faulty apps removed from the system, you should not encounter any error message pop-ups on your PC.
3. Fix the Corrupt System Files
System files can get corrupted due to malware attacks or due to a system update that was not installed properly. When that happens, other errors start to show up, and installed apps on the device become unresponsive or crash at times. Error messages also start appearing out of nowhere.
It is possible to fix the corrupt system files, and you can do that using the command prompt.
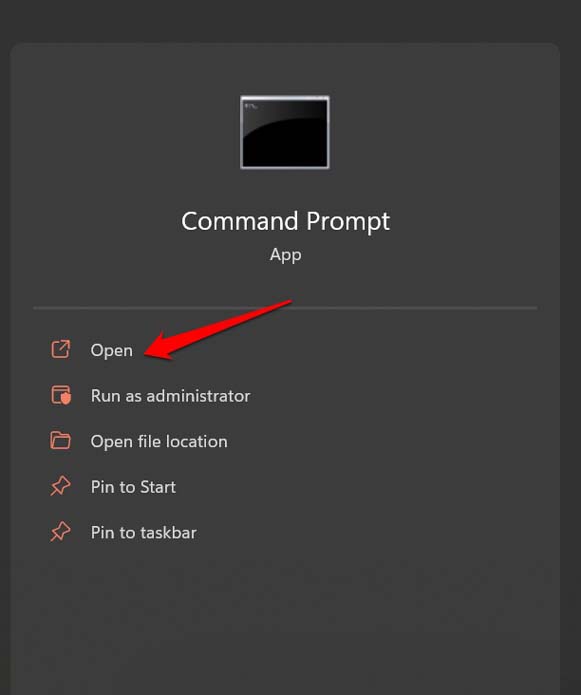
- Launch the Command Prompt.

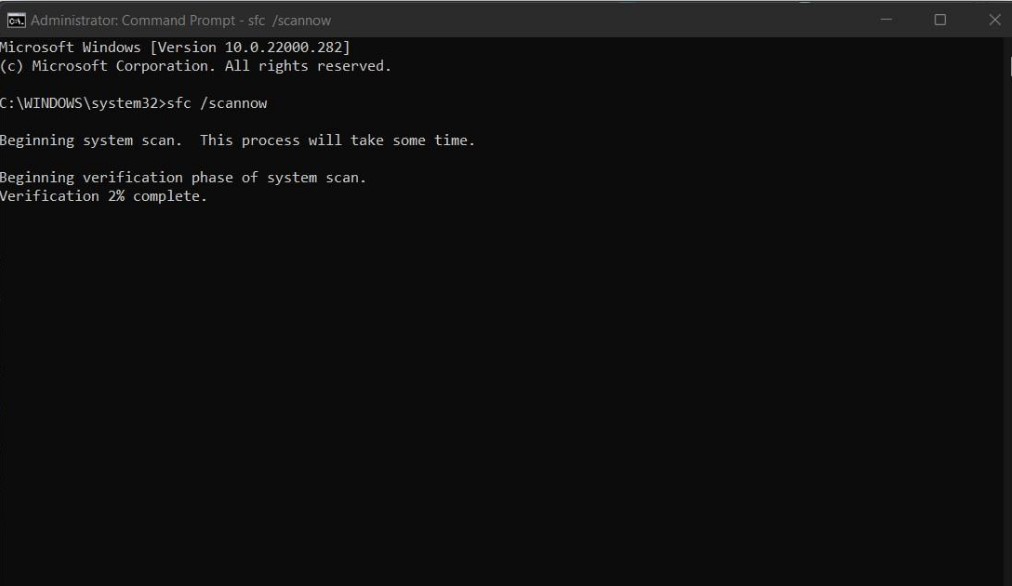
- Enter the command
sfc/ scannow

- Press enter.
It will start looking for possible corrupt files by scanning all protected system files on the computer. Next, the utility will attempt to repair any files that are found to be corrupted or damaged. If a file cannot be repaired, it will be replaced with a cached copy that is stored in a compressed folder located at %WinDir%\System32\dllcache.
4. Scan for Malware on your Windows PC
Often the presence of Malware can be a prominent cause of random error messages on Windows OS. On Windows 11 the malware addressing is significantly better as compared to Windows 10. Many users own PCs running Windows 10 that may not be upgradeable to Windows 11.
So, on an older build, there is much probability of a malware attack. It is always advised to regularly perform manual malware checks on the computer regardless of whether you are using Windows 10 or 11.
- Go to Windows search by pressing Windows + S hotkeys.
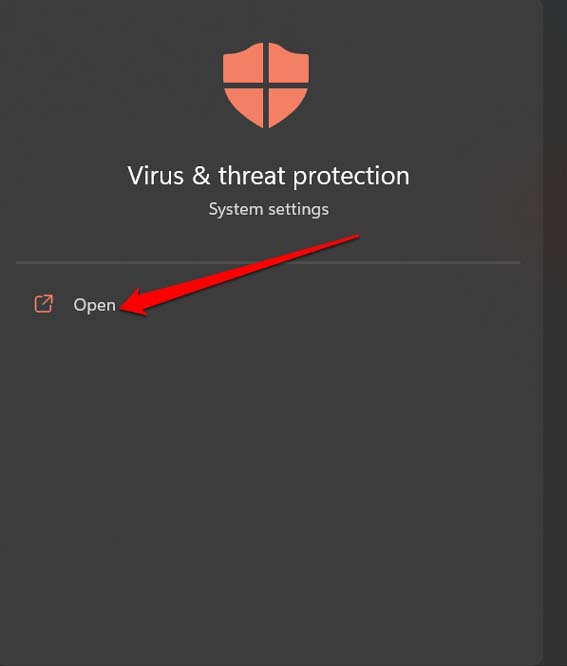
- Type Virus and Threat Protection in the search field.
- Click Open when the desired option shows up in the search result.

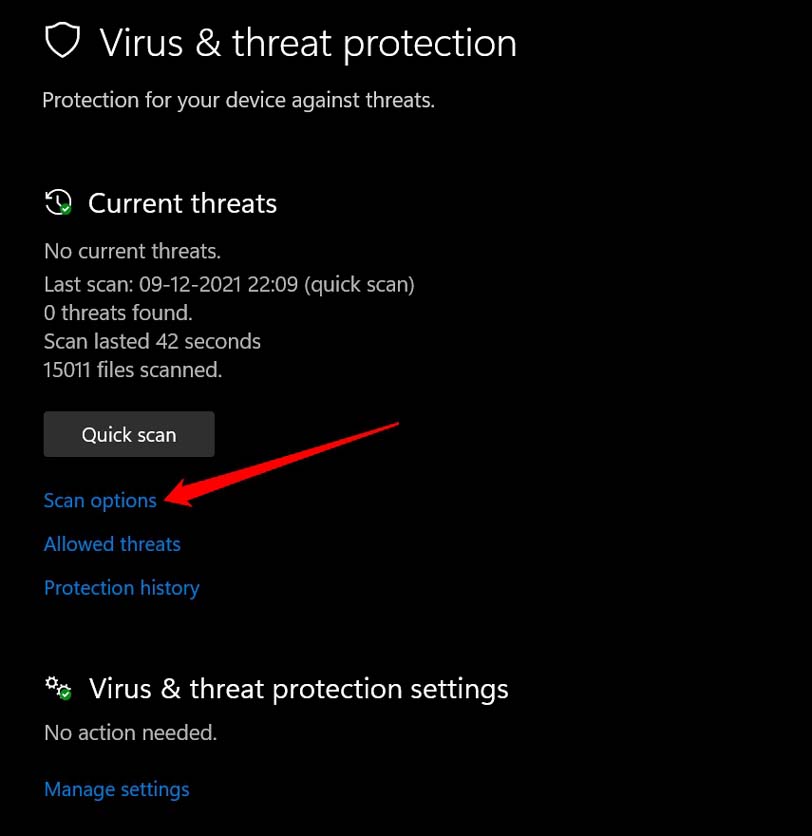
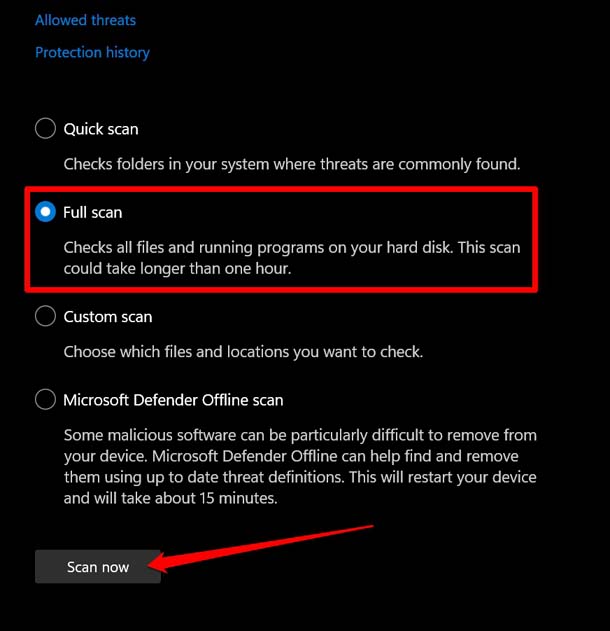
- Now, click on Scan Options.

- Set the option to Full Scan and click on Scan now.

Depending on the volume of files present on your PC, the malware scan will take time accordingly. During the search, if any malware is found, then immediately remove it. For that, you can follow the necessary instructions that you would see on the screen.
5. Use Command Prompt to Re-register the WSClient.dll
If the WSClient.dll has become corrupt, then it is necessary to de-register it and successively register it once again. When you register a DLL file, it enables Windows OS to know where to find the file and how to use it.
De-registering and registering the DLL file can be done from the Command Prompt.
- Launch the Command Prompt.

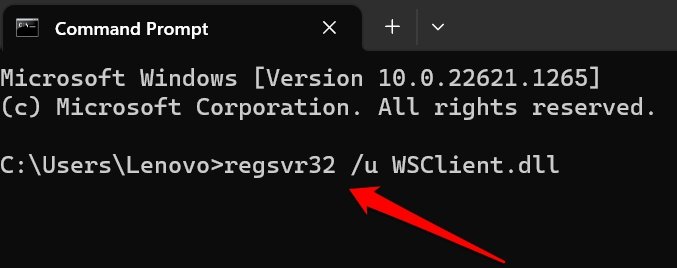
- Enter the command to unregister the DLL file
regsvr32 /u WSClient.dll

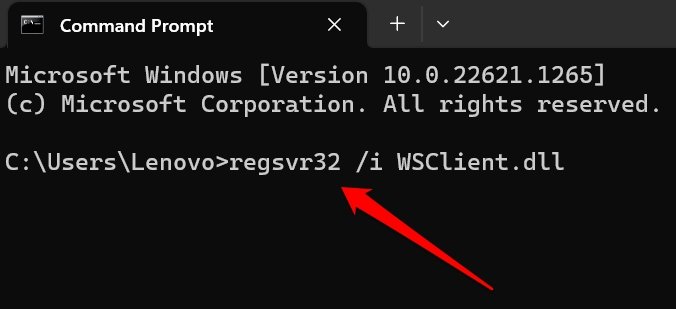
- To register the DLL file, enter the command below.
regsvr32 /i WSClient.dll

This should essentially fix the WSClient.dll Missing error on Windows.
6. Change the Default DNS to Google DNS
Inconsistent network issues are often addressed by changing the DNS to that of Google DNS. This is very effective troubleshooting to fix WSClient.dll Missing error on startup in Windows 11.
- Press Windows + R.
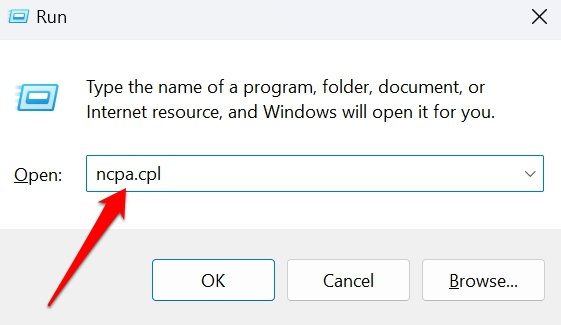
- In the Run box, type ncpa.cpl and press enter.

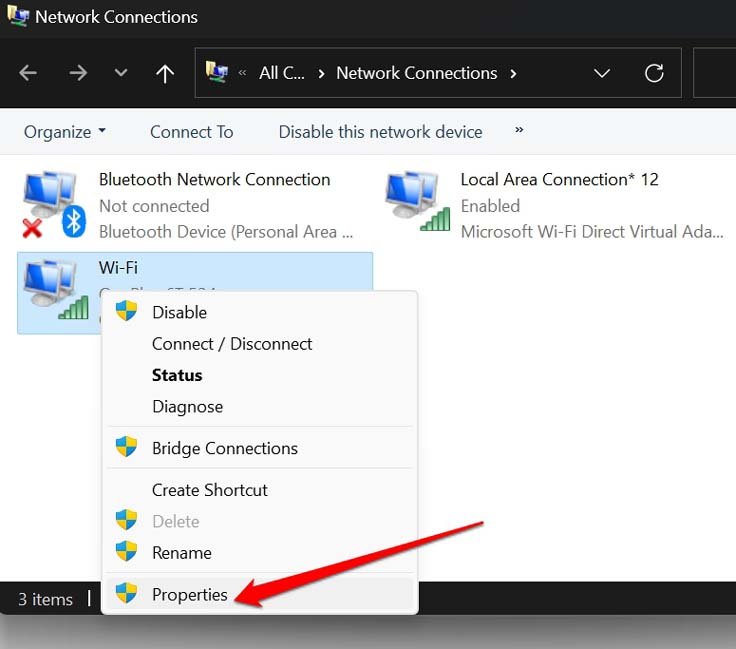
- The Network Connections page will appear.
- Right-click on your WiFi Network and select Properties from the menu.

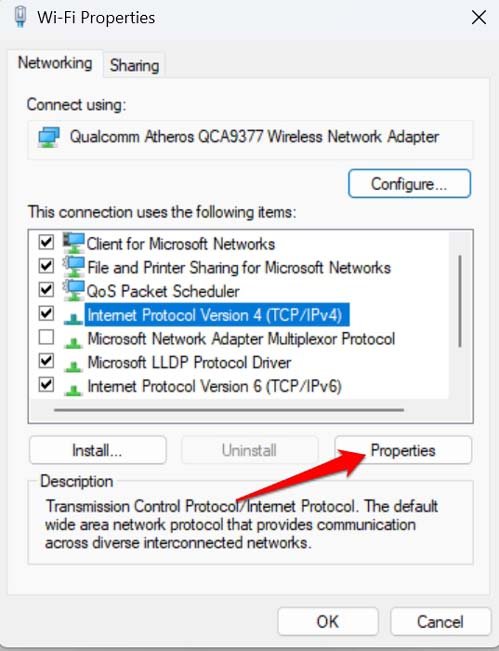
- Under the WiFi Properties dialog box, click on the tab Networking.
- Scroll to Internet Protocol Version 4(TCP/IPv4) and click on it to highlight it.
- Next, click on Properties [of Internet Protocol Version 4(TCP/IPv4) ]

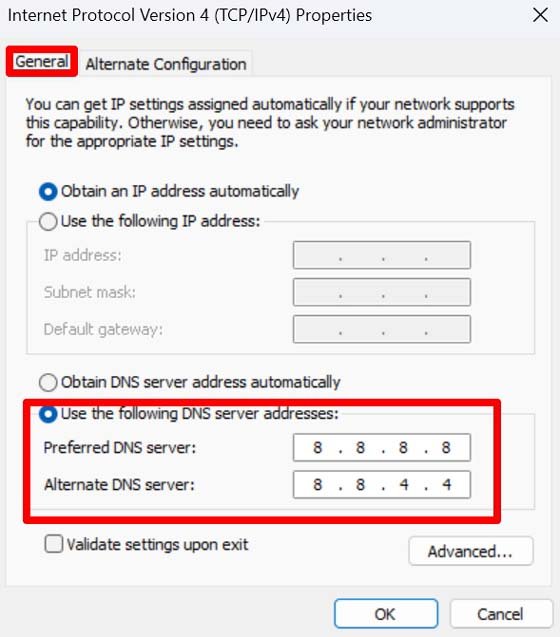
- Set the Preferred DNS to 8.8.8.8 and set the Alternate DNS to 8.8.4.4

- Go back to the Networking tab.
- Repeat steps 7 and 8 for Internet Protocol Version 6(TCP/IPv6)
- Once all the steps are done, reboot the computer.
7. Perform a Clean Boot
One of the most effective ways to deal with Windows startup problems and errors is to perform a clean boot. This causes the WIndows to start with only the necessary native apps and services. No third-party apps or services are initiated during boot-up.
If you see no error message during the clean boot, this confirms that there is a certain third-party app that is causing the WSClient.dll Missing error on startup. You can then one-by-one uninstall the various third-party apps to know which app it is that has been causing this error message.
Here are the steps to do a clean boot.
- Press the Windows key + R on your keyboard to open the Run dialog box.
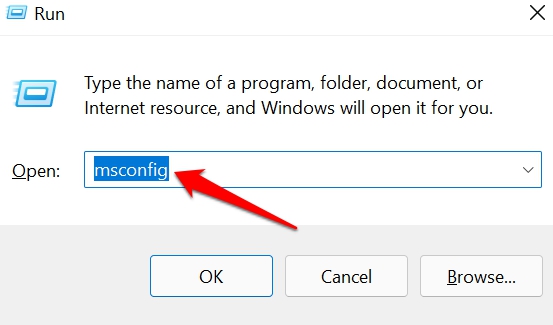
- Type msconfig into the Run dialog box and press Enter.

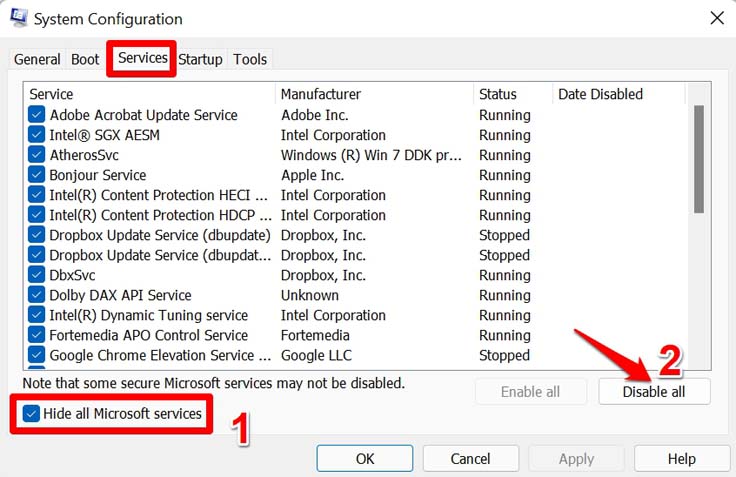
- In the System Configuration window, click on the Services tab.
- Check the box next to Hide all Microsoft services at the bottom of the window.
- Next, click on the Disable all button to disable all non-Microsoft services.

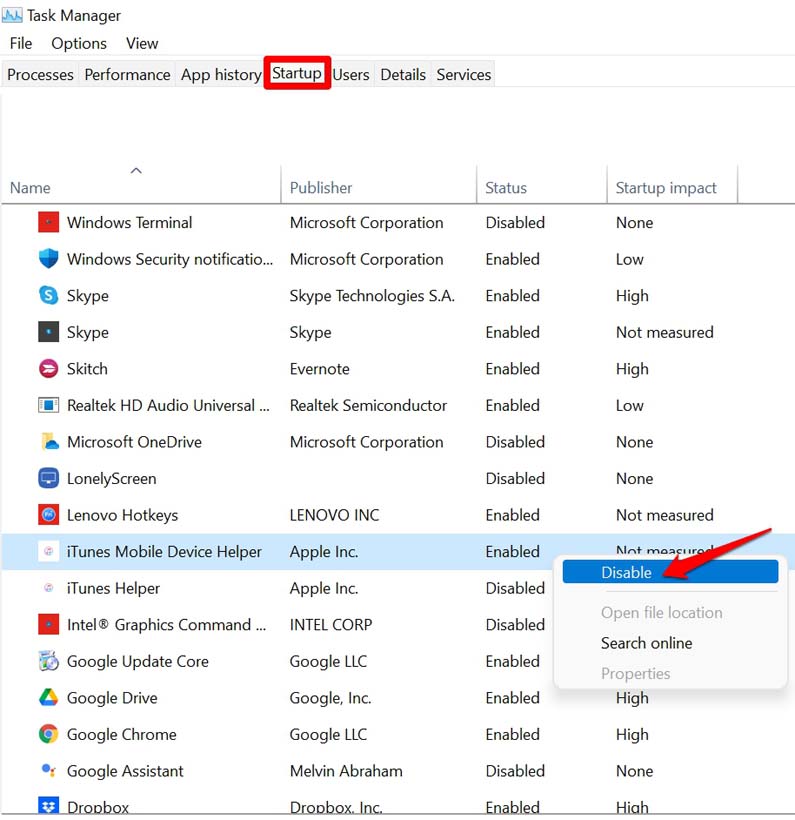
- Click on the Startup tab.
- Click on the Open Task Manager link.
- In the Task Manager window, select each startup item and click the Disable button.

- Close the Task Manager window.
- Click on the OK button in the System Configuration window.
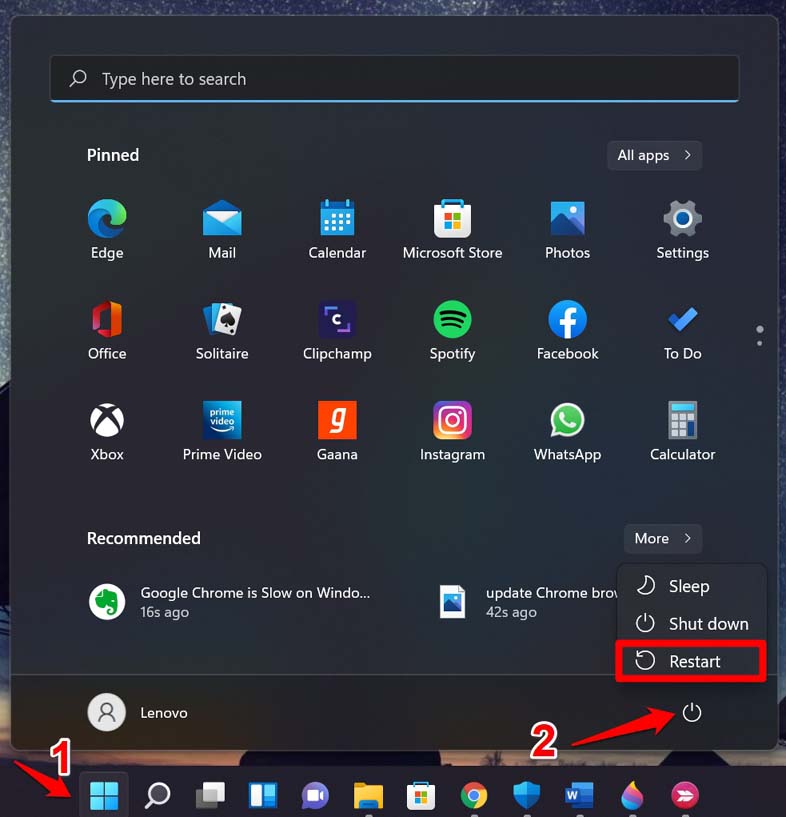
- Restart your computer.

8. Disable the “WSRefreshBannedAppsListTask” from Task Scheduler
The aforementioned task may call the WSClient DLL when a certain third-party app may be corrupt or there may be any corrupt system file messing up with the Windows. It is useful to access the Task Scheduler and terminate this task.
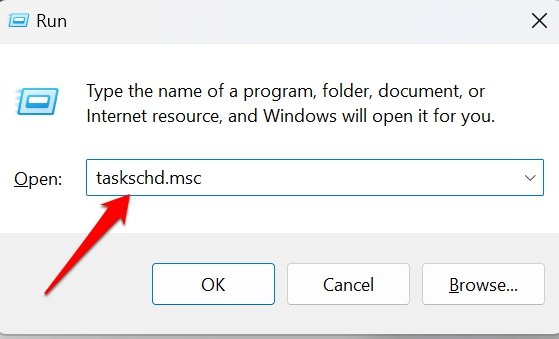
- Open the Run dialog box by pressing Windows + R.
- Then type taskschd.msc and press enter.

- Follow the path mentioned below.
Task Scheduler library > Microsoft > Windows > WS
- Right-click on WSRefreshBannedAppsListTask and select Disable.
- Close the Task Scheduler.
9. Reset the Windows Store Cache
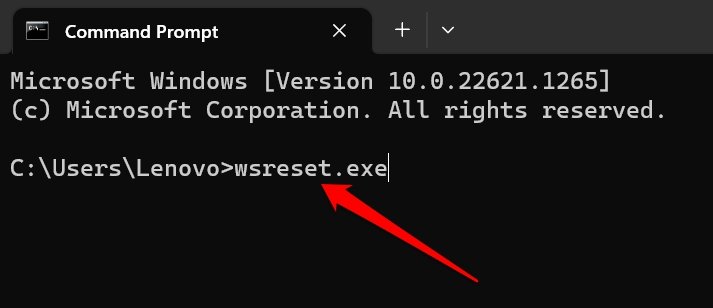
Lastly, you can reset the Windows store cache using the command prompt. Resetting the Windows Store cache clears the temporary files and data stored by the Microsoft Store app on your computer.
- Open the command prompt.

- Enter the command
wsreset.exe

- Press Enter.
Conclusion
I hope these troubleshooting tips will help you to resolve the WSClient.dll Missing error on startup in Windows 11. Users of all levels deserve a smooth user experience. So, remove the error messages on Windows OS promptly with the help of this guide.
If you've any thoughts on How to Fix WSClient.dll Missing Error on Startup in Windows 11?, then feel free to drop in below comment box. Also, please subscribe to our DigitBin YouTube channel for videos tutorials. Cheers!



![[4 Methods] Fix Origin Not Opening Error in Windows 11 2](https://cdn.digitbin.com/wp-content/uploads/fix-origin-wont-open-in-Windows-11-520x292.png)


