With various social media services and image hosting sites, online image sharing has become one of the easiest jobs on the internet today. Talking about image hosting sites, Imgur is another such name that has come to our radar lately. This online image hosting platform has earned massive popularity over a very limited period of time. And why not? After all, Imgur provides a very intuitive web page interface containing some significant features that hold engagement over the platform.
For instance, you can upload your pictures on Imgur with just a click. It also allows you to edit images, comment on others’ images, and so on. Imgur certainly has this fun feature that allows you to create memes on the platform which contributes to the engagement of the platform. Besides, one of the highlighted features of Imgur is that it lets you create albums, called imager. This further helps in identifying the images based on the categories making it an easier go for the users.
However, as we talk about creating an album on Imgur, many users are still unaware of this. So, to help you create an album on Imgur, we came up with a step-by-step tutorial that will guide you through.
Steps to Create an Album on Imgur
To create an album on Imgur, you will need an account. Imgur allows you to upload images anonymously, but you cannot create an album without having an account. So, make sure you have an account on Imgur, or else create a new one before moving on.
Well, now that you have your account set up, let us go and watch how we can create an album on Imgur.
- Firstly, visit www.imgur.com and log in to your account.
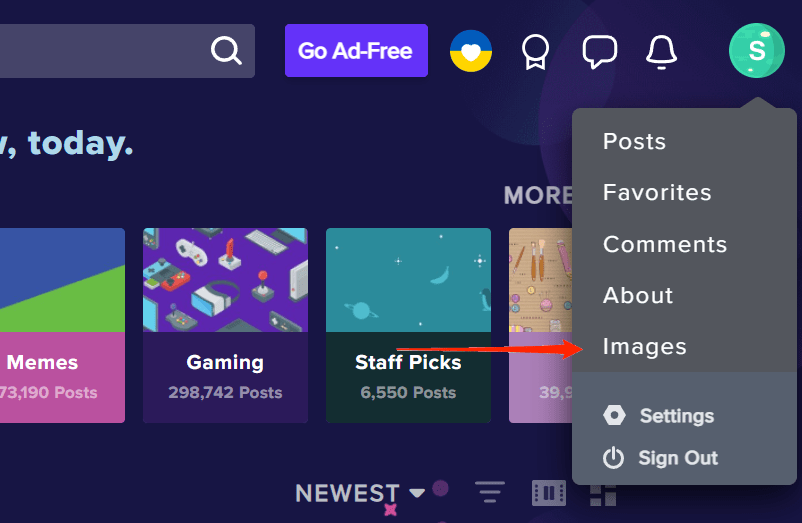
- Now, click on the profile icon in the top-right corner and select ‘Images’ from the drop-down menu.
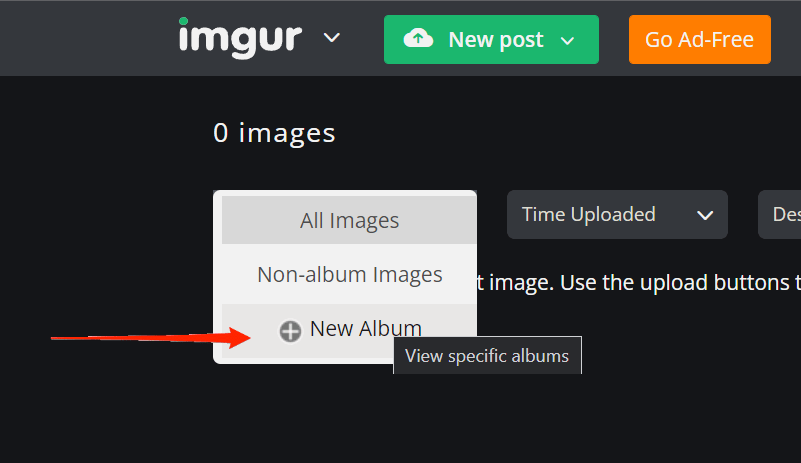
- This will open a new page. Click on the ‘All Images‘ option to display the other options from the drop-down menu and select ‘New Album’.
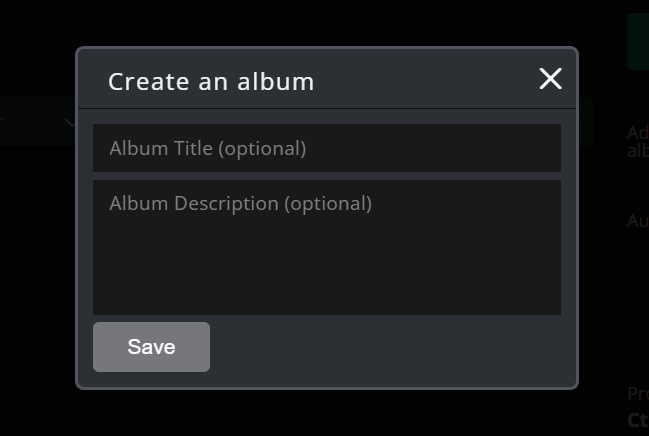
- Next, specify the title and description for the new album and click on the Save button.
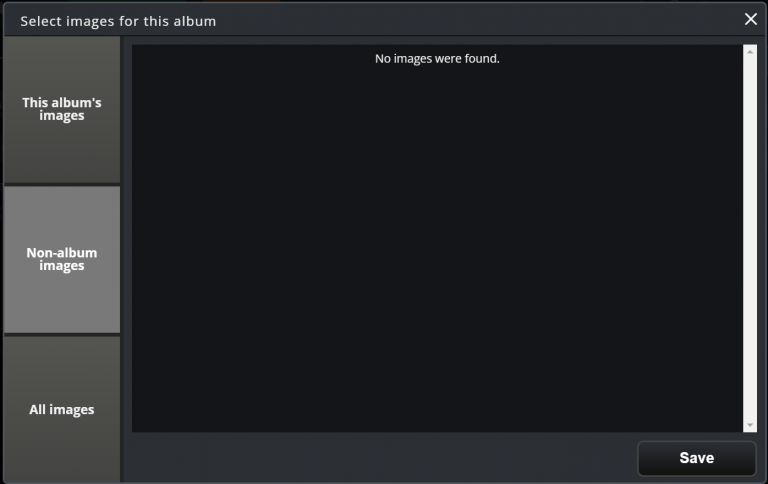
- Once it is done, you have successfully created your first album on Imgur. To add images, click on the Add Image option and make sure the specific album is selected instead of ‘All Images‘.

- Finally, you can select all the images from your Imgur account and save them to this Album for easier access in the future.
Wrap Up
As you have seen, creating a new album on Imgur is no big deal. All it takes is a few clicks here and there. However, the one point where users get confused is the lack of visibility of the options. Hopefully, if you follow all the steps carefully, you should not have any further problems in creating an album on Imgur and uploading images on it. Let us know if you have any other related queries in the comments below.
If you've any thoughts on How to Create an Album on Imgur?, then feel free to drop in below comment box. Also, please subscribe to our DigitBin YouTube channel for videos tutorials. Cheers!





1) Thank you for making this. I’m a programmer and web designer and couldn’t figure out for the life of me where the hell they put the new album button.
2) This is the stupidest, most unintuitive fucking place EVER to put a “make album” button. They have moved/changed how to make an album so many times that it took me MULTIPLE web pages before I found this one (which has accurate information as of 20220816 so thank you Rahul).
3) Why the hell would they not put a “new album” button on the ALBUMS PAGE??? This is seriously some of the worst web design I’ve ever seen in my life.