If there’s an email client that doesn’t need any introduction of any sort, it has to be the one from Google. The most used app in the Google Workspace, Gmail is among the oldest email service that houses the accounts of millions of users across the globe. This indeed is no easy job, even for the tech giants like Google.
And this could well be the reason why there are a few occasional hiccups while using this service, especially on smartphones. From the app just refusing to open to the inability of the emails to sync themselves, there could be quite a few issues that you might face.
Well, in all these scenarios, this tutorial shall come in handy. In this guide, we will make you aware of different methods to fix the Gmail App not working on Android devices. So without any further ado, let’s get started.
1. Check Gmail Server Status
First and foremost, make sure that Google’s servers are up and running. In recent times, there have been a few server-related issues with various Google Apps and services, including Gmail. To verify whether that is the case as of now or not, head over to the Google Workspace Status Dashboard and check out Gmail’s status.
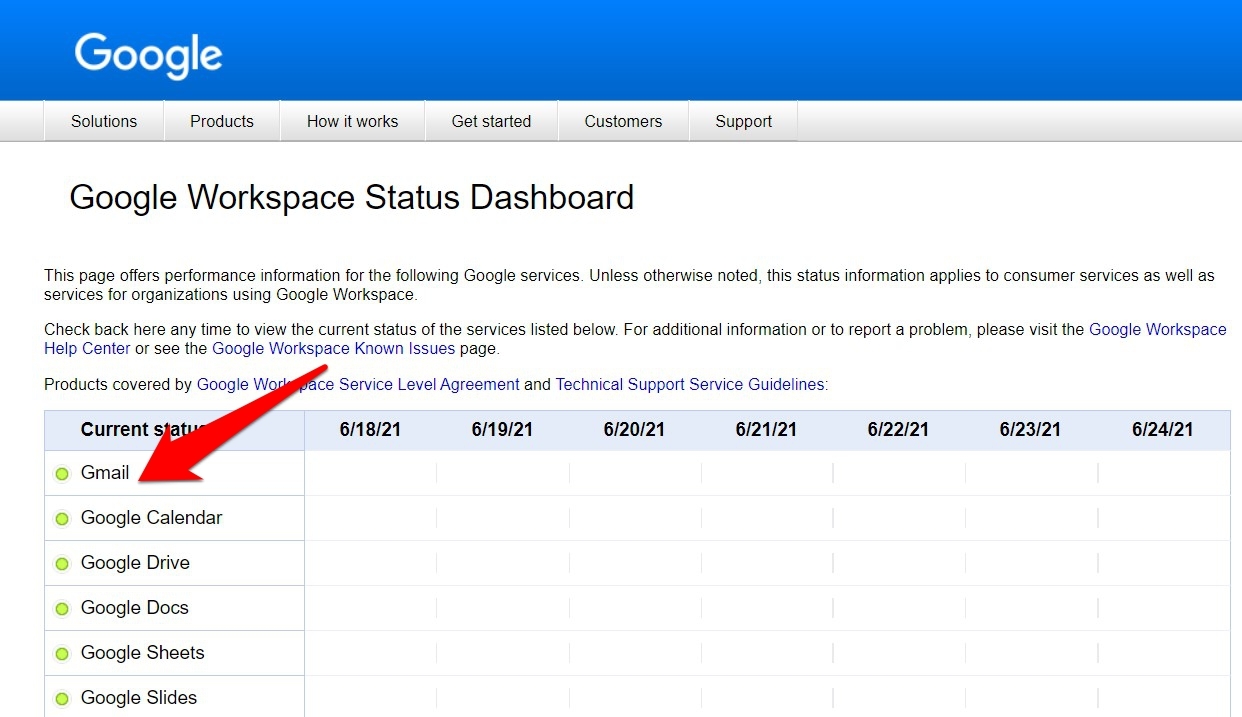
If it is showing a green light, then it’s all well and good from their end. However, in the case of orange or red lights, there’s a server issue. So all you could do is wait until Google rectifies it and this, in turn, will help you fix the Gmail app not working on Android devices.
2. Check Network Connectivity
It is no hidden secret that Gmail requires an active internet connection to carry out its functionalities. So double-check that you are having a strong internet connection.
You may also consider switching to your carrier data or sharing data via Hotspot. Try out these workarounds and see if they are able to fix the Gmail app not working on Android devices.
3. Restart and Re-Enable Gmail App
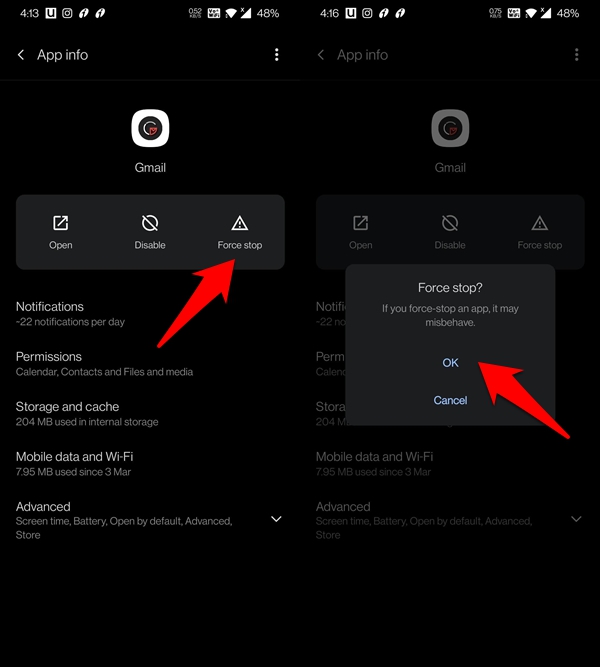
If any of Gmail’s background processes aren’t functioning along the expected lines, then it could directly affect the app’s foreground functionalities. So force stopping the app and then restarting it is one of the pretty straightforward approaches.
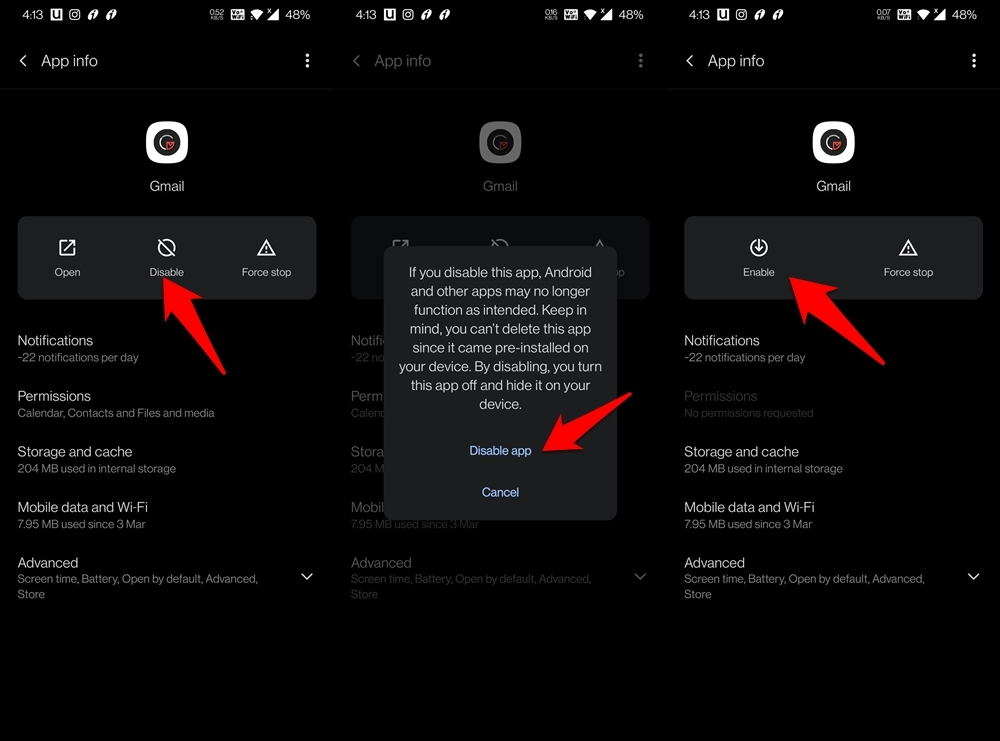
Along the same lines, you should consider disabling and then re-enabling Gmail. This will create a new instance for the app and it will then start from scratch. All these have been explained in the below steps, follow along:
- Head over to the Settings page on your device.
- Then go to Apps and Notifications > App Info.
- Scroll to the Gmail App and tap on Disable.

- Then tap on Disable App in the confirmation dialog box that appears.
- Wait for a few seconds, and then tap on Enable.
- After that, hit Force Stop > OK.

- Again, wait for a few seconds and let the app start its processes in the background.
- Finally, relaunch the app and check if it was able to fix the Gmail app not working on Android devices.
4. Perform a Manual Sync
If the app is functioning well and good, but there’s an issue with the syncing of emails, then you should consider performing manual sync.
- For that, head over to the Settings > Accounts page on your device.
- Then select your Google Account that is linked with Gmail.
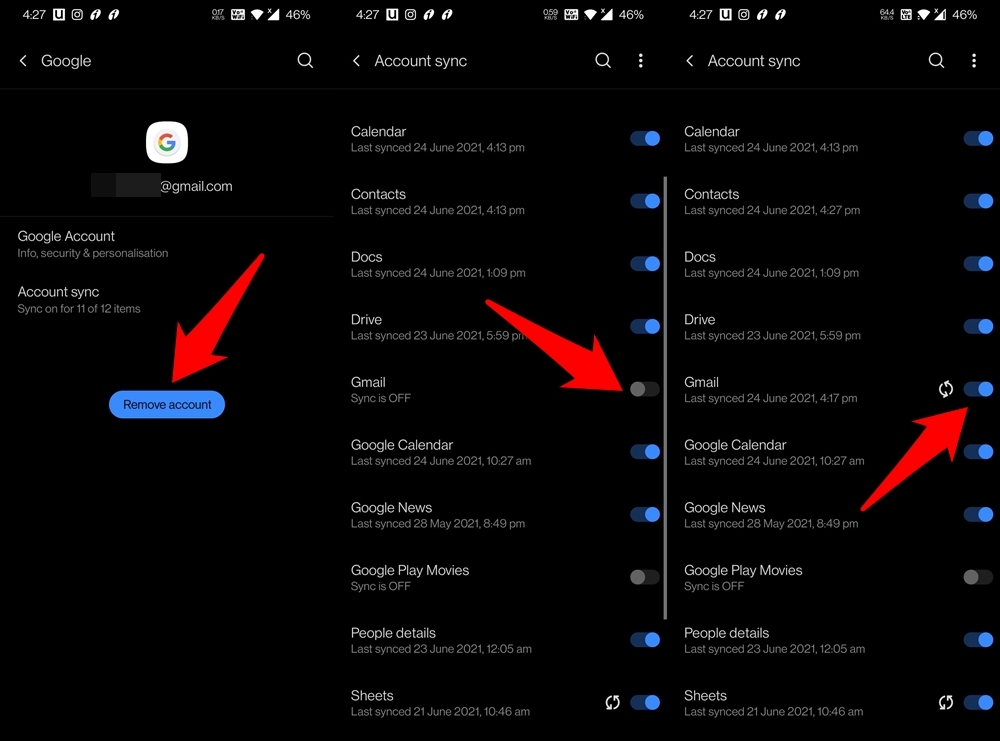
- Within that, tap on Account Sync and disable the toggle next to Gmail.

- Wait for a minute or two and then re-enable the toggle.
- The sync will start again and from now on, you will receive your emails without any delay.
5. Disable Battery Optimizations
Continuing with our last fix, issues with sync can also happen if you have any battery optimizations put in place. In order to preserve battery juice, this feature will disable most of the background activities, and disabling the sync feature is among its topmost priority.
To fix it, you have two options in hand: either perform manual sync each time or disable the battery-saver feature for the Gmail app. Since we have already discussed the first method, let’s turn our attention toward the latter one:
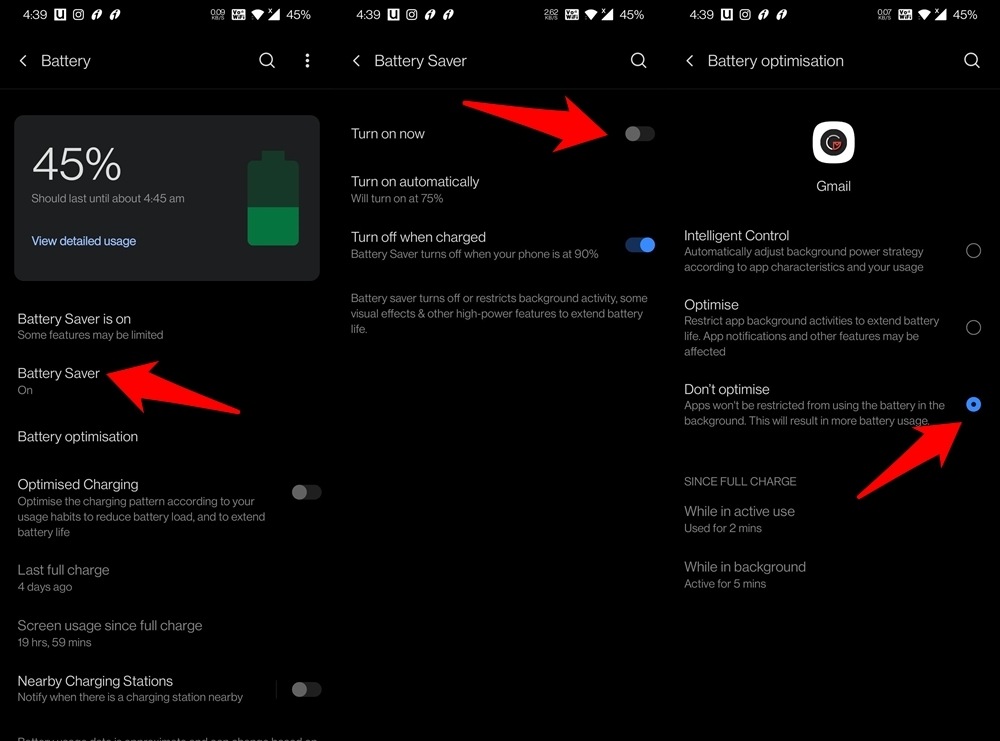
- Go to the Settings > Battery menu on your device.
- Then go to the Battery Saver option and turn it off.
- After that, head over to the Battery Optimization section.
- Scroll to the Gmail app and select Don’t Optimize.
Now try accessing your emails and check if were able to fix the Gmail app not working on Android devices. Do keep in mind that while Battery Optimization is a per-app feature, Battery Saver encapsulates the entire device. So any changes made to the latter will be reflected throughout the device.
6. Delete Gmail App Data
While all your email and its associated data are stored in the clouds, the Gmail app will still have its associated data stored on your device. And if it gets corrupted, then there’s every possibility of the app not being able to work as expected. Therefore, you should consider deleting Gmail’s app data and then letting it re-populate it from scratch.
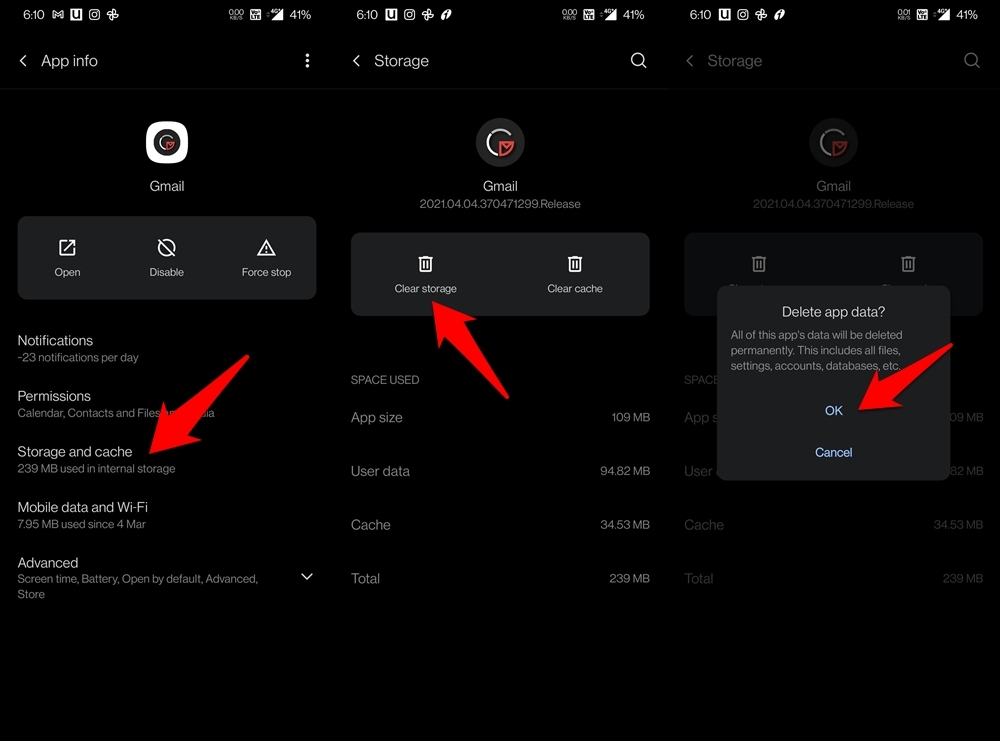
- So head over to Settings, followed by Apps and Notifications.
- Within that, go to App Info and select Gmail.
- Go to its Storage and Cache section, tap on Clear Storage > OK.
- Once the data has been deleted, launch the app and sign in with your Google account.
- Verify if it was able to fix the Gmail app not working on Android devices.
7. Remove and Re-Add Account
Many users were able to fix the issues with the Gmail app after removing the concerned Google account from their device and then adding them back in. This will result in fresh sync of all the Google apps, services, and frameworks and could well rectify the underlying Gmail issue as well.
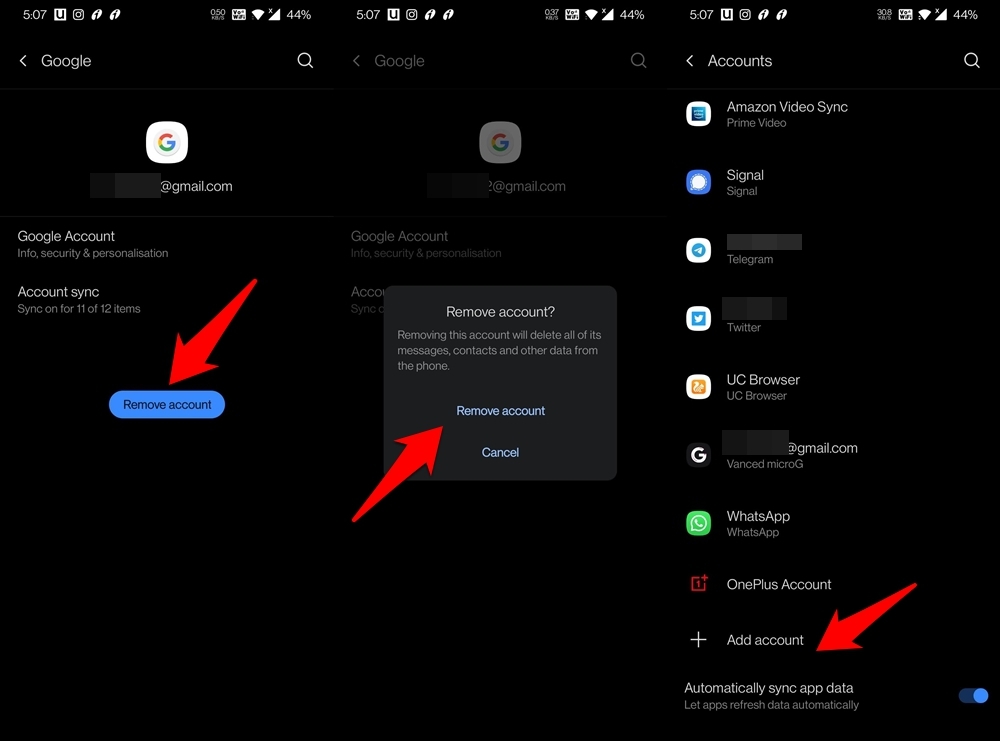
- So navigate to the Settings > Accounts page on your device.
- Select your Google account that is associated with Gmail.
- Then tap on the Remove Account button.
- Again tap on Remove Account in the confirmation window.
- Once that is done, go back to the Accounts page and scroll to the bottom.
- Tap on the Add Account option and proceed with the on-screen instructions to re-add your Google account.
After the account has been added, give it a few minutes for the sync to complete. Then launch the Gmail app and the issue would have been rectified.
8. Check the date and time
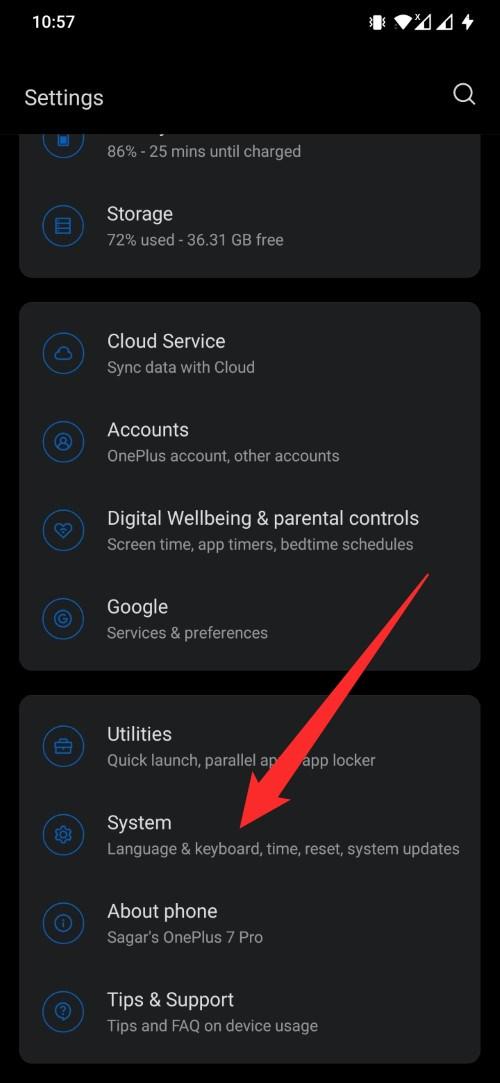
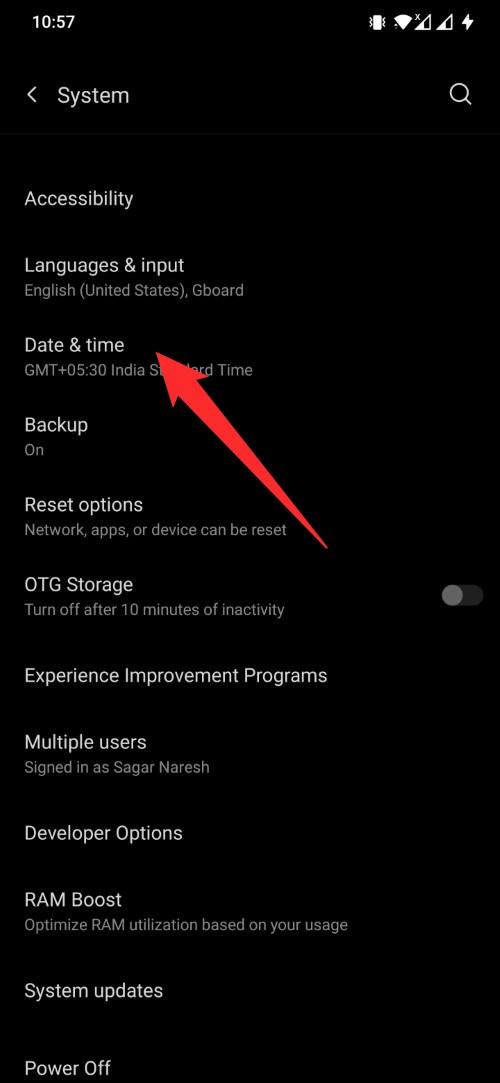
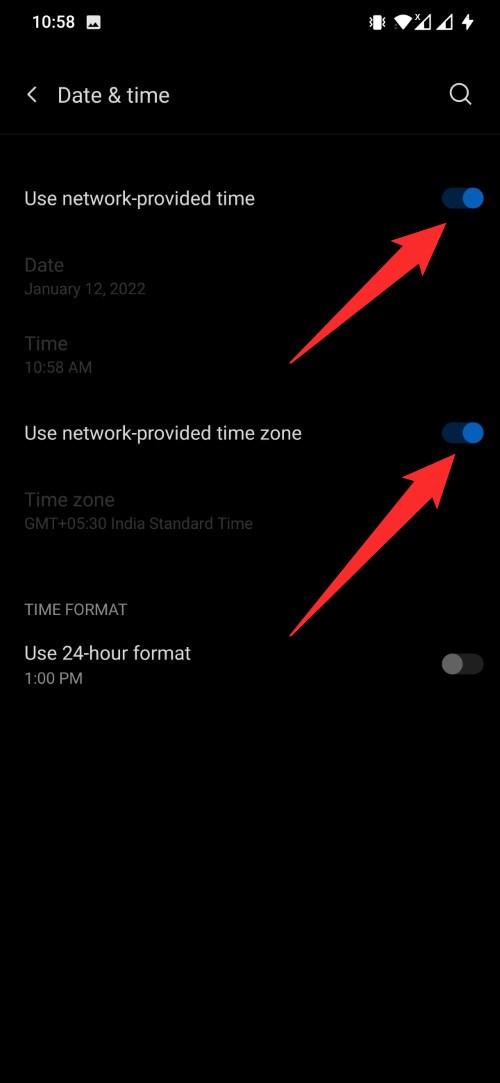
Another important setting that you need to check and set properly is the date and time of your system. The best way to do this here is to select the automatic date and time option. Here’s how you can do it.
- Open Settings.
- Scroll down and select System.

- Tap on Date & time.

- Select the Use network-provided time and Use the network-provided time-zone options.

- That’s it!
Conclusion
So with this, we conclude the guide on how you could fix the Gmail app not working on Android devices. We have shared seven different fixes for the same. Do let us know in the comments section which one worked out for you.
If you've any thoughts on Gmail App Not working on Android: Top Ways to Fix!, then feel free to drop in below comment box. Also, please subscribe to our DigitBin YouTube channel for videos tutorials. Cheers!
