Many users have reported that they were greeted with can not connect to RPC service? in Windows 11/10 machine. I faced the same problem on the Windows PC, and I solved it by following the official solution. Users have reported that the Realtek Audio Console is inaccessible due to the error. The users are not able to tweak the settings or change the options since the Audio Console is not opening. You have to fix the RPC service in the system, and I have shown you multiple ways to resolve it.
What causes RPC service to fail in Windows 10/11 PC?
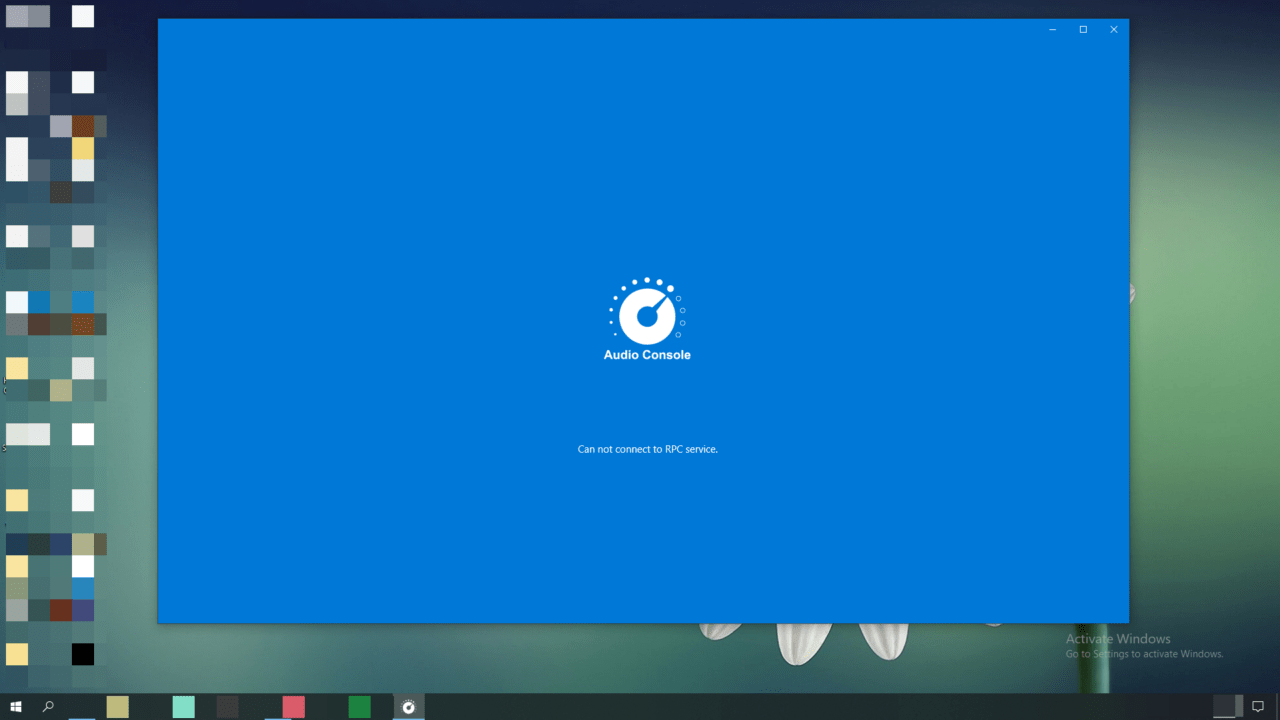
RPC full form is Realtek Procedure Call, and it’s an audio service. The Windows software runs several services in the background, and the audio chip is trying to communicate with the operating system to provide functionality. Allow me to give you a few reasons why the RPC service failed in the Windows machine, so you can prevent the Realtek Audio Console from failing again.
Windows Software Problem: Windows 11 is the latest software, and it’s going to take a few months for the operating system to reach stable status. I do recommend the users go back to Windows 10 and wait for another few months. Nonetheless, I have shown you a few solid solutions, and they will resolve the problem.
Outdated Driver: I have upgraded my laptop from Windows 10 to Windows 11, and the upgrade assistant is running on the old drivers. There is no doubt that the old Realtek drivers work in the newer software, but it cannot bring the best out of Windows 11. I will have shown you how to uninstall the audio drivers on the PC and reinstall the latest version on the machine.
Windows Malware: Unfortunately, Windows is the primary target for privacy invaders, and they have released over 100 million new malware pieces in 2021 alone. Your PC might be infected with the malware, and it is causing the services in the system to fail. Remove modified programs and Windows software in the system.
Corrupted Software: Windows software is corrupted, and you should validate the system files integrity. Of course, I got you covered below and showed you a tutorial on it. You should be able to fix the operating system in the machine, but the possibility decreases depending on the level of damages.
Windows Update: Millions have upgraded the Windows software to the latest version. Windows Update is taking up the challenge to find compatible drivers for the latest software, and they are installing the latest drivers automatically. The latest drivers might be unstable, and it’s a common problem. I will show you how to remove it and use the old drivers instead.
1. Reboot Windows PC
Shut down the Windows PC and turn it on after a minute.
Windows loads the services, drivers, startup applications, and other important files. Realtek Audio Console may get fixed, and the RPC service may communicate with the hardware in the PC.
2. Roll Back Audio Drivers
Windows might have updated the audio drivers in the PC, and you can restore the previous drivers. You can create a restore point in Windows 11 machine, and if something goes wrong, then you can revert the changes.
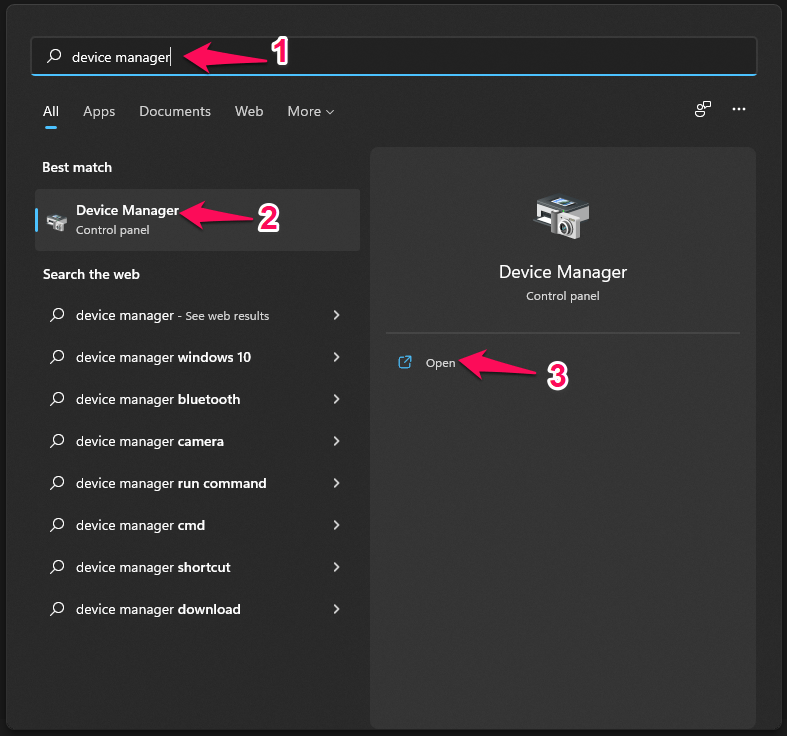
- Open “Device Manager” from the search bar.
- Click on “Sound, video, and game controllers” to reveal the options.
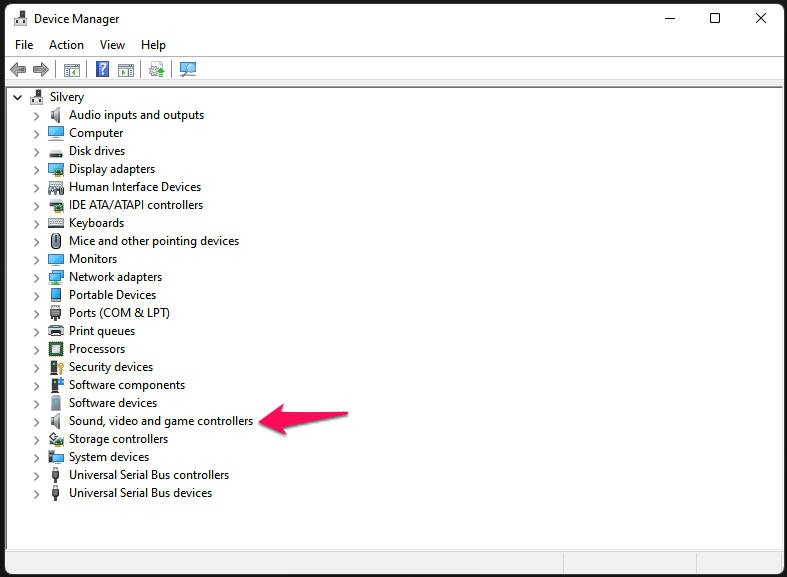
- Select “Realtek (R) Audio” then right-click the mouse to view more.
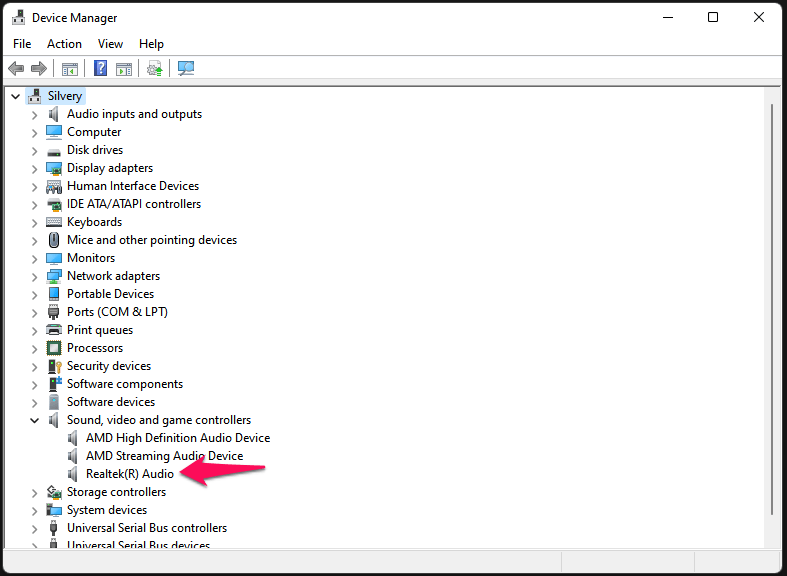
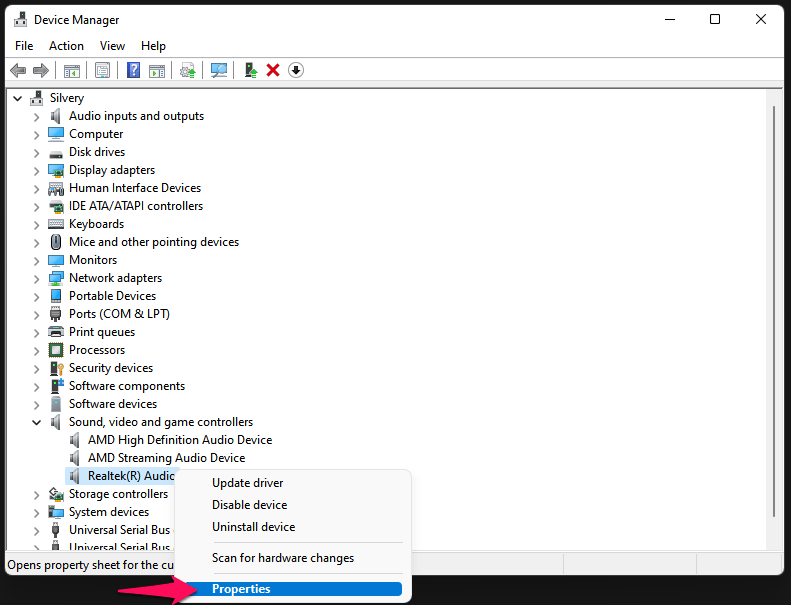
- Choose “Properties” from the options.
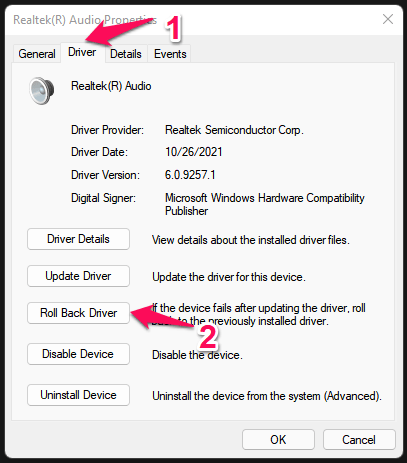
- Click on “Driver,” then select the “Roll Back Driver” option.
- A new pop-up appears on the screen; choose a valid reason, then click on “OK” to finish it.
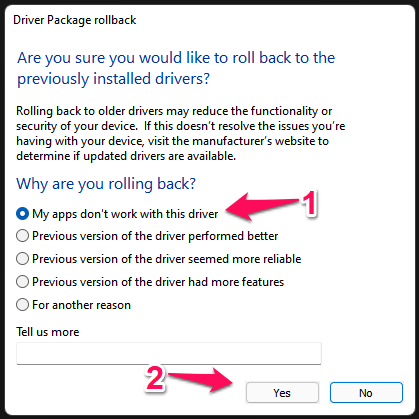
The audio driver removes the recent updates and rolls back the driver. Restart the Windows 11 PC and try to run Audio Console again.
3. The Ultimate Solution
I want to ignore the solutions that I have mentioned below and focus on the ultimate solution. I will show you how to download the Windows 11 compatible audio drivers from the official site, uninstall the existing audio drivers from the machine then reinstall them.
Step #1: Download Audio Drivers from the Official Site
Your laptop drivers are available on the manufacturer’s site. Pre-build desktops have the drivers on the seller page or manufacturer page. I have an assembled Windows gaming machine and you can download the latest drivers from the motherboard manufacturer site. Let me show you the way and save Windows-compatible drivers.
- Open the browser and search for the motherboard page.
- Type the motherboard/laptop model number/pre-build desktop model number and open the official site page.
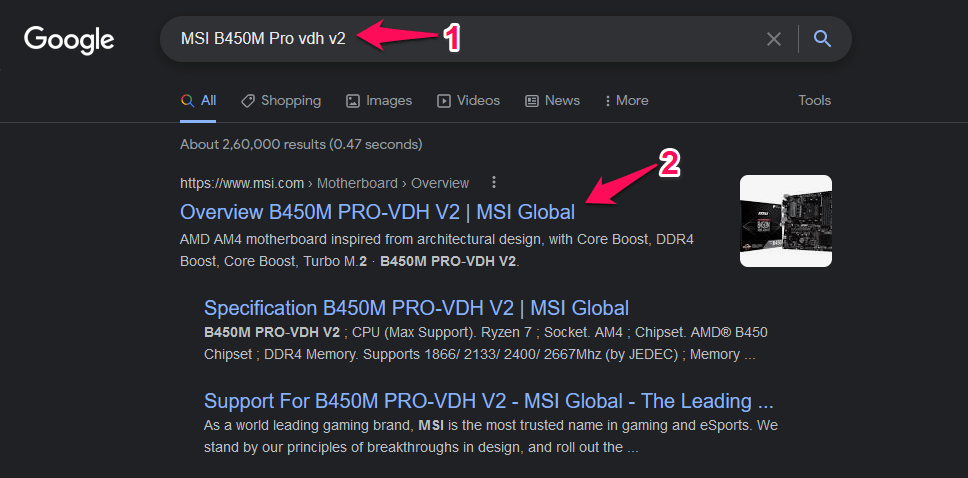
Example: “MSI B450M Pro VDH V2”.
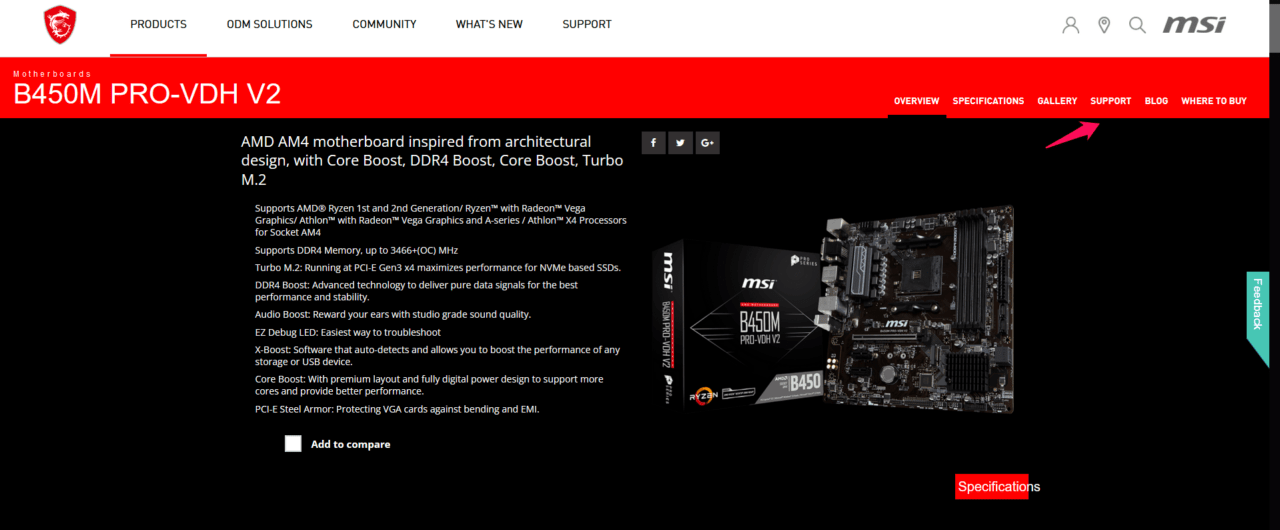
- Click on “Support” located in the main menu.
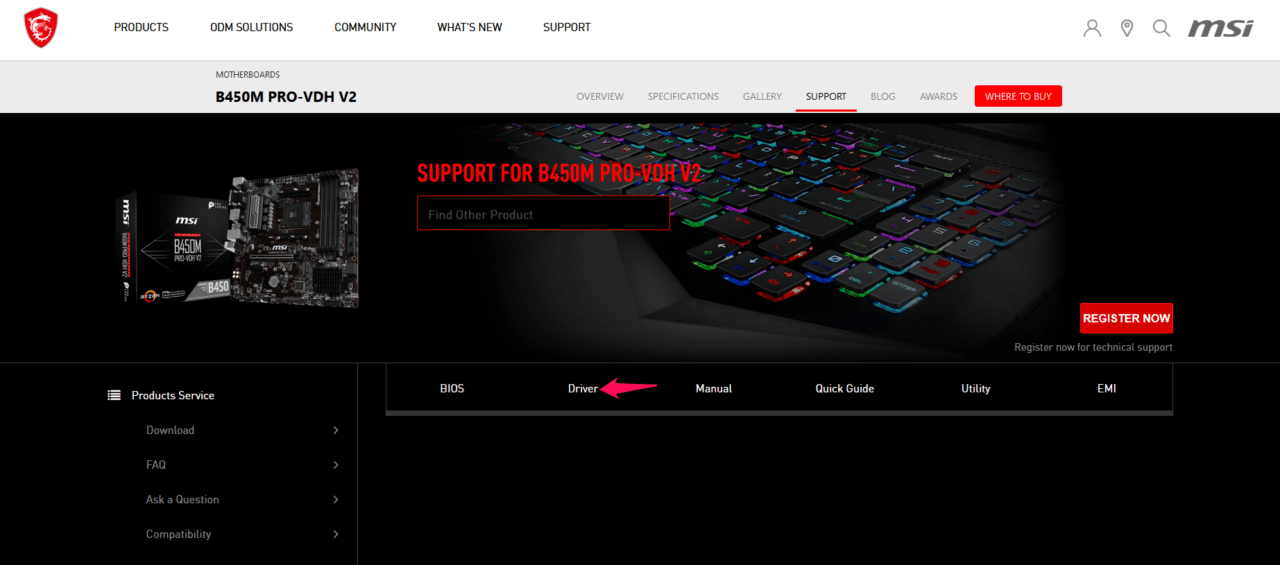
- Click “Drivers” from the menu.
- Choose the operating system.
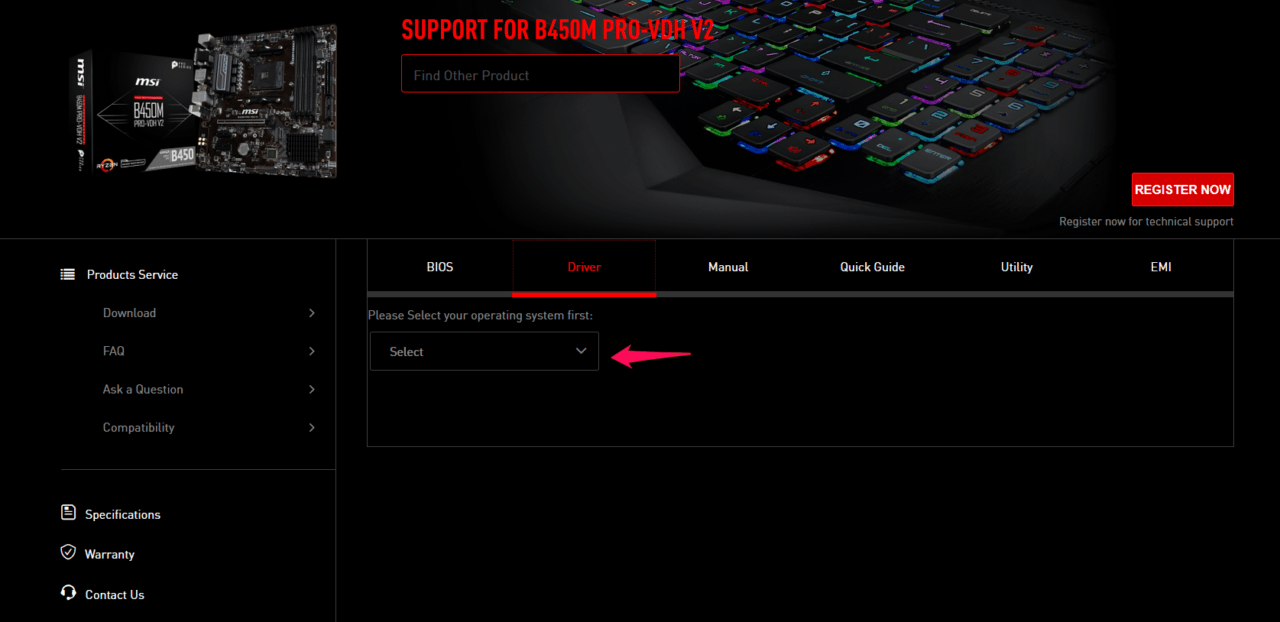
Select Windows 10 or Windows 11 from the drop-down menu.
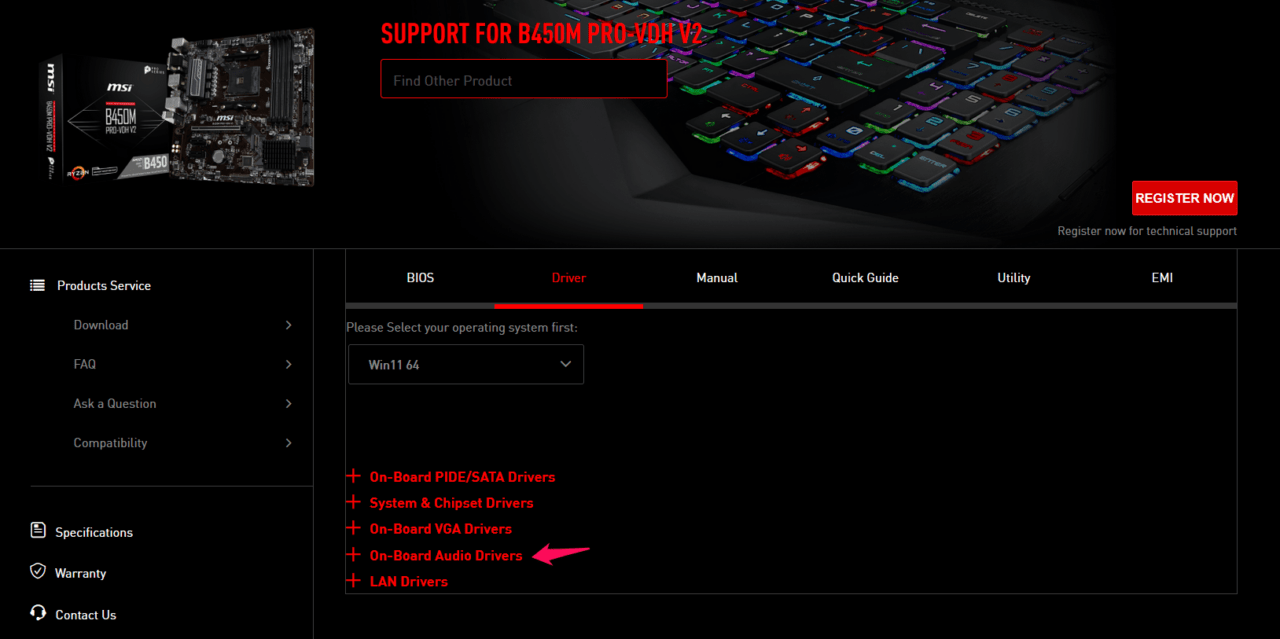
- Click on “Onboard Audio Drivers“.
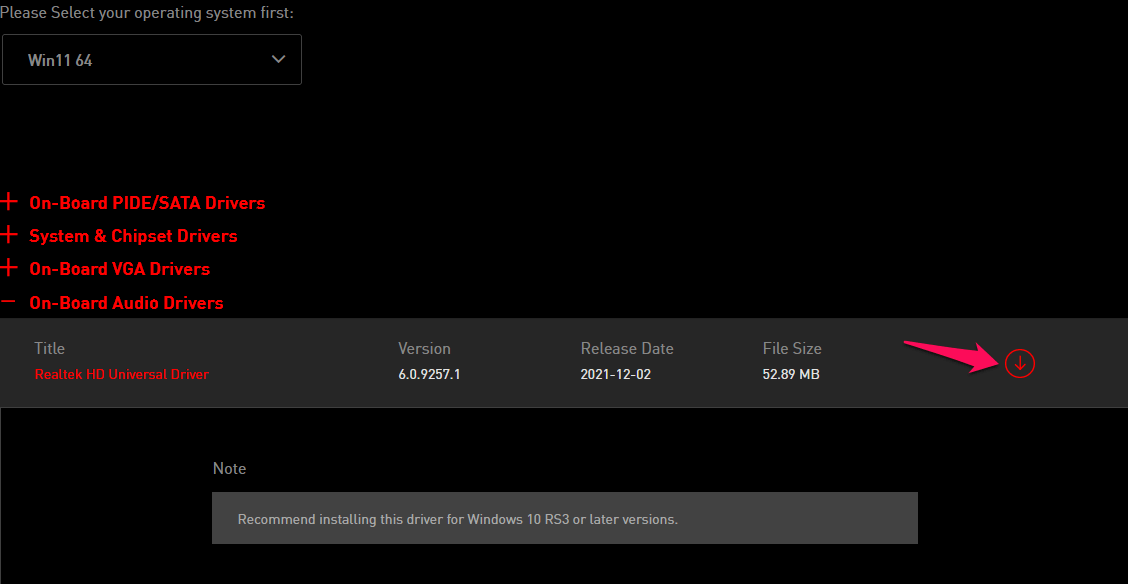
- Download “Realtek HD Universal Driver” to save the executable file.
- The audio driver is saved in the system.
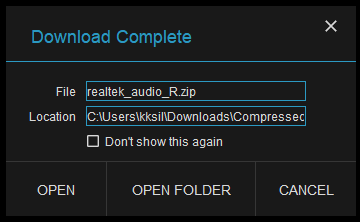
Now, you have saved the audio driver and extracted it in the desktop or downloads folder.
Step #2: Boot in Safe Mode
Your PC should be in safe mode to uninstall the audio drivers and download DDU from the official site.
Also, download Display Driver Uninstaller from the official site. You have to scroll down on the DDU download page and click on a country server to download it.
- Open “Settings” in Windows 11.
- Choose “Recovery” under the “System” option.
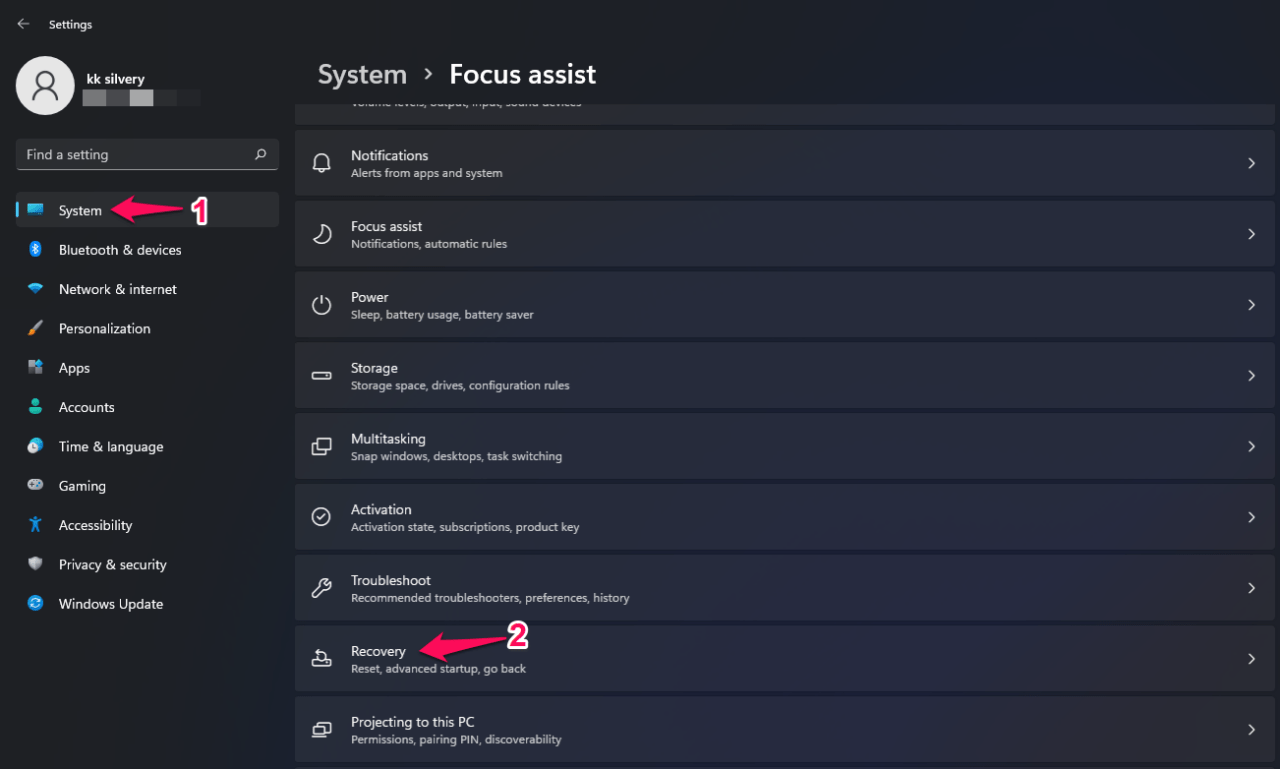
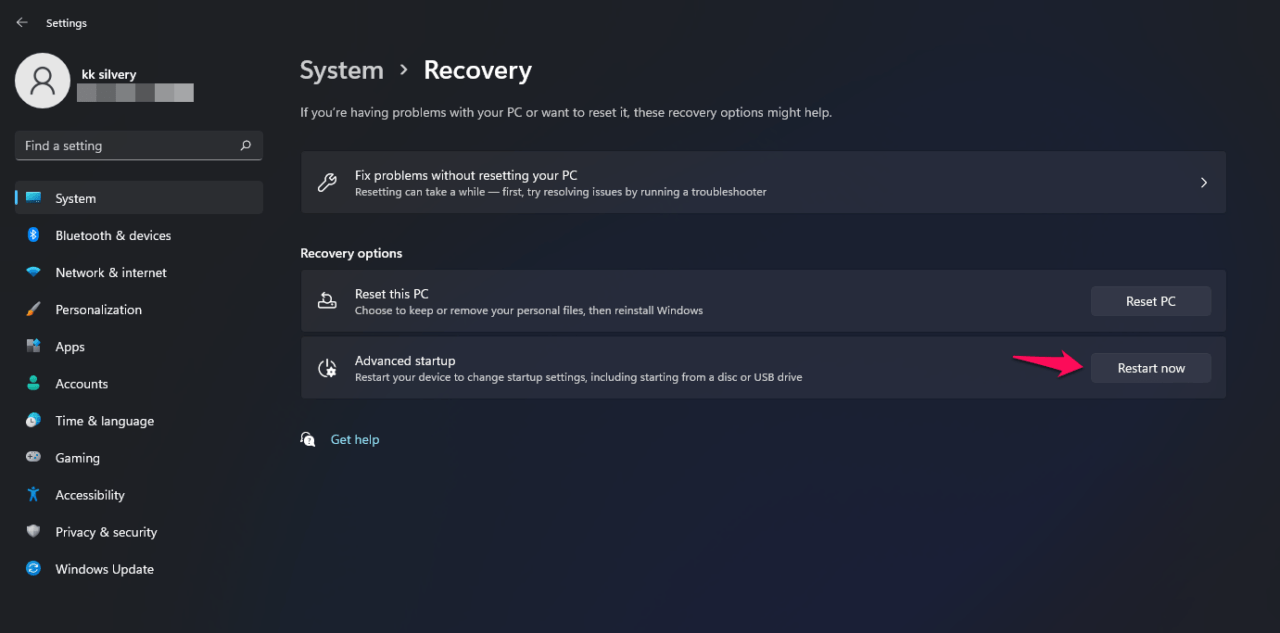
- Click on the “Restart now” option.
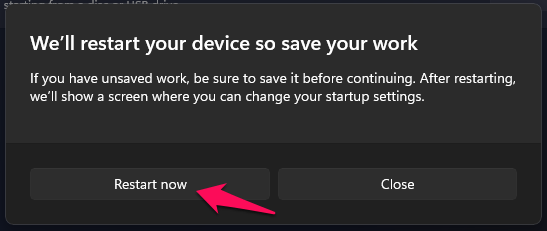
- The PC prompts confirmation from you and select the “Restart now” button.
Note: You can boot into recovery mode by restarting the PC while holding the Shift key.
- Your PC restarts and boots into recovery mode, then select “Troubleshoot” to continue.
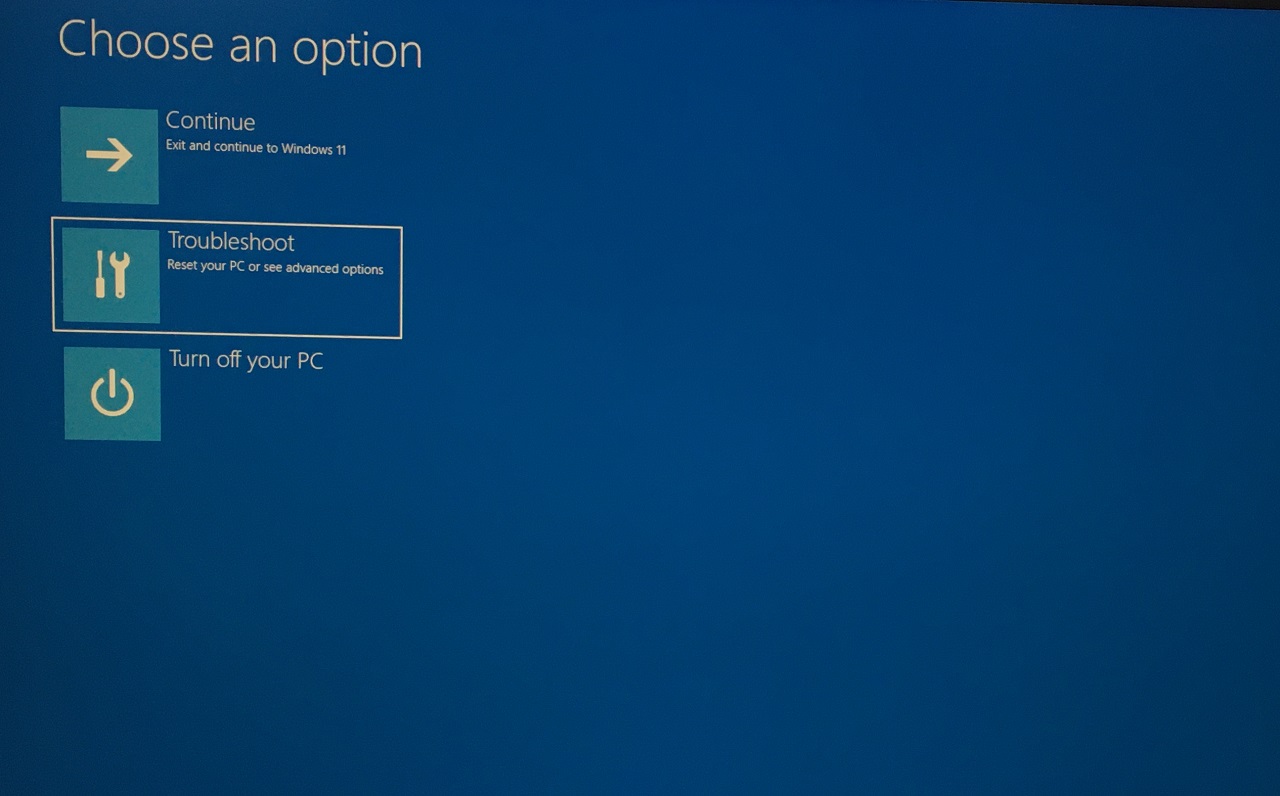
- Choose “Advanced options” to view more.
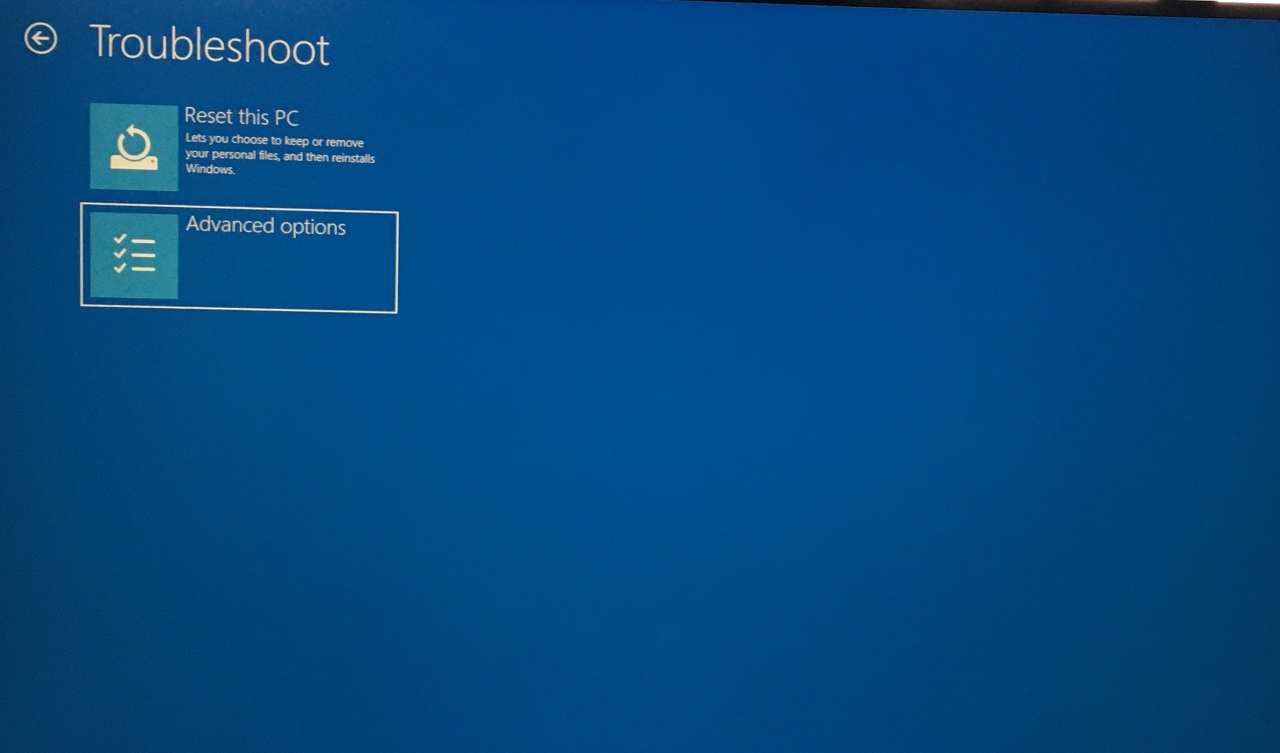
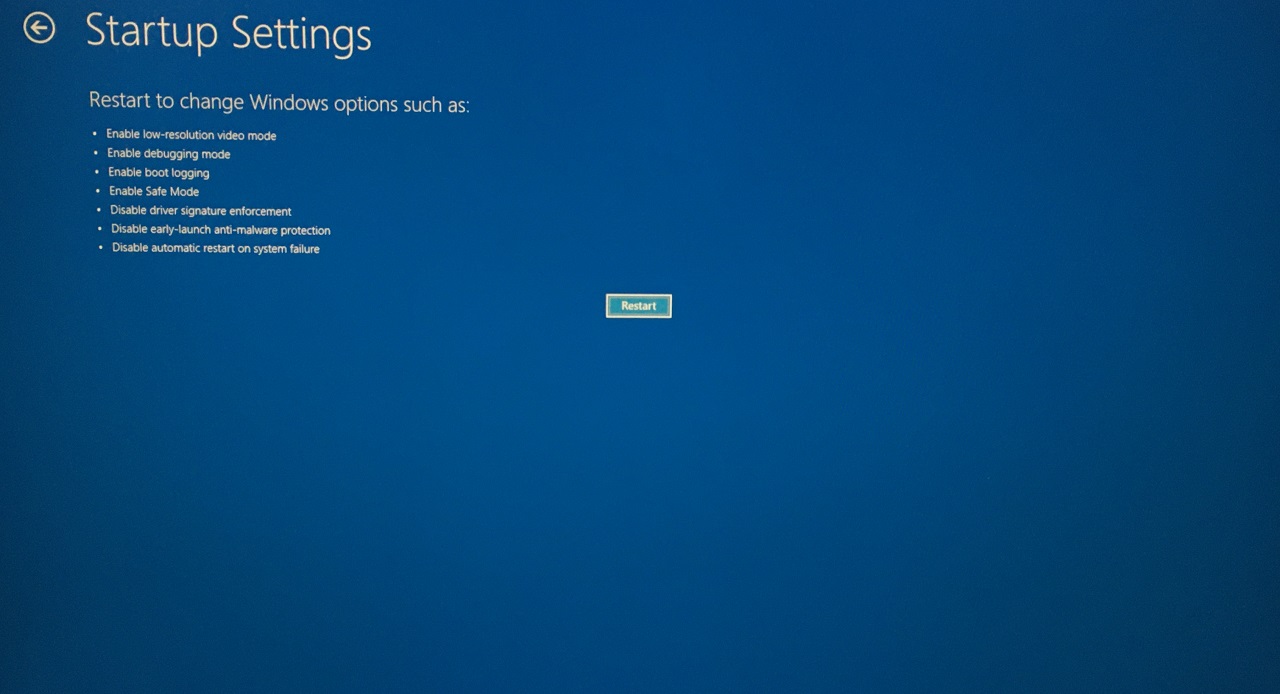
- Select “Startup settings” to view more.
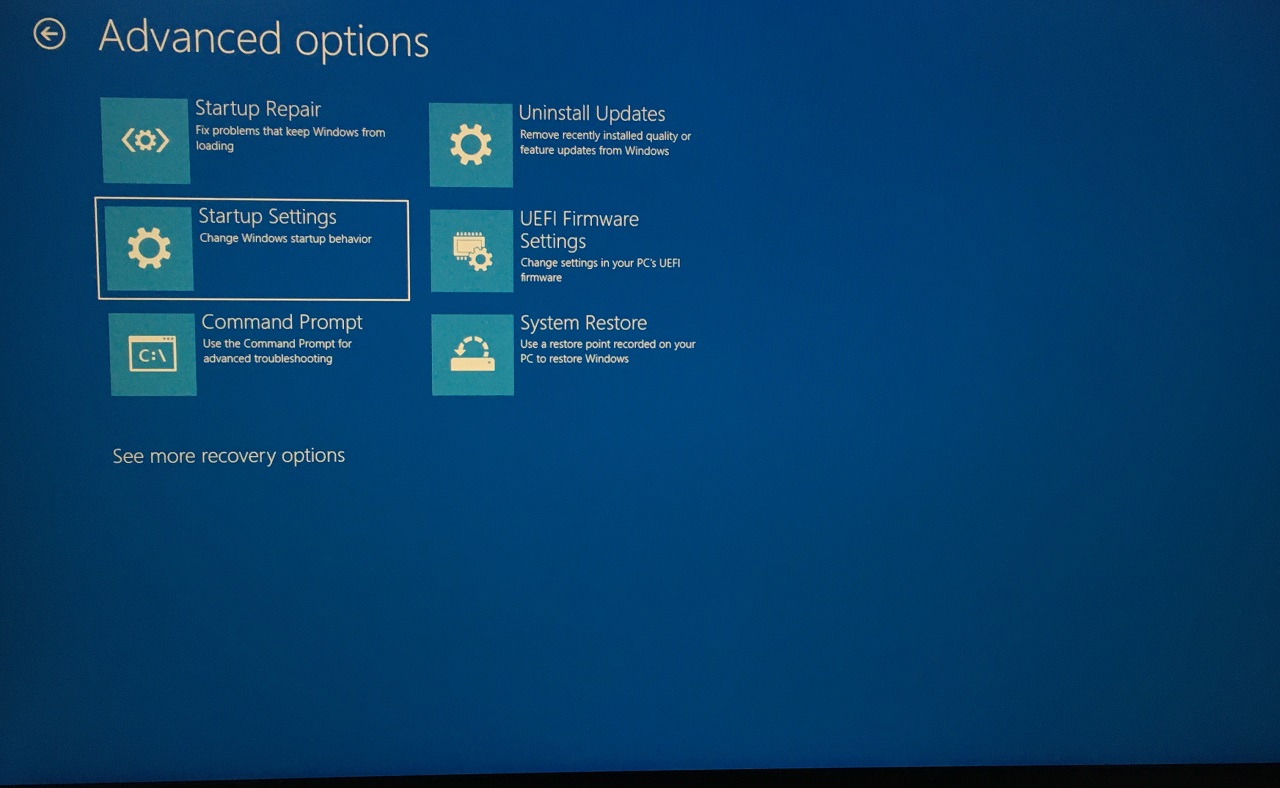
- Click on the “Restart now” button.
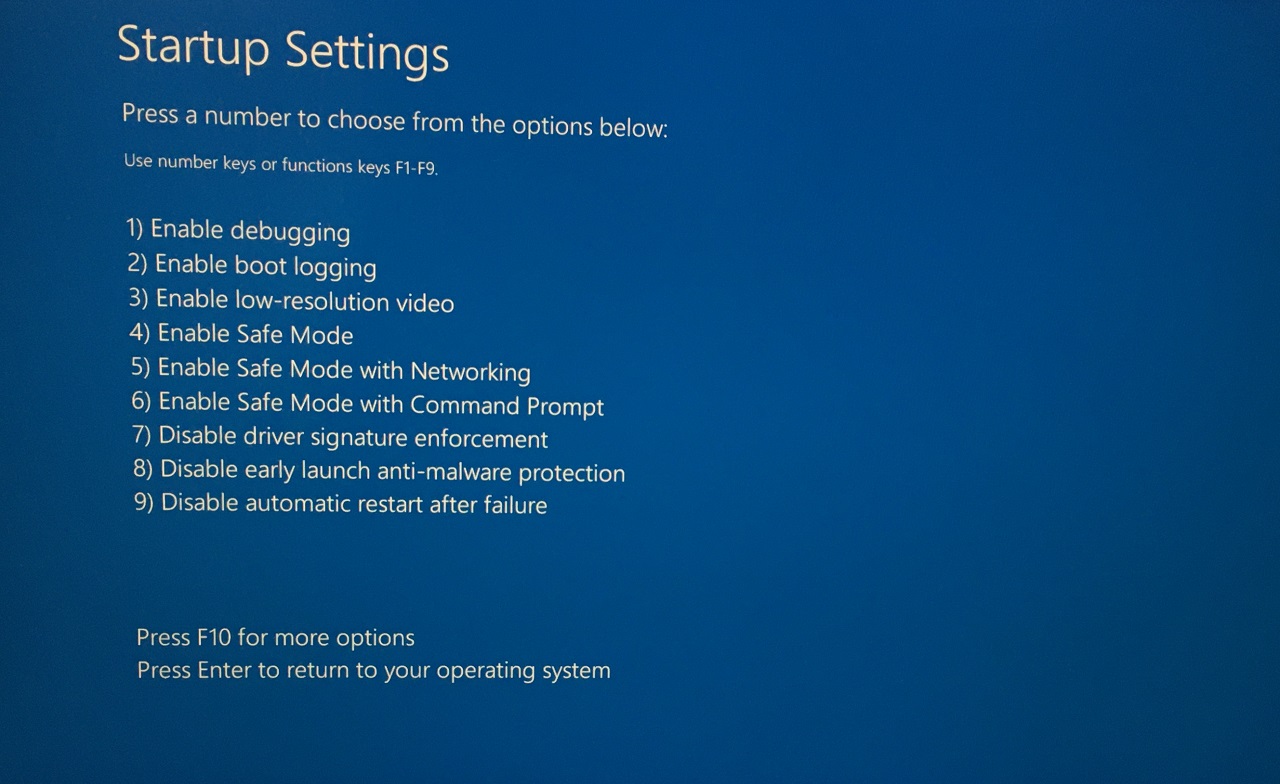
- Press the 4 key to enter safe mode.
Enter the Lock Screen password or PIN to login into the desktop.
Step #3: Uninstall Audio Drivers
The time has come to uninstall the audio drivers from the system. Go to the DDU file and extract it. You can use the default ZIP archiver in the system.
- Open Display Driver Uninstaller as administrator.
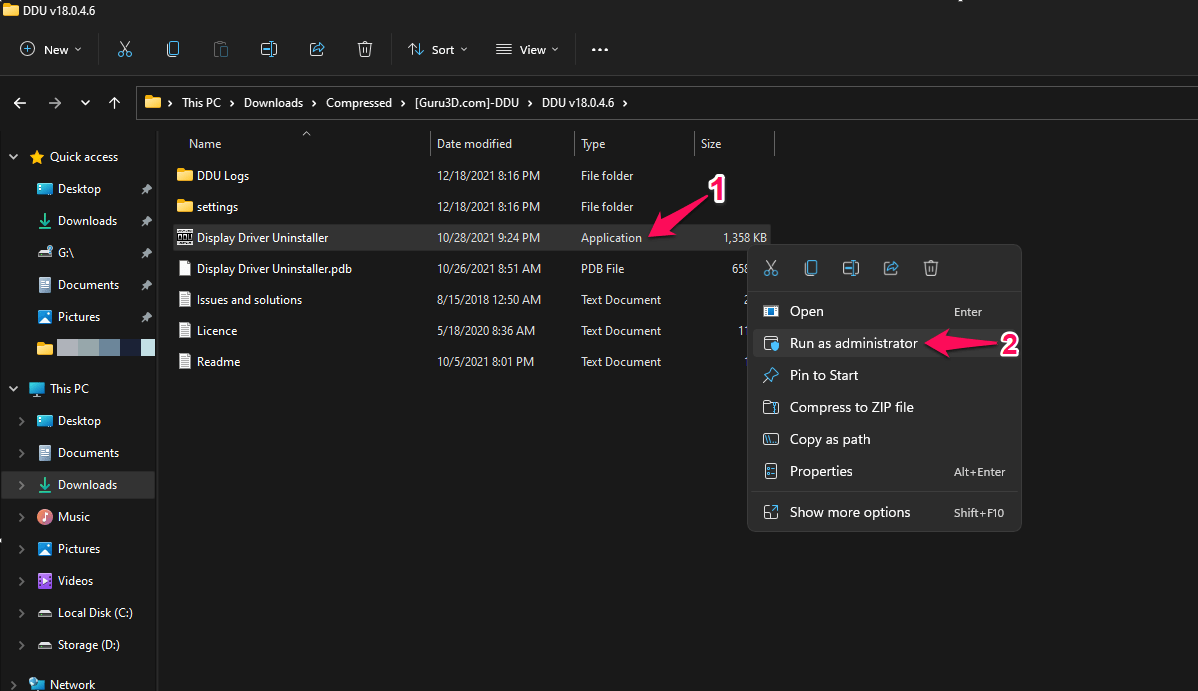
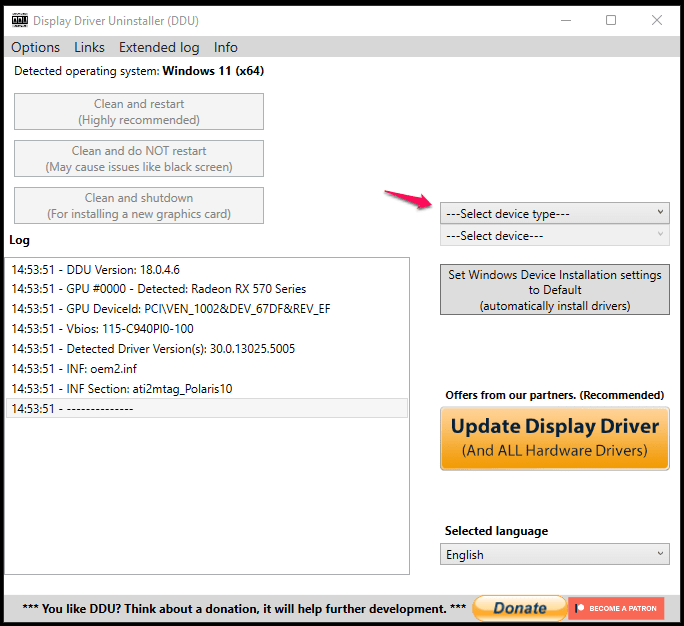
- Choose the device type and select “Audio” from the drop-down menu.
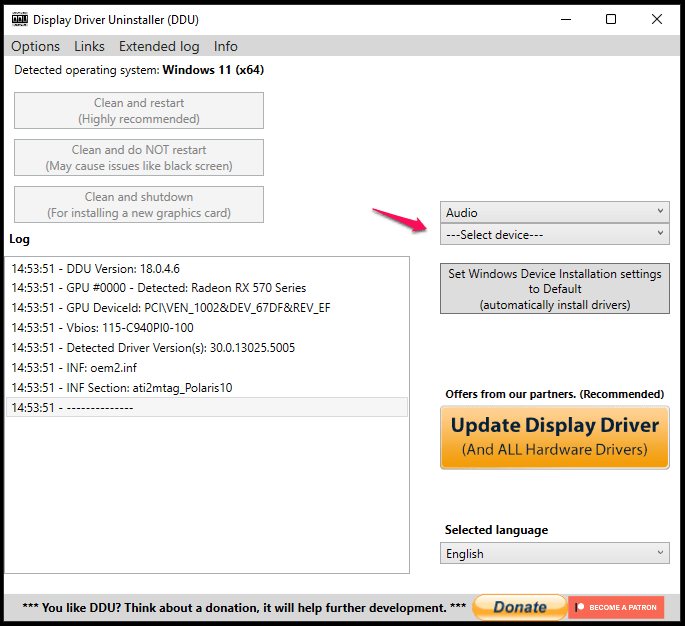
- Choose the audio manufacturer and it is Realtek in my case.
- Click on the “Clean and restart (Highly recommended)” option.
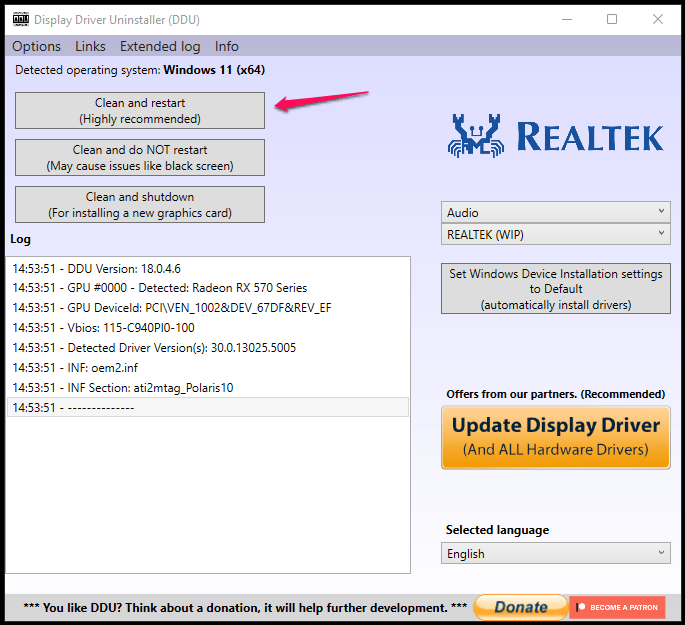
Sit back and relax while DDU is uninstalling the audio drivers.
Your PC boots back into the Windows 10/11 machine, so you don’t have to get out of safe mode manually.
Step #4: Reinstall Audio Drivers
Almost all drivers are bundled in a ZIP archive and extracted the files in the local storage. Make sure to switch to an administrator account because Windows requires admin access to install drivers in the system.
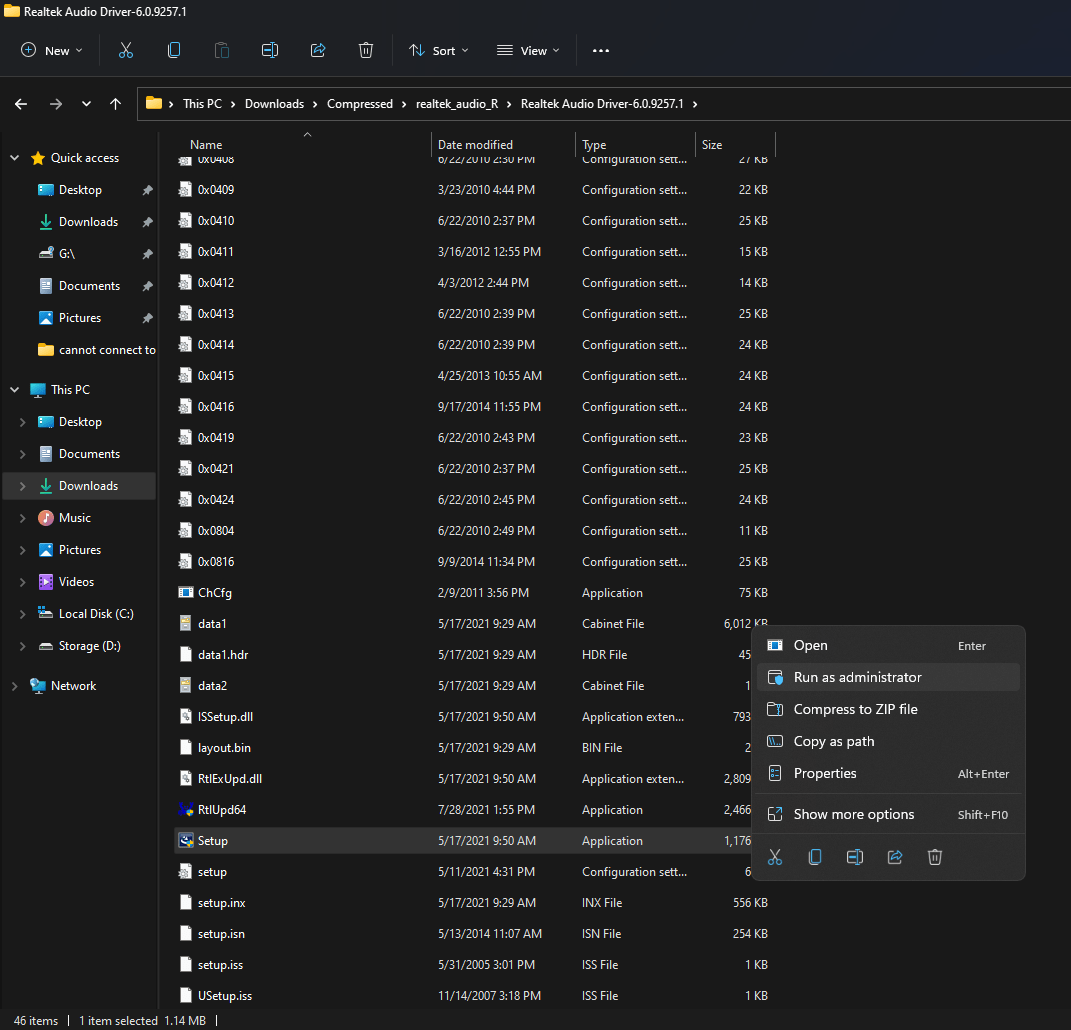
- Open the extracted folder and run “Setup.exe” as administrator.
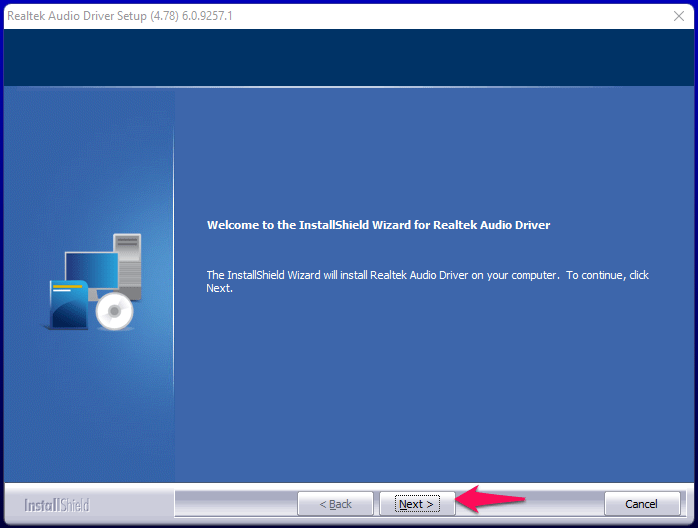
- The setup wizard shows up on the screen and click on “Next” to continue.
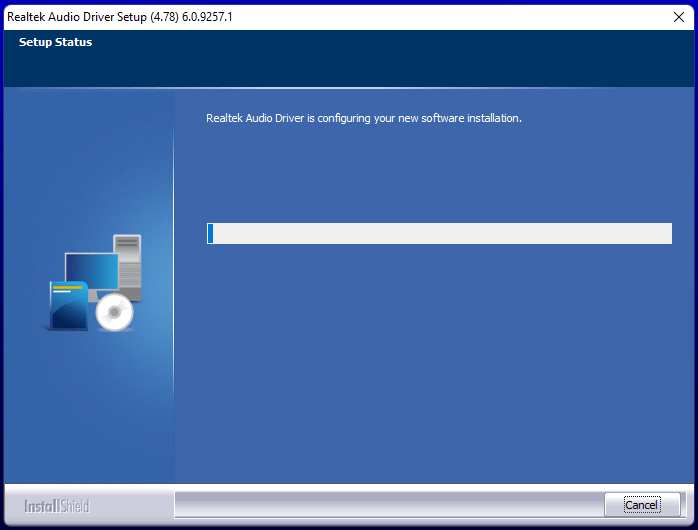
- Let the package load the drivers.
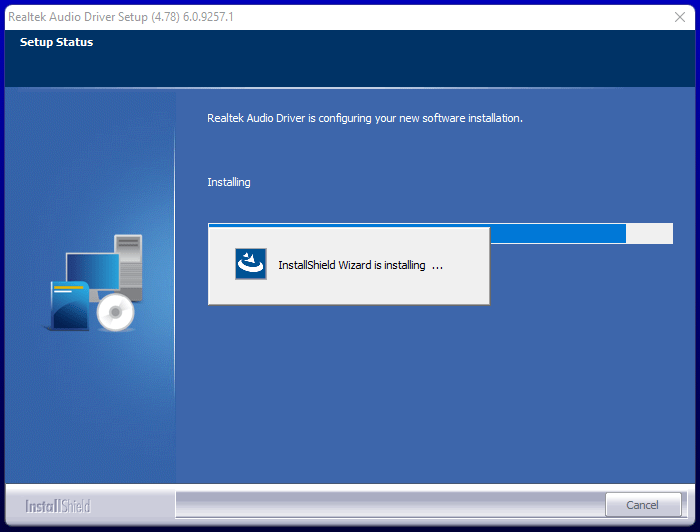
- Let the wizard install the packages.
- Click on “Finish” to restart the PC.
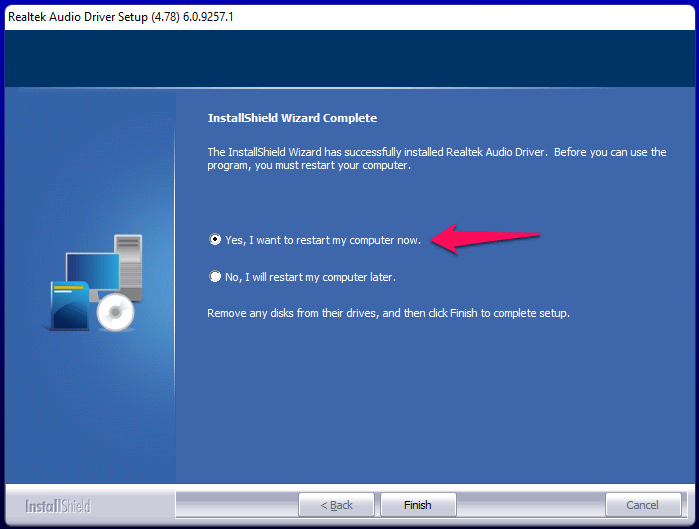
Your Windows PC restarts and it will load the compatible audio drivers in the next session. The “can not connect RPC service” error won’t show up when you launch Realtek Audio Console.
4. Run Full System Scan
You should subscribe to a premium security solution and if you have one installed, then that’s a bonus point for you. Many users ignore the full system scan because it takes longer than an hour to finish the scanning process. However, I recommend you do it because the malware might be destroying the system files as we speak.
I will show you a method to scan the entire machine using Microsoft’s Security program. Disable Wi-Fi or remove the LAN cable before beginning the process.
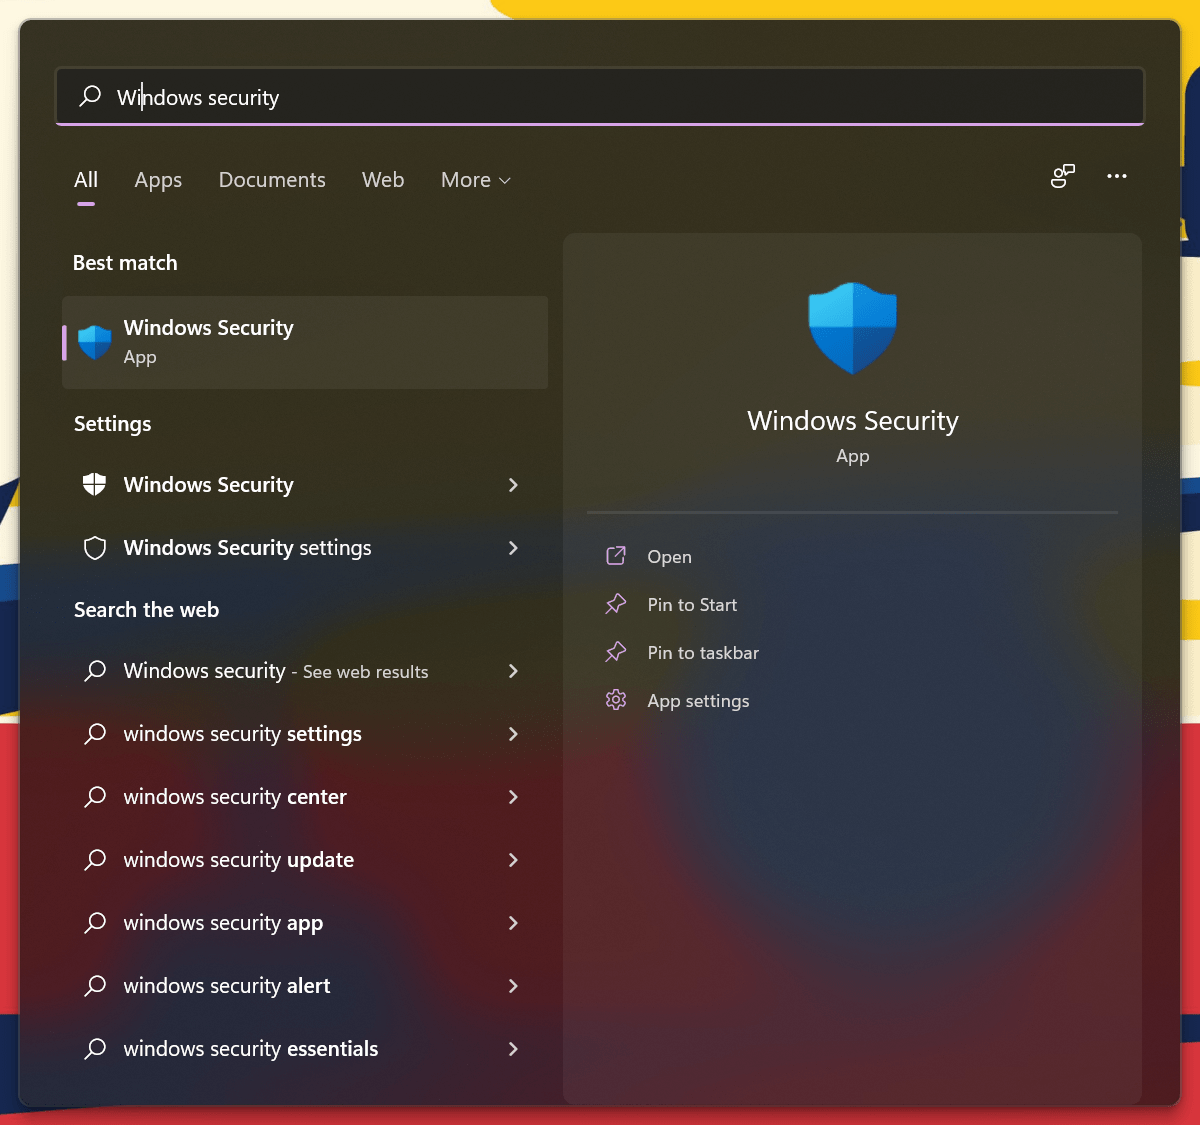
- Search for “Windows Security” and open the program.
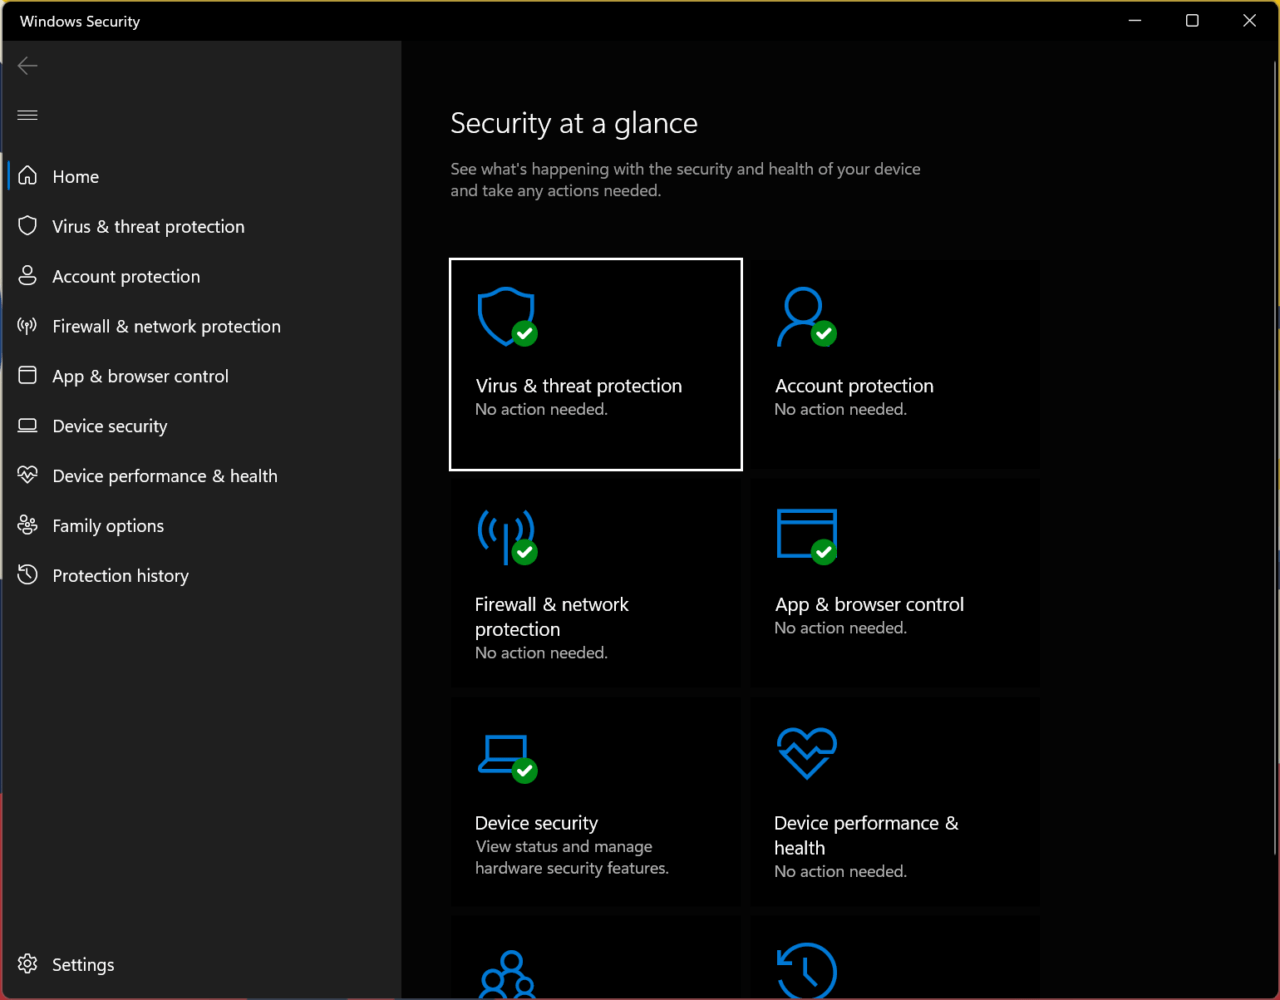
- Choose the “Virus & threat protection” option.
- Click on the “Scan Options” button.
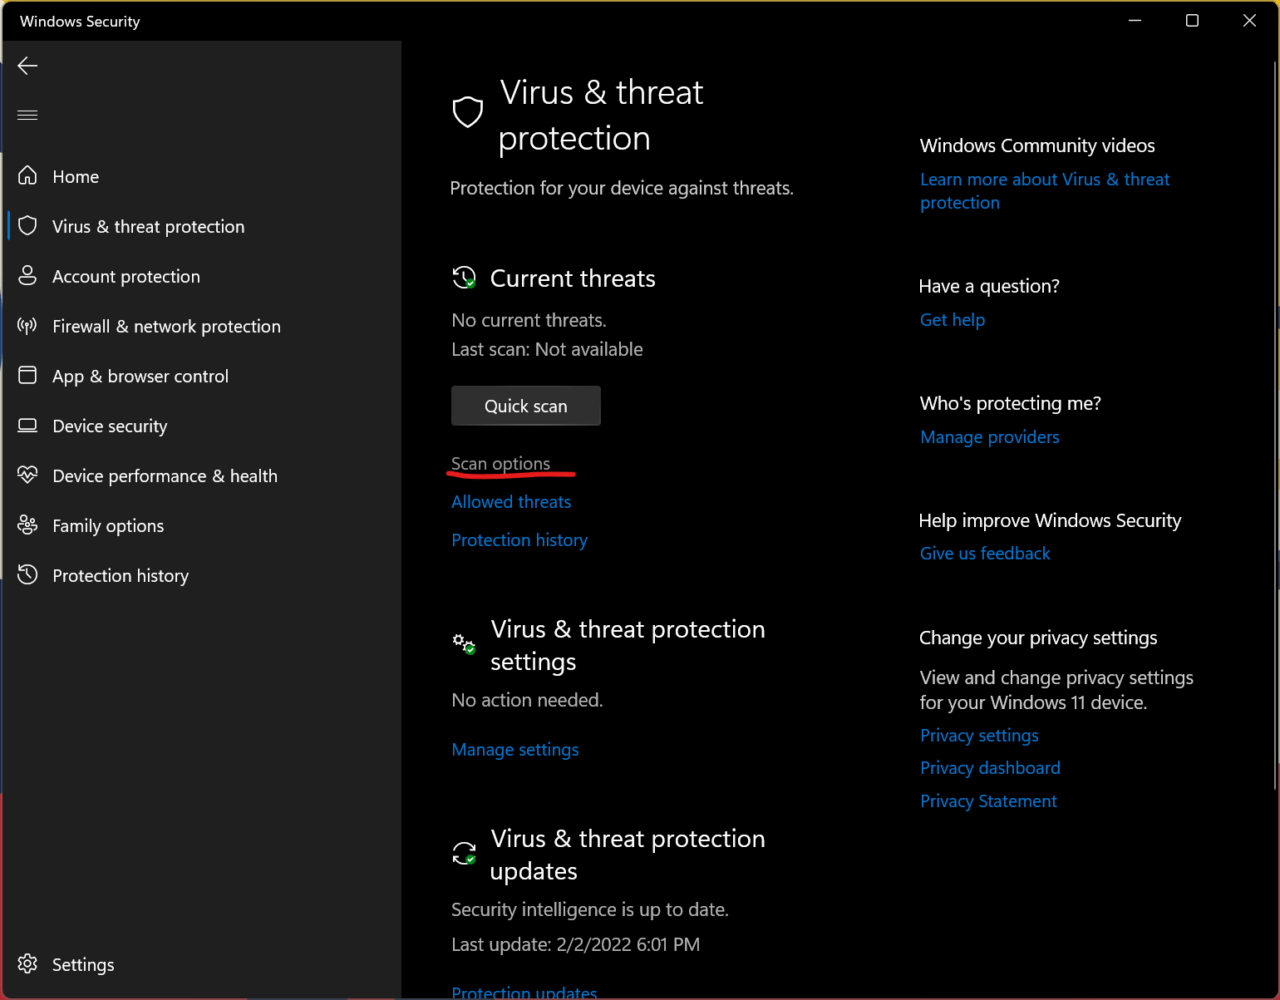
- Select the last fourth “Microsoft Defender Offline scan” option.
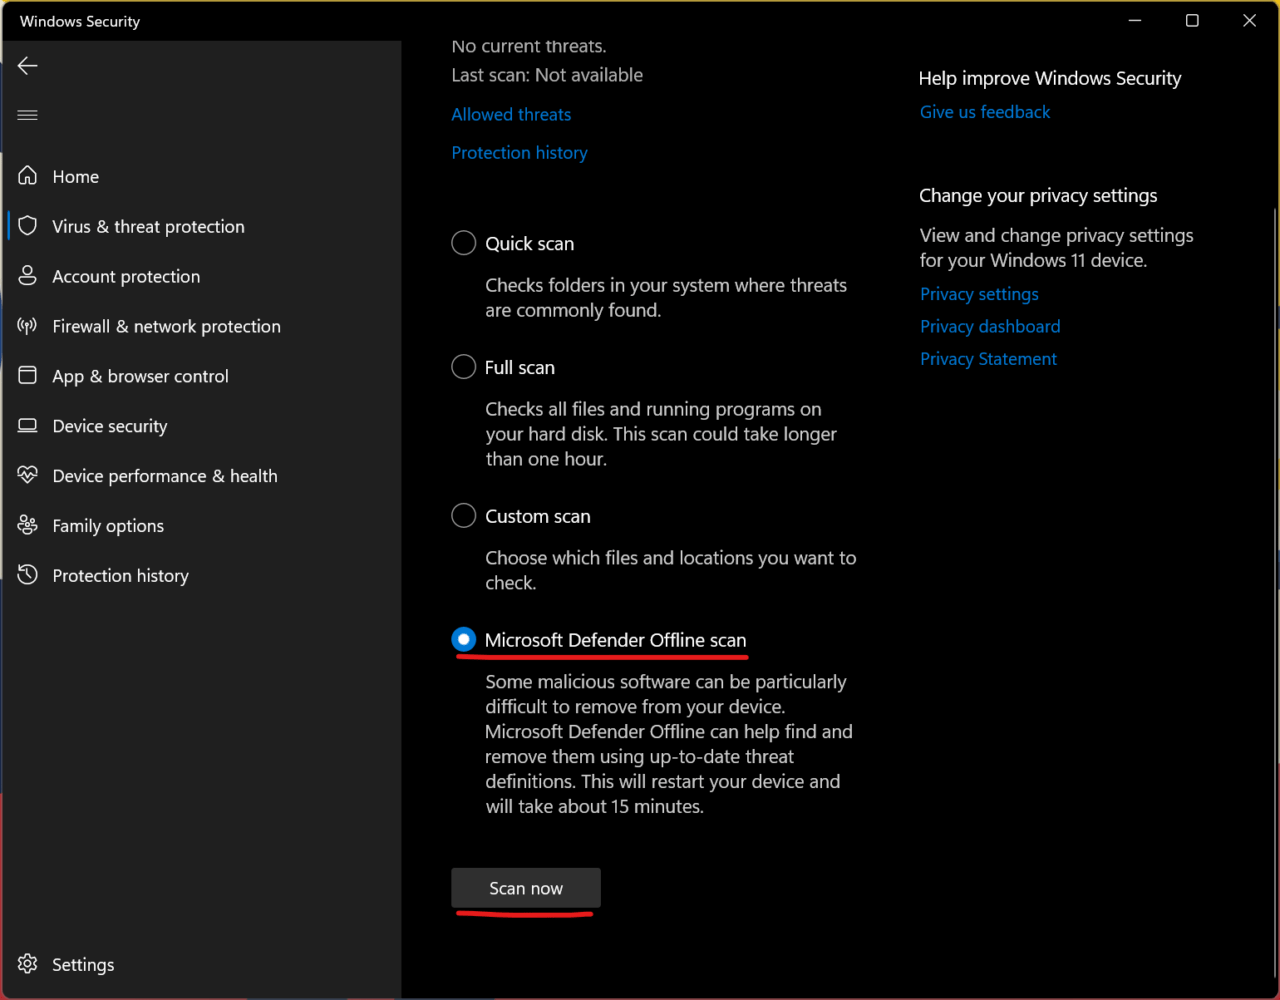
- Click on the “Scan now” button.
Windows Security shuts down the computer and runs the scan in offline mode. The security scanning process takes less than fifteen minutes on modern computers with NVMe SSD. You can expect the security scan to be higher if the machine has older components.
5. Update Windows Software
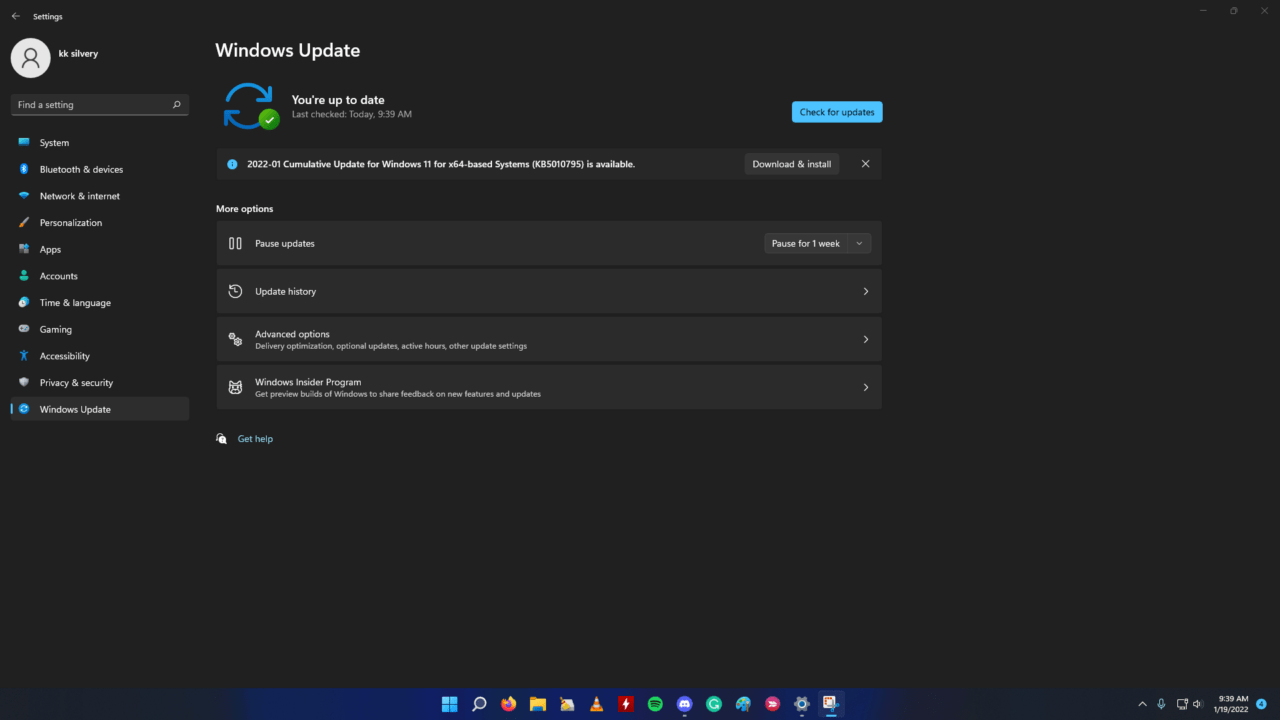
Newer software always has drawbacks and the in-house developers take time to release patches. You should miss quality and security updates specially designed for Windows 11.
I recommend the users reinstall Windows 11 operating system from the bootable USB drive. You can watch any YouTube tutorial to install fresh Windows from a bootable USB drive and I have done it hundreds of times.
Bottom Line
You can solve “Can Not Connect RPC Service” by restarting the PC or reinstalling the drivers from the system. However, it’s not easy to fight against malware that is hiding in the storage drive, so you should consider reinstalling the OS to resolve the issue. Let us know how you resolved the Realtek Audio Console error in the comment section below.
If you've any thoughts on Easily Fix Realtek Audio Console ‘Cannot Connect to RPC Service’ in Windows 11, then feel free to drop in below comment box. Also, please subscribe to our DigitBin YouTube channel for videos tutorials. Cheers!
