Are you not able to see the Safely Remove Hardware option when you wish to eject external hard drives on your Windows 11? In this guide, I have come up with troubleshooting tips to fix the issue. While a majority of people simply pluck out the external hard drive to eject it this is a bad practice. It can corrupt data and files present within the USB drive.
If you don’t have any files from the external hard drive open while you eject it out, then there won’t be an issue. The problem happens when files and folders are open and you simply remove the hard drive without ejecting it.
Later when you again connect the hard drive to your PC, you may not be able to eject the external hard drive. I mean the Safely Remove Hardware option won’t show up. It is there to ensure that no program on your PC is currently using the contents present in the external hard drive. Hence, safe removal refers to no loss or corruption of any data.
Reasons Why You Can’t Eject External Hard Drive on Windows 11
Here are the possible technical reasons why you are not able to see the Safely Remove Hardware option when you try to eject the external hard drive.
- The contents of the external hard drive are still in use through some applications installed on your computer.
- The external hard drive may be affected by computer viruses or malware causing the Safely Remove Hardware option to not show.
- The USB drivers installed on the PC may have become corrupted or outdated.
Way to Fix Can’t Eject External Hard Drive on Windows 11
Now, let us get down to the troubleshooting method to fix Cannot Eject External Hard Drive on Windows 11
Eject the External Drive by Restarting the PC
You can restart your computer. When the restart process initiates, the computer will automatically close all the active programs and applications on the computer. You do get notified about the action.
So, when you restart the computer, automatically, the external hard drive contents won’t be in use. You can eject them easily without having to worry about data getting corrupted.
To restart your Windows computer,
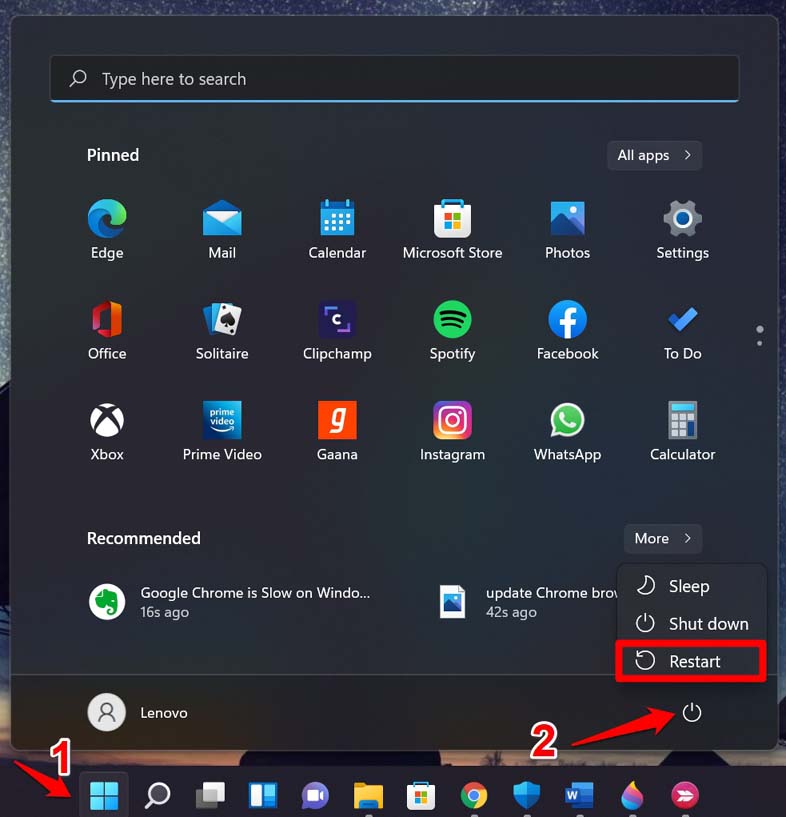
- Press the Windows key.
- Then from the dialog box that shows up, click on the power icon.
- Next, click on Restart from the small menu that appears.

- As the system asks you about active programs, choose to close them all.
- Then as the system shuts down and restarts, simply eject the external hard drive.
Manually Invoke Safely Remove Hardware Utility
You should automatically see the Safely Remove Hardware message when you click Eject the concerned USB drive from the PC. However, there is another way to manually invoke the utility and have the external drive ejected from your PC.
- Press Windows + R key combinations.
- Enter the following command and hit the enter key.
RunDll32.exe shell32.dll,Control_RunDLL hotplug.dll
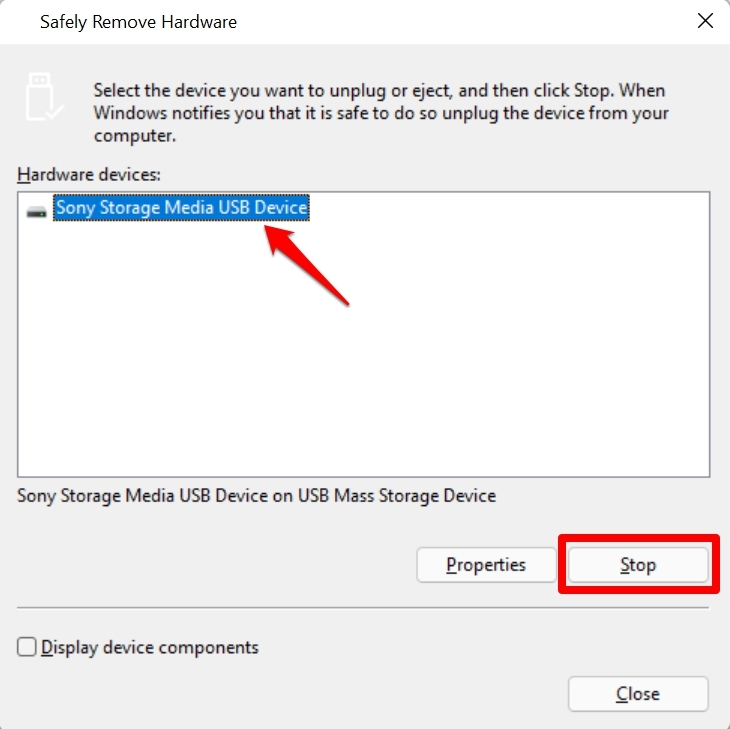
- The Safely Remove Hardware dialog box will open.
- The external hard drive connected to your PC via USB will be displayed.
- If you have multiple USB hard drives connected, then select the one you wish to eject.
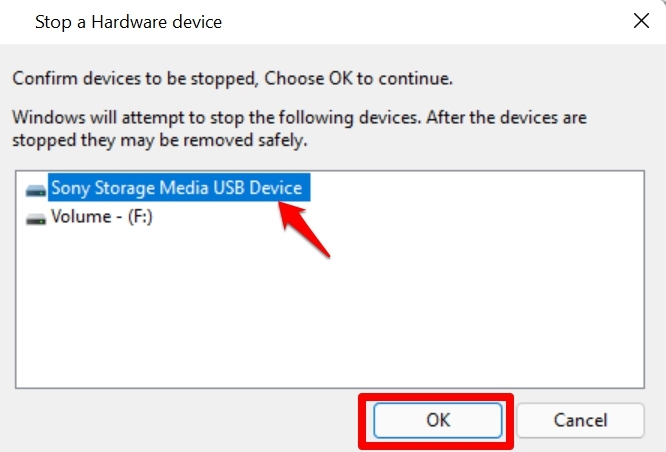
- Then click on Stop.

- To confirm the action for the selected external hard drive click on OK.

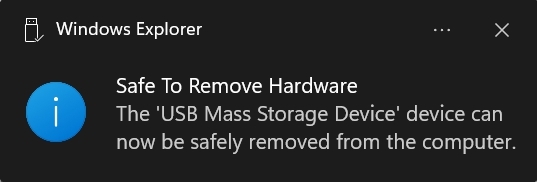
- You should see the pop-up message at the taskbar saying it’s safe to remove the hardware.

Update the USB Drivers on your computer
Normally, the drivers are updated automatically but maybe it’s just a random bug not letting the external hard drive eject. So, you can try to manually update the USB drivers on your PC.
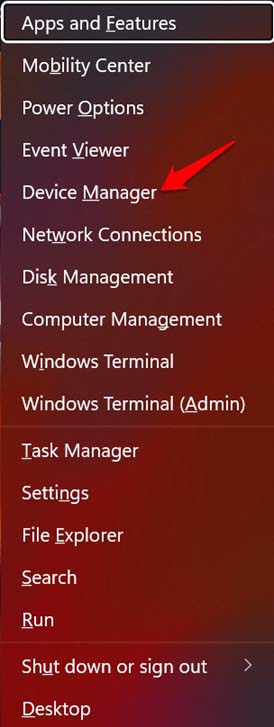
- Open the device manager by pressing Windows + X.

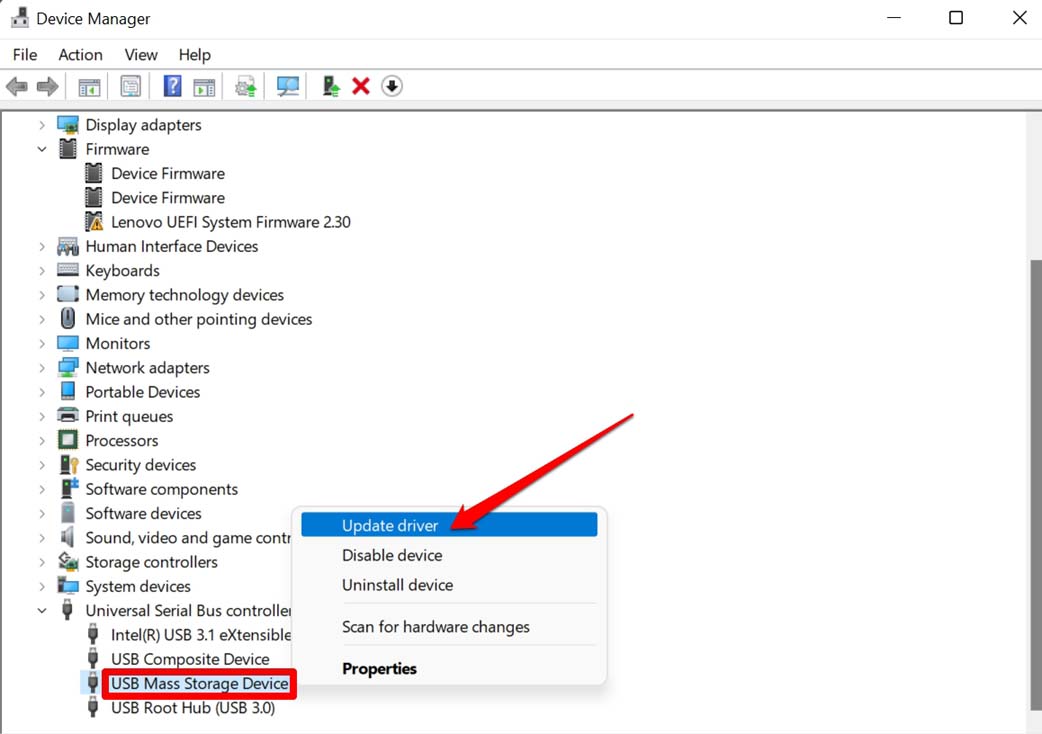
- Then navigate to Universal Serial Bus Controllers and expand it.
- Under that check, if there is an attribute with a yellow exclamation mark on it.
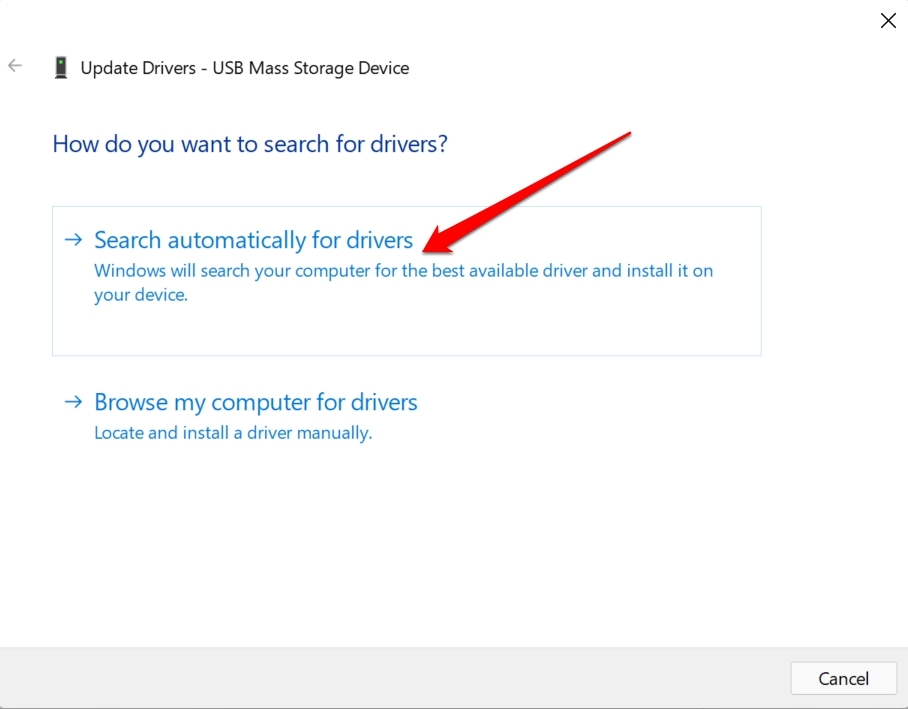
- If there is one, then right-click on it and select the Update Driver option.

- Then select Search Automatically for Drivers and provided you are connected to the internet, the system will grab the necessary drivers and update them on its own.

Secondly, if you do not see any yellow exclamation then right-click on the USB drive and select Uninstall device.
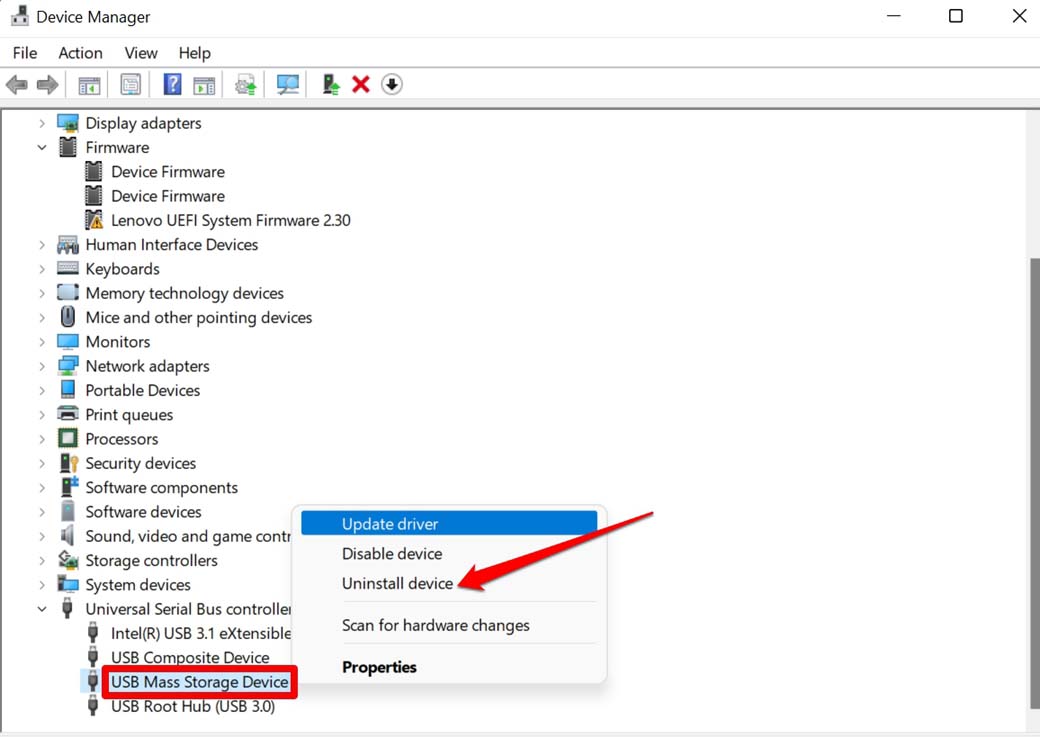
Then eject the external hard drive and reinsert it. The driver should be updated automatically. Next time when you eject the hardware you should see the message for Safe Removal of the Hardware.
Close All the Files or Apps on the External Hard Drive Before Ejecting
Before you eject the external hard drive make sure you have closed all the folders, files that you have opened from the drive. If any file is open on any application, then close that as well. Otherwise, you won’t see the Safe to Remove Hardware option. If you forcefully eject the hard drive, then there is a higher chance of data loss and corruption.
Scan the External Hard Drive for Malware Attack
Often people use their external hard drives everywhere on any random PC they use other than their personal computers. So, the device may have contracted malware from any vulnerable computer.
Usually, personal computers or enterprise machines are thoroughly protected and regularly scanned using legit anti-virus applications. So, there is a very low probability of getting your external hard drive infected if you connect it to such computers.
Mostly, when you use the external hard drives by connecting them to PCs in cyber cafes where computers are not scanned frequently and dozens of people use their USB hard drives, there is a higher chance of malware infection.
The best practice is to whenever you connect your external hard drive to any computer, first run a scan on it to check for malware. Also, avoid using external hard drives at cyber cafes. Use cloud drives instead if possible.
To scan your external hard drive.
- Go to This PC.
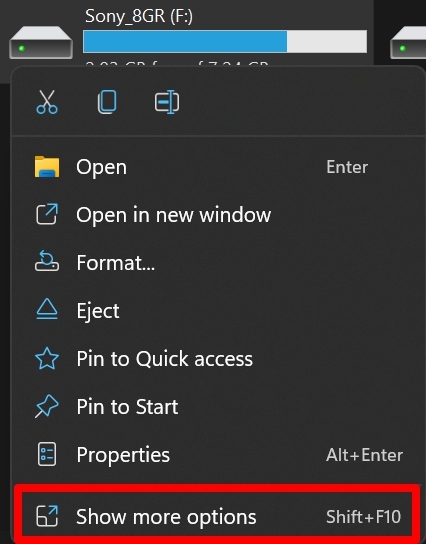
- Right-click on the external hard drive.
- Select Show More Options.

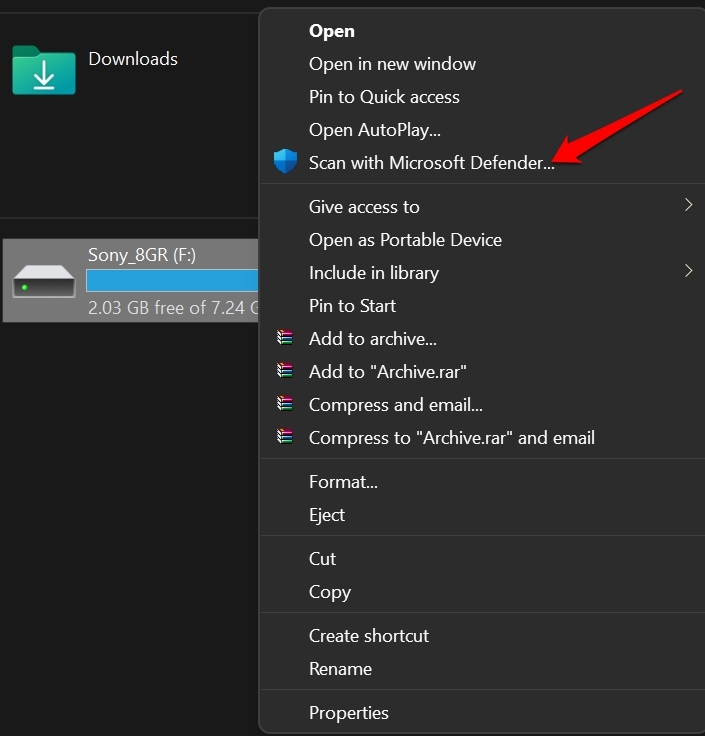
- From the menu, select the option Scan with xxx [xxx can be any 3rd-party antivirus app or Windows Defender depending upon what you use]

If any malware is found then let the Windows OS fix that. After that, you should be able to eject the hard drive safely without any hassle.
So, these are the various troubleshooting methods that you have to follow if you can’t eject the external hard drive on your Windows 11 computer.
If you've any thoughts on How To Safely Eject External Hard Drive On Windows 11?, then feel free to drop in below comment box. Also, please subscribe to our DigitBin YouTube channel for videos tutorials. Cheers!




This absolutely freaking ridiculous. I haven’t used windows in 20 years and it’s just as much a pile of garbage as it was then. I was forced to buy this piece of crap because the astrophotography crowd is still in the dark ages. I hate Windows more than ever. GARBAGE!
Having used every version of MS/PC DOS from one forward, and every version of Windows along the way, I must respond. I “freaking” LOVE the new Windows. I have also used several versions of UNIX and most versions of Linux along the way. Having also used every version of the Oracle RDBMS software from version 2 to the newest version 21, I have installed it on over a dozen platforms, including on Windows. I am not too fond of Apple mostly because of the way they’ve scrambled my photos; but I still carry an iPhone and have used many versions of the Apple OS; although, never to install Oracle. Guess all software has pieces that are “GARBAGE” 🙂 Cheers!