Are you planning to sell your iPhone? Then you need to perform some tasks before selling your iPhone to keep your data safe. As you will be handing over your iPhone to someone else, you have to make sure that the iPhone does not have any digital footprint on the data that belongs to you.
A new iPhone before being used must be logged in using the Apple ID of the concerned iPhone owner. When you sell away your iPhone to someone else, they will log into that iPhone with their Apple ID. The original owner of the phone must keep in mind things below before selling the iPhone.
Besides, the iPhone is connected to various other Apple services that you must disconnect and remove the associated profiles saved on the device. There are a few other things that you need to do before selling your iPhone. Let’s check that out now.
Best Tips to Follow Before you Sell Your iPhone
So, here are the various tips that will help you to make your iPhone ready for the new buyer.
Disable Find My iPhone
You need to do this for you have to log out of your Apple ID and every other Apple service you used to have on the iPhone. The person who will buy the phone will log into the iPhone using his Apple ID. Then he will be prompted by the iOS to re-enable Find My iPhone as he is the new owner now.
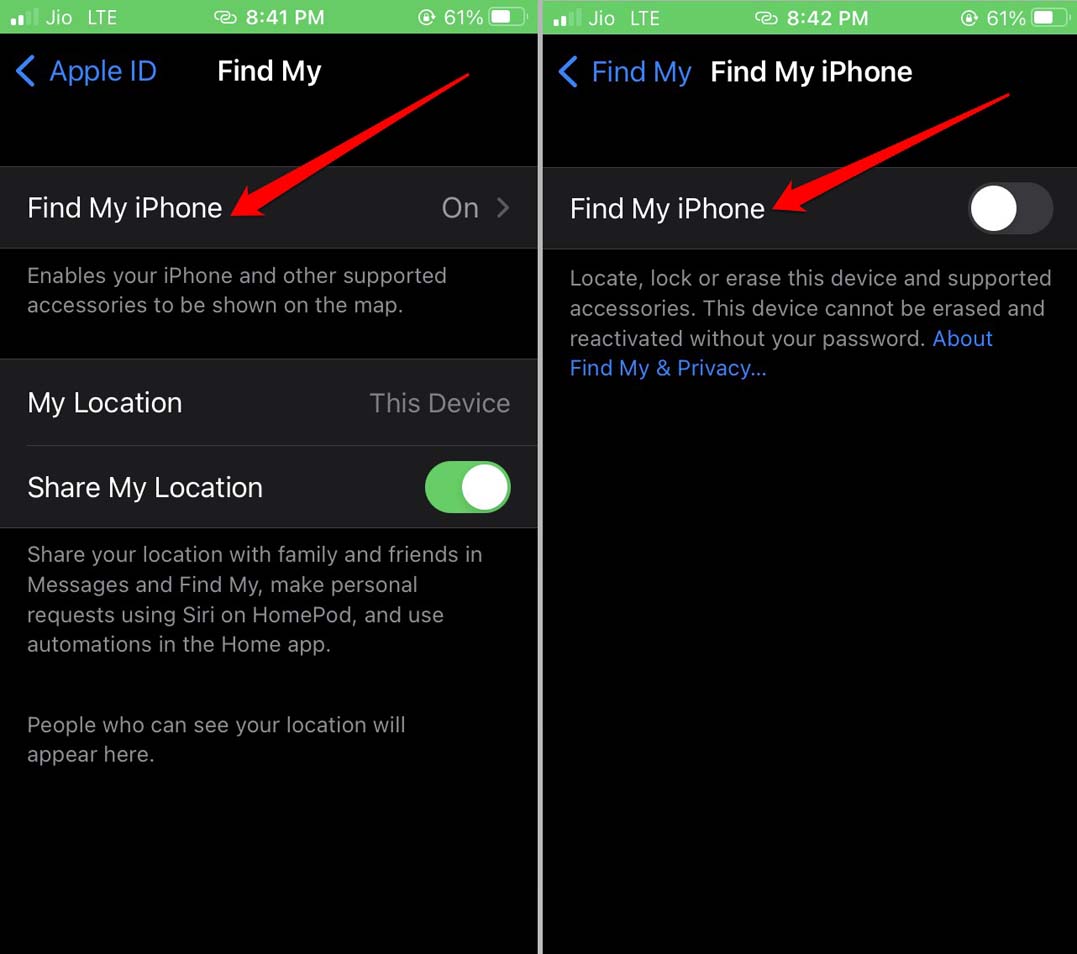
To disable Find My iPhone,
- Open the Settings app.
- Tap on your Apple ID at the top of the screen.
- Next, tap on Find My.
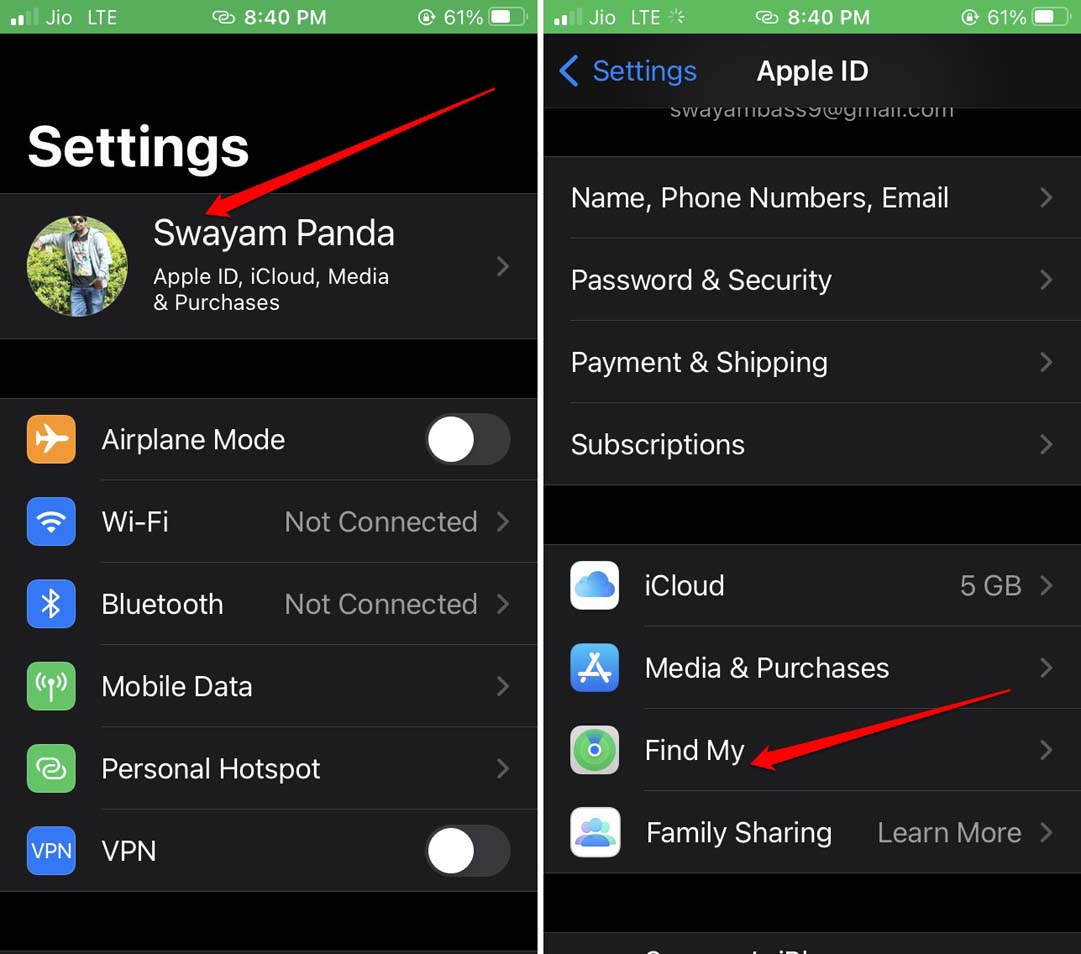
- Tap on Find my iPhone.
- Now, tap on the switch beside the feature to turn it off.
If you have sold the iPhone and not turned the Find My iPhone off, you can still do it by accessing iCloud.
- Open the browser on your PC.
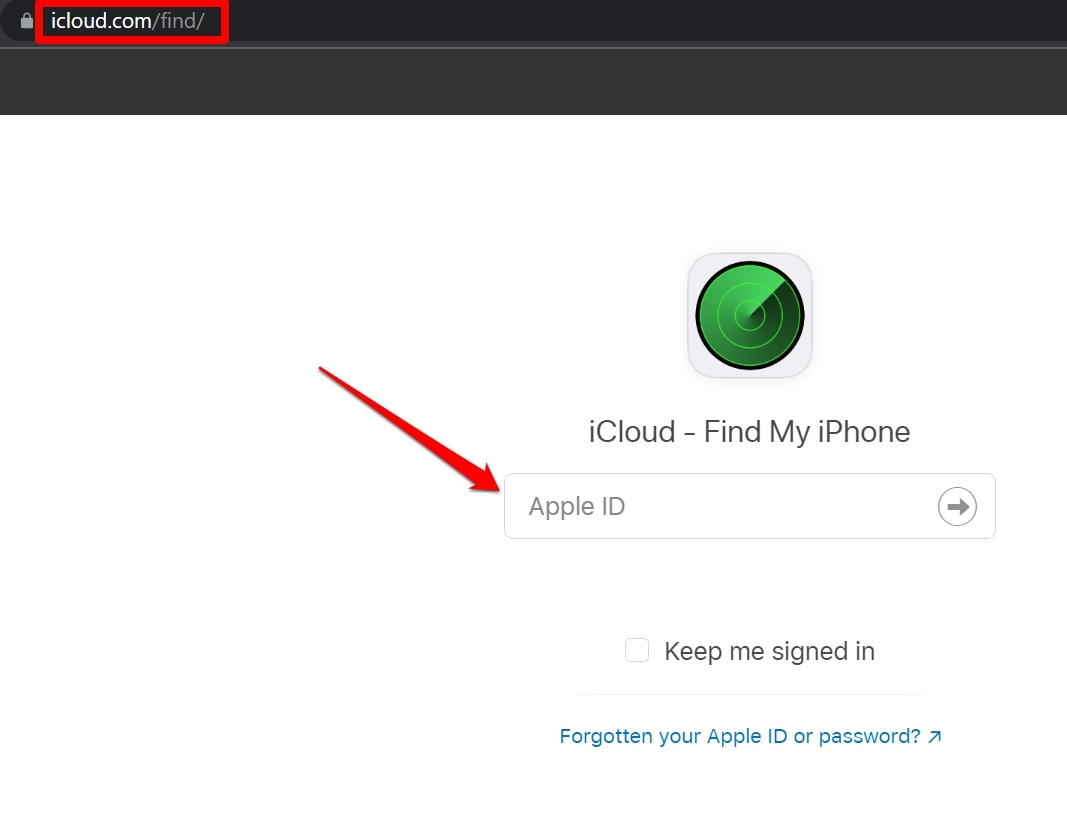
- In the URL bar, type iCloud.com/find.
- Log in using your Apple ID.
- In the right-hand corner, click on your name to reveal a drop-down menu.
- From that drop-down select Account Settings.
- Under My Devices, you will see your iPhone is listed. Click on it.
- Then click on the X sign beside the iPhone to remove it.
- You may be asked to enter the Apple ID password to confirm the move.
Turn off iMessage on your iPhone
iMessage service is Apple ID-oriented. This means if you are planning to sell your iPhone you will eventually log out and de-link your Apple ID.
If you do not disable iMessage, and if someone sends messages to you, they may be received by the new owner of the iPhone. This is undesirable and needs to be avoided.
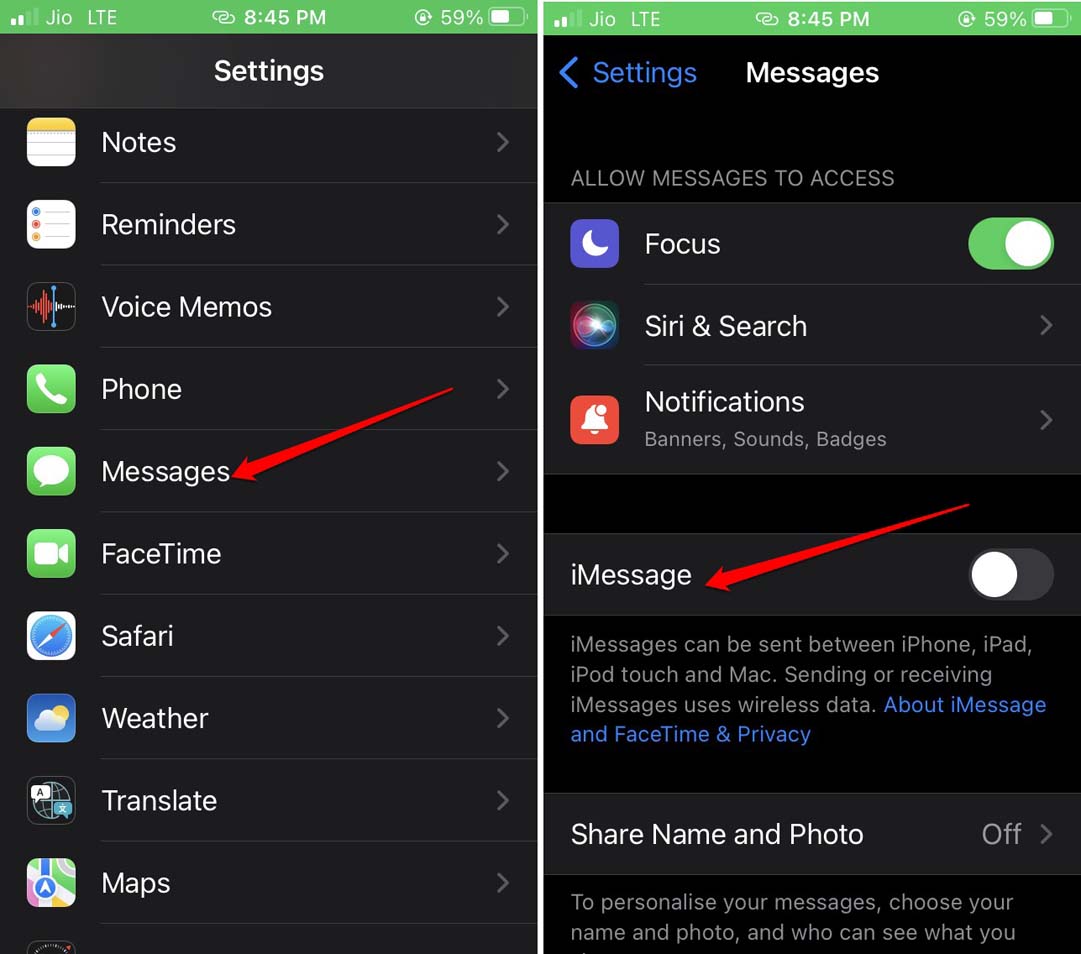
- Open the Settings app.
- Tap on Messages.
- Tap on the switch beside iMessage to disable it.
Create a Backup of your iPhone Data
It is important to make a data backup of your content present on the iPhone and transfer it to iCloud. If iCloud has been taking automatic backups over time then that’s fine as well.
- Open the iOS Settings app.
- Tap on your Apple Id.
- Then tap on iCloud.
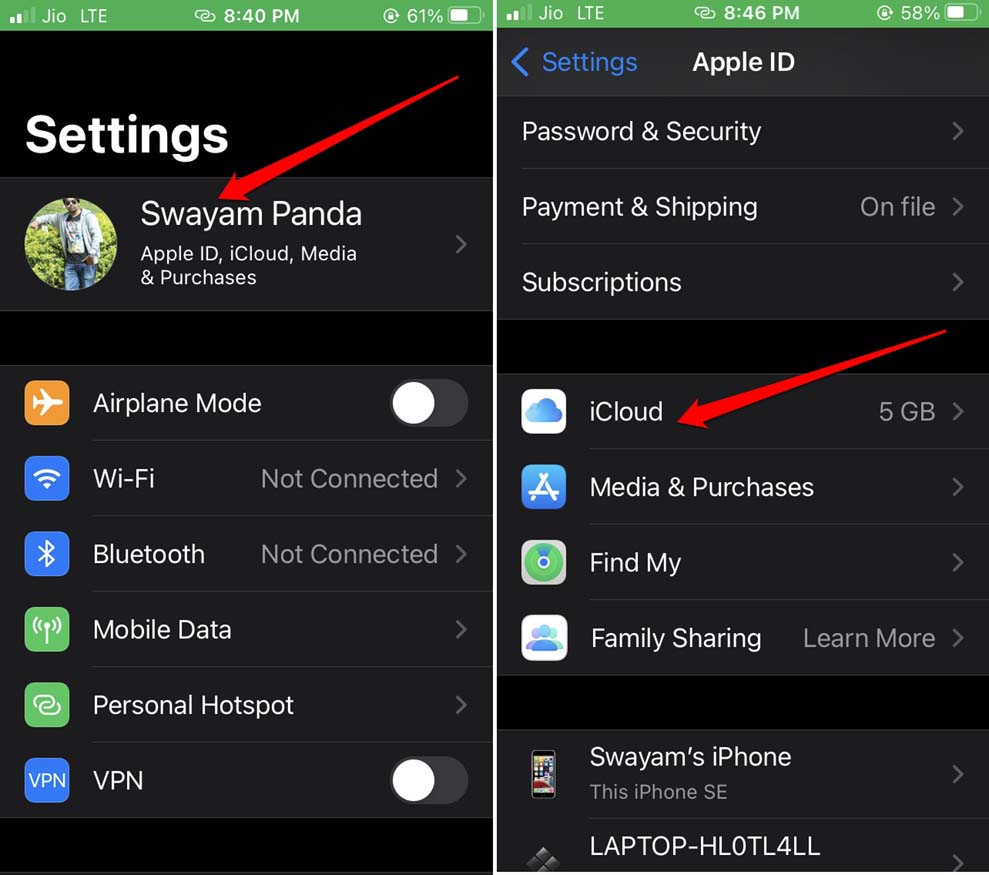
- Next, tap on iCloud backup.
- Tap on Backup Now.
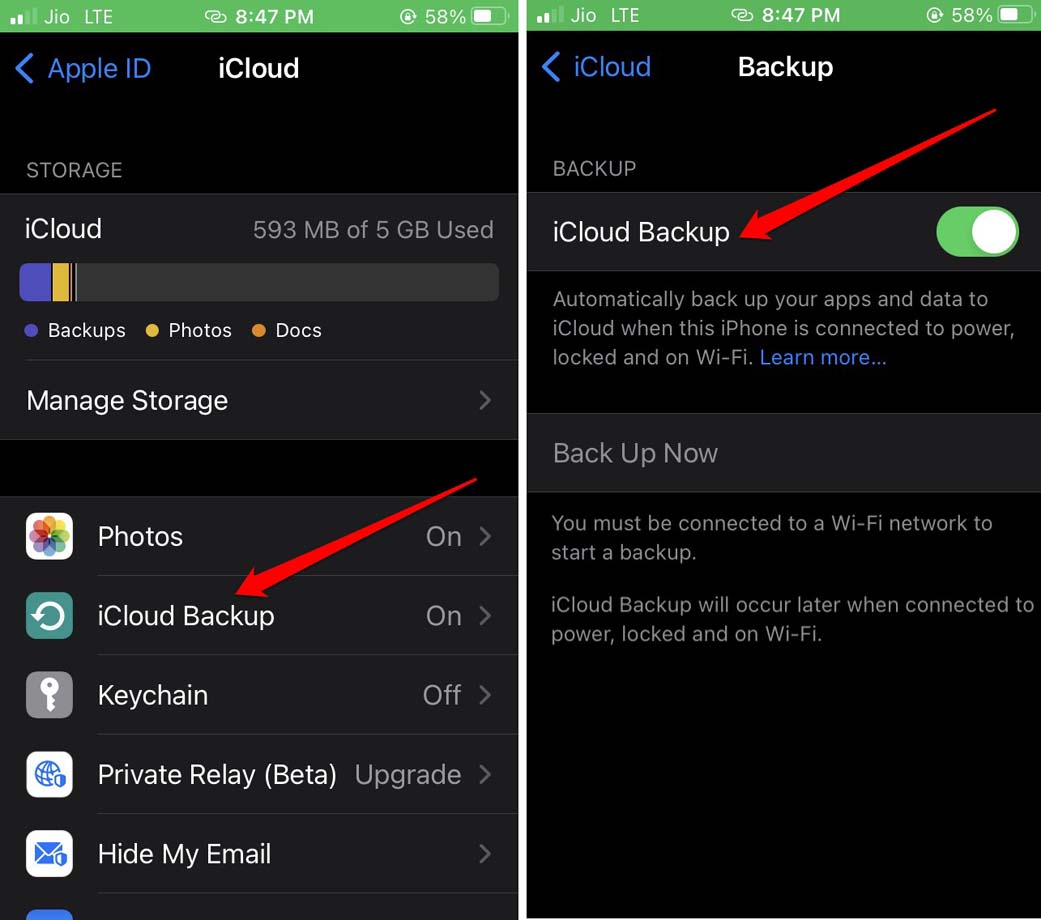
If iCloud backup is already enabled then the Back up Now option will be greyed out. This means the data on your iPhone is being actively backed up to the Apple cloud storage. I suggest using a WiFi network during creating the backup to fasten up the upload process.
Alternatively, you may also create a backup of your iPhone data using iTunes and store the backup on your computer. You have to install the latest version of iTunes on the PC on which you will create a backup of your iPhone data.
- Connect the iPhone and the PC.
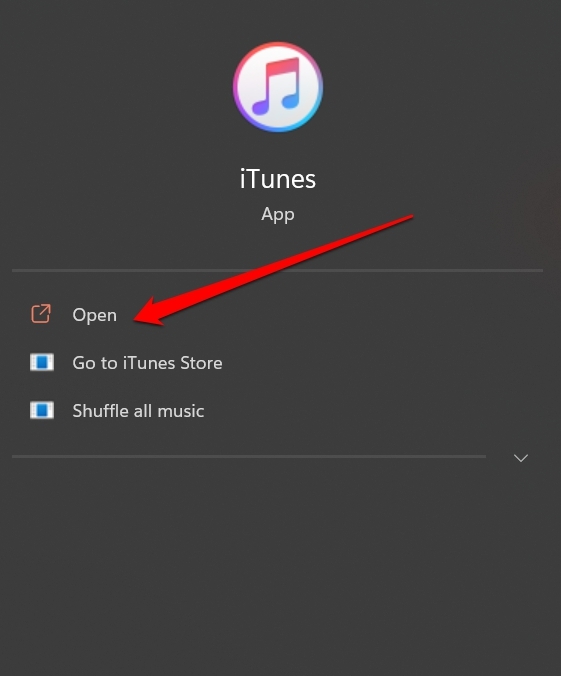
- Then launch iTunes on your computer.
- You will see an iPhone icon on the left-hand side of the iTunes home screen. Click on it.
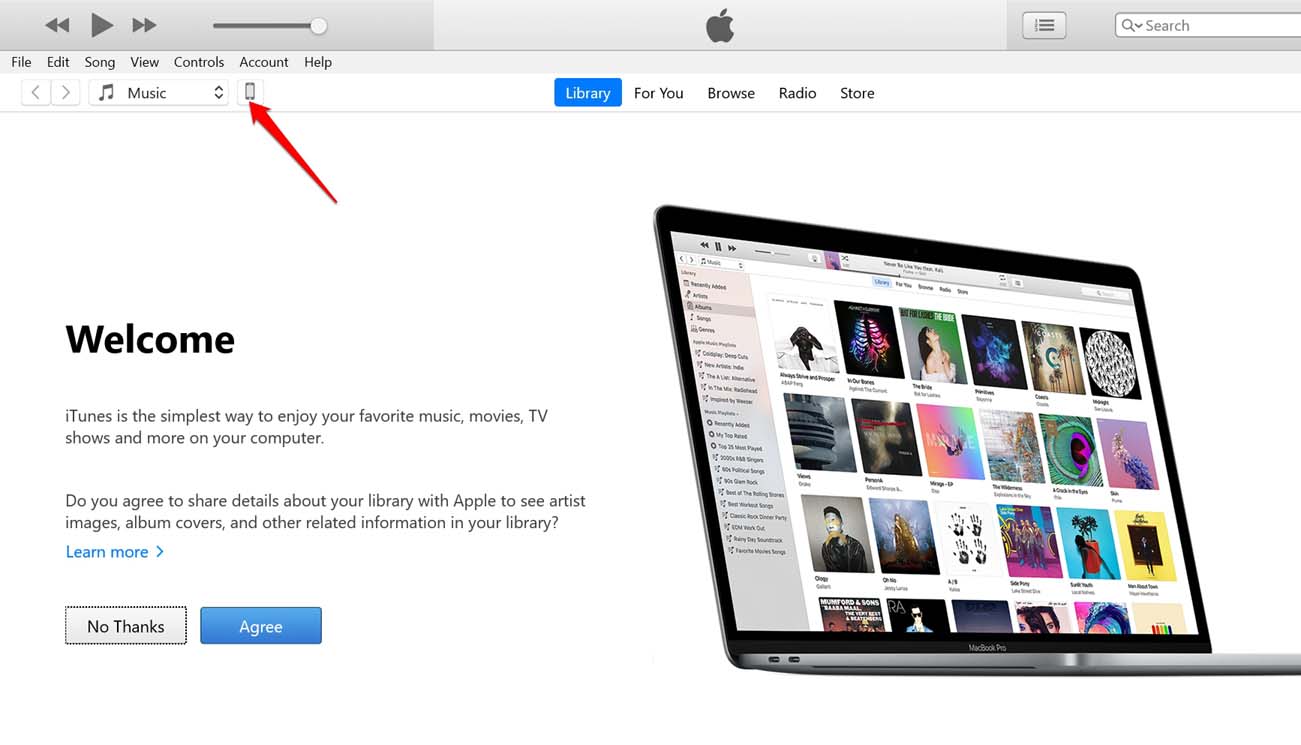
- Under the Backups tab, click This Computer and click on Backup Now.
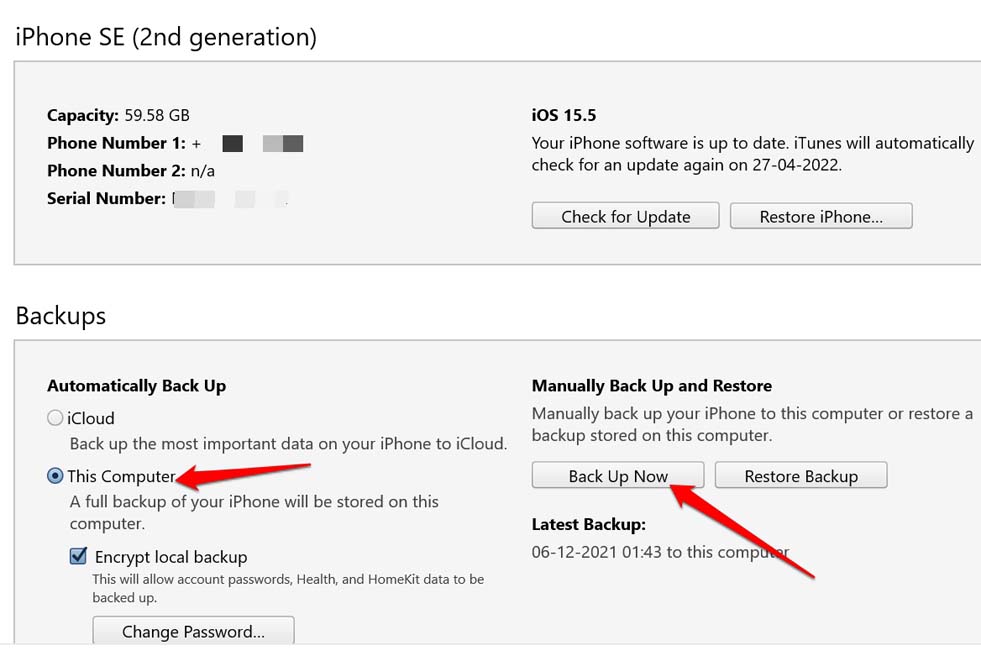
Depending upon the amount of data you are backing up it may take a few minutes or half an hour to create the backup.
Wipe Out All the Data on Your iPhone
This is an important step you must not miss out on. First, take a backup of all your data present on the iPhone. Then you have to wipe out all the data and content present on the device.
- Open the Settings app.
- Then tap on General.
- Under that navigate to Transfer or Reset iPhone.
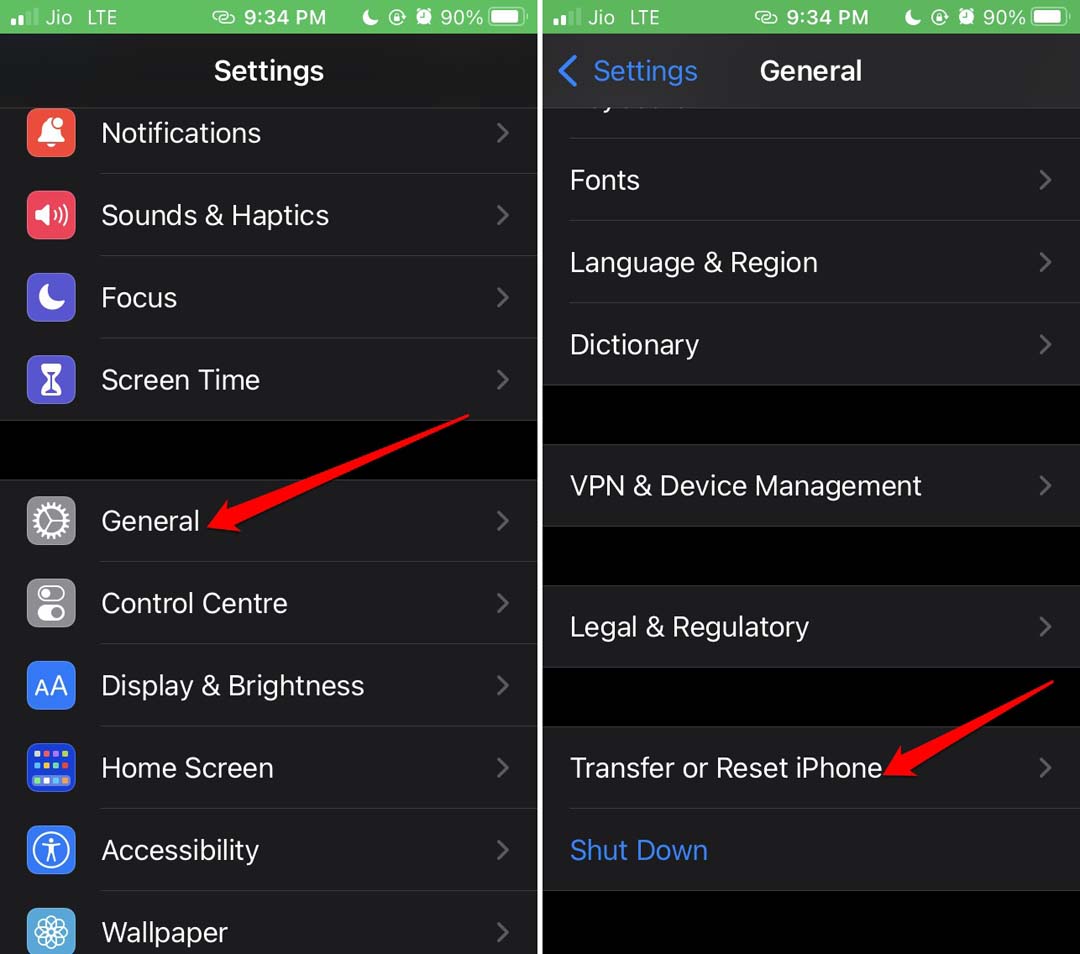
- From the menu select the option Erase All Content and Settings.
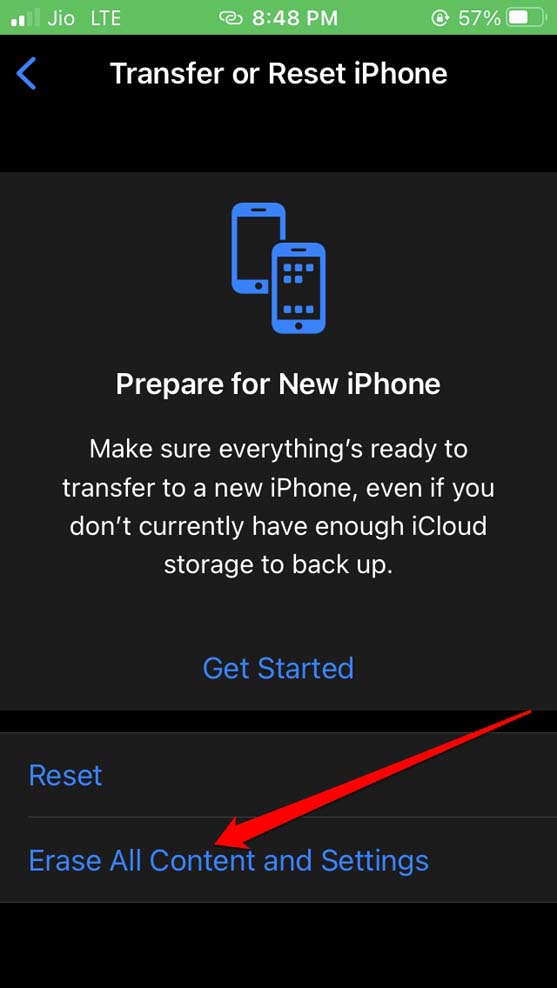
- You will be asked to enter the iPhone passcode and confirm the data wipeout.
Make sure to have a sufficient battery charge on your iPhone as the data deletion process may consume more time depending upon the volume of data present on the iPhone.
Unpair Your Apple Watch Linked to the iPhone
As you are selling out the iPhone, it’s important to delink your Apple Watch which is paired to the iPhone.
- Launch the Apple Watch app on the iPhone.
- Tap on My Watch. [Tap on All Watches to select one watch if you have more than one Apple Watch]
- Next, tap on the info button and select Unpair Apple Watch.
De-Register the iPhone from your Apple ID profile
The concept is fairly simple. As the iPhone is being sold it will have no association with your Apple ID. So, it is wise to de-register the iPhone.
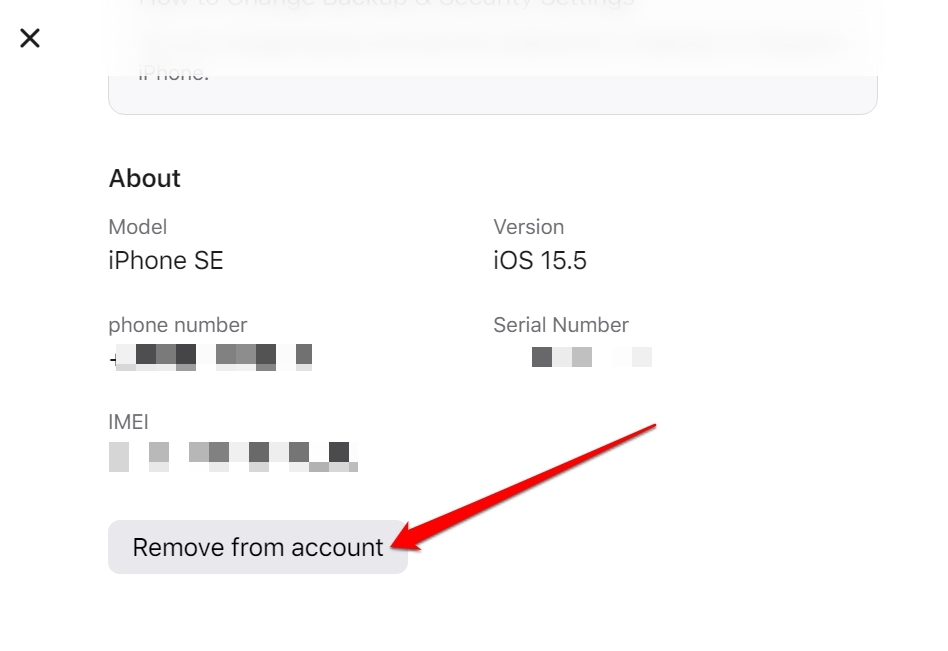
- Open the browser on your PC and visit https://appleid.apple.com/account/manage.
- Log in using your Apple ID credentials.
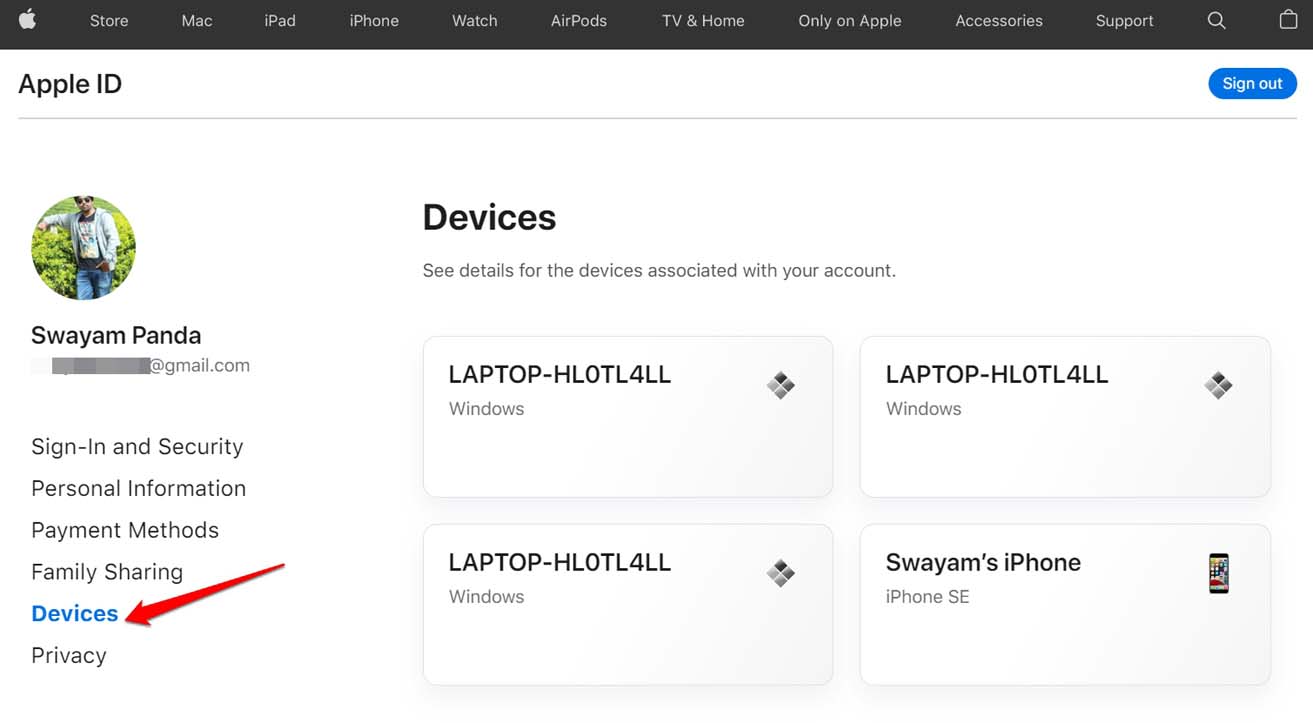
- Now, click on Devices.
- Click on your iPhone name.

- As the iPhone details show up, navigate to the bottom and click on the Remove from Account button in the popup.
Sign Out of Your Apple ID
Go for this step only after you have successfully created a backup of your device data and erased the existing content on your iPhone. Signing out of Apple ID will also sign you out of the Apple Store and iCloud.
- Launch the Settings app.
- Then tap on your Apple ID profile.
- Navigate to the option Sign Out and tap on it.
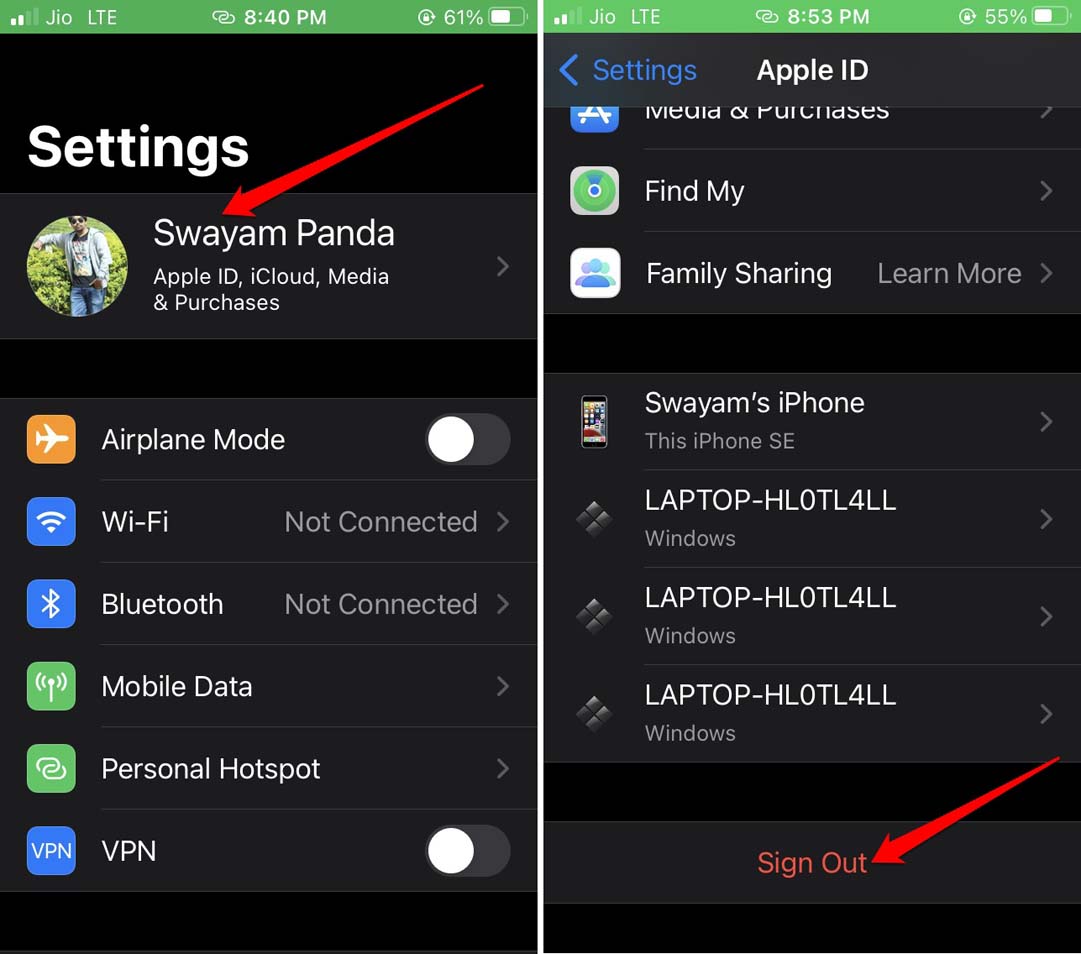
- You will be asked to enter your Apple ID credentials.
- Then tap on turn off to sign out.
Eject the SIM Card
This may seem like really easy but in most cases, people before selling their iPhones forget to eject their SIM Card. So, make sure after you are done all the necessary things like backing up data, wiping out your iPhone, take out your SIM card.
Use the designated SIM ejector PIN for your iPhone model and carefully remove the SIM card. Also, make sure to include the SIM ejector tool with the iPhone box for the person who is buying the iPhone. Otherwise, the person won’t be able to insert his SIM card into the iPhone.
Sign Out of Apps
You may be using various apps such as dating apps, financial apps, etc on your iPhone. Usually, there are dozens of such apps that almost every smartphone user has on their iPhone. Check all the apps and log out of all these apps.
You should uninstall these apps as well and delete them from your iPhone. This way the new iPhone owner won’t have access to the apps you used. Later you can install the apps on your new iPhone and log in using your credentials.
Ensure the iPhone Has No Hardware Issues
Before you deliver your iPhone to the new owner, just check that there are no issues with the hardware. Mostly, check on the front display and backside glass if there is any crack or anything.
If no issues are there, then it is fine. Otherwise, before selling your iPhone get the issues fixed by taking the device to an official Apple service center.
Do check for heating issues as well on the iPhone. As the device is now clear of data and is almost new without many apps so heating issues should not be there.
Make sure to include the paperwork, original bill, power brick, and the cable in the iPhone box.
Conclusion
So, these are the important things you must do before selling your iPhone. Following these tips will keep your data safe which you can use on the new iPhone you get. Also, resetting the iPhone will make it easier for the new buyer to set up the iPhone effortlessly as per his requirements.
If you've any thoughts on 10 Things You Must Do Before Selling Your iPhone, then feel free to drop in below comment box. Also, please subscribe to our DigitBin YouTube channel for videos tutorials. Cheers!
