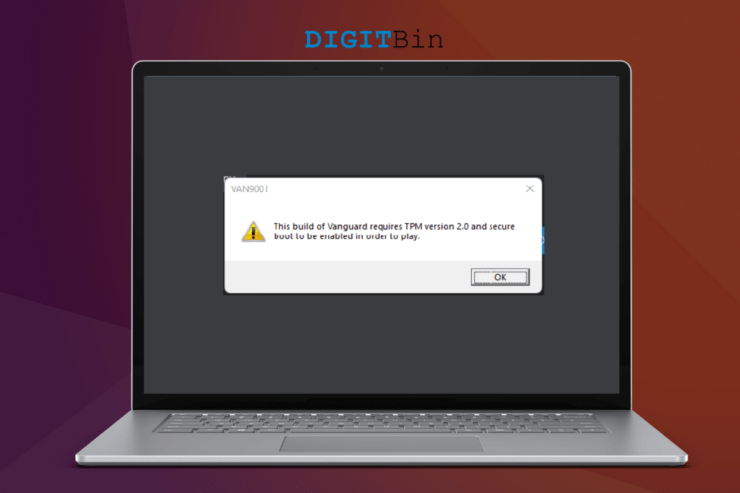
I launched Valorant, and I got greeted with “this build of vanguard requires TPM version 2.0” in Windows. We can come to many conclusions, but I insist the readers identify the core problem first. Microsoft laid down the system requirements for the latest Windows 11 operating system, and TPM 2.0 & Secure Boot are part of it. Let’s look at several reasons why Valorant is not allowing the player to enter the game.
Why is Vanguard preventing Valorant to launch?
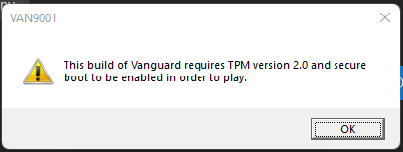
I have shared a snapshot below, and it clearly says, “this build of vanguard requires TPM version 2.0”. The error code VAN9001 states that Windows PC couldn’t find enabled TPM 2.0 and Secure Boot in the system. Let me give you a few valid reasons why Vanguard stopped Valorant from launching.
Windows 11 Security Feature:
Microsoft understands the existing security loopholes in the earlier version. I have come across Chinese programs selling openly and designed to bypass the lock screen.
The TPM 2.0 is a physical chip, and Secure Boot creates unique keys. The physical TPM 2.0 prevents privacy invasion, and a secure boot prevents system boot file modification.
You have to enable TPM 2.0 and Secure Boot from BIOS to fix VAN9001.
Vanguard Security Latest Protocol:
Millions tune in to Valorant every day because they have an effective anti-cheat system. I play Apex Legends, PUBG, Counter-Strike, Dirty Bomb, etc. I have never seen an anti-cheat system like Vanguard. The game identifies the cheaters in the game and blocks them permanently. The anti-cheat system is effective and Riot Games are utilizing the new technology.
Windows 10 to Windows 11 Upgrade:
The VAN9001 error appears on recently upgraded Windows gaming machines. Most early Windows 11 birds have faced the problem and those who have upgraded from the earlier version. I upgraded the software from 10 to 11 during the early days. I have installed a fresh copy of Windows 11 from a flash drive, and the problem didn’t persist in the fresh installation. I have shown you how to resolve the VAN9001 error in the upgraded Windows 11 PC.
Pirated Windows:
Unfortunately, the average consumer doesn’t understand the value of free Windows. Microsoft released the 10th edition with a free version. The Redmond-based company wanted the loyal users to move forward from the pirated operating systems.
Pre-activated Windows won’t let you download or install updates, and they constantly monitor your actions. Many privacy invaders have shared how they procured credit cards, debit cards, and email credentials.
I have shared a snapshot of modified Windows. The modified operating system is not allowing the software to upgrade. Move on to genuine Windows 11/10.
Malware:
Windows and malware go hand in hand. In 2020, the reports reveal that they found one hundred million malware pieces, and the situation has gotten worse in the past couple of years. The pandemic has forced millions to go online, and privacy invaders are taking advantage of it. Keep your Windows system secure and free from threats.
Best Ways to Fix VAN9001 in Windows 10/11
TPM 2.0 and Secure Boot are a necessity for Windows 11. I have organized the guide in order, so follow the tutorial step-by-step, and do not skip a beat.
1. All Hail Windows 10
Microsoft hasn’t given up on Windows 10, and they will continue to provide support until October 14, 2025. The Redmond-based company wants to reduce e-waste, and software developers will keep on providing support for the 10th edition.
You got three more years on the paper, and software developers will provide the latest updates for the 10th edition.
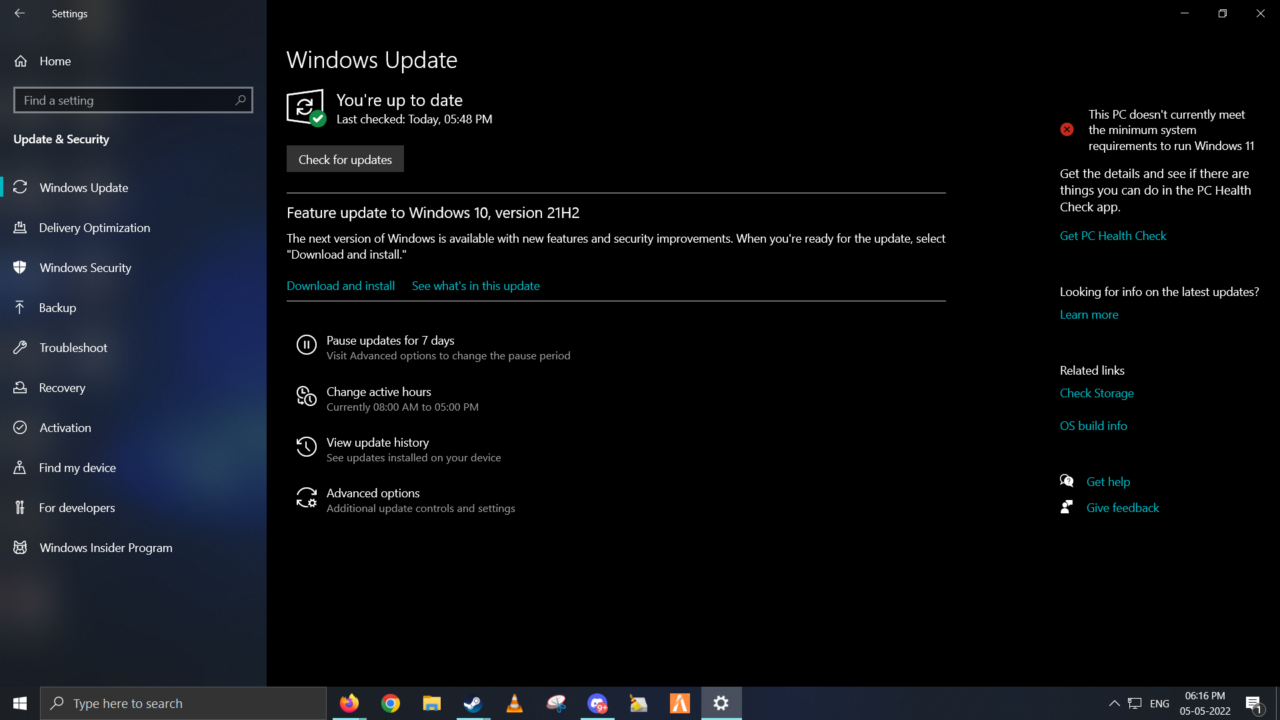
New laptop costs 2x times higher than the regular price due to the ongoing chip shortage.
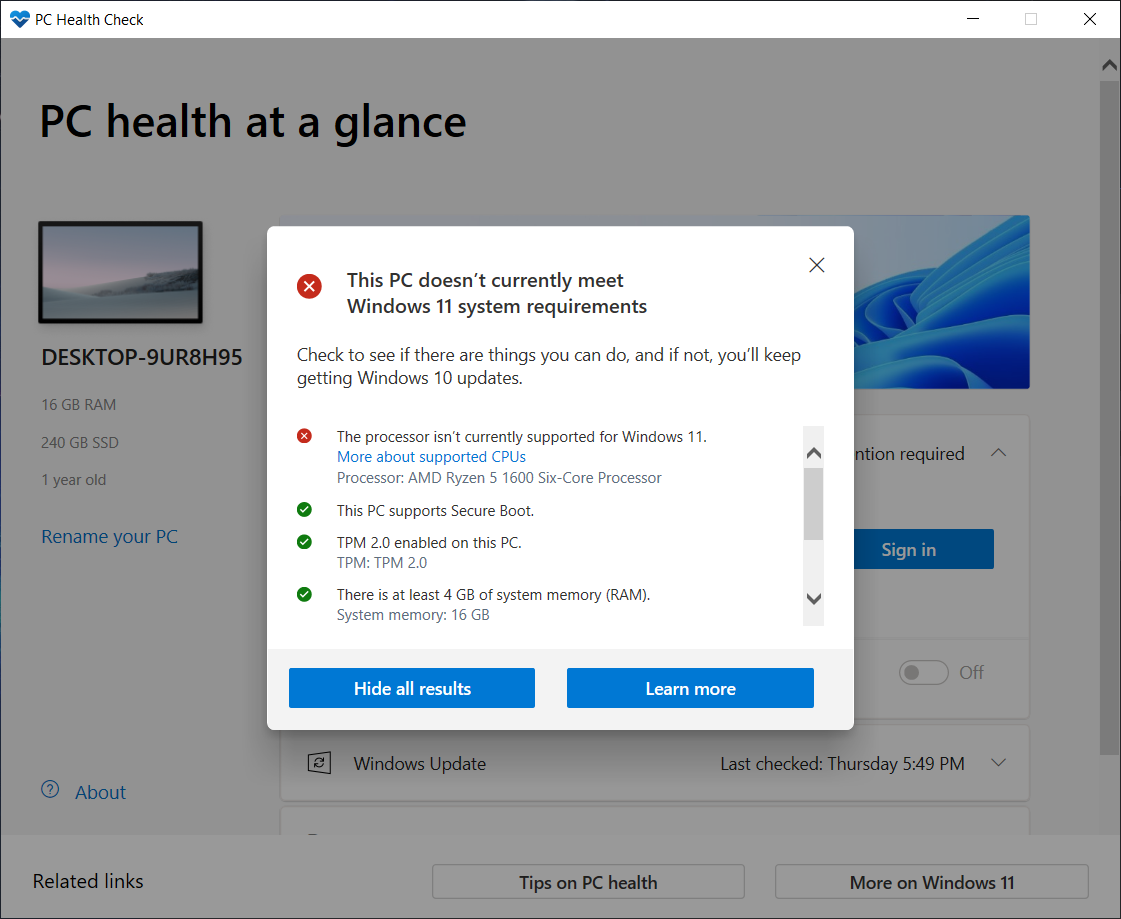
I have to invest a minimum of $250 on Ryzen 5 3600 since the B450 motherboard supports up to AM4 3rd gen processors.
You are saving a lot of money on upgrading the motherboard, processor, and other components.
2. Windows Insider Program
I have installed the Windows beta program, and I ended up with many problems. Microsoft mentions that they cannot guarantee a bug-free and clutter-free experience on the beta version. A gaming machine should never run the beta operating system.
- Open “Settings” by pressing Windows Key + I keys.
- Go to the “Update & Security” option.
- Choose “Windows Insider Program” from the left side menu.
- You can get out of Windows Insider Program from here.
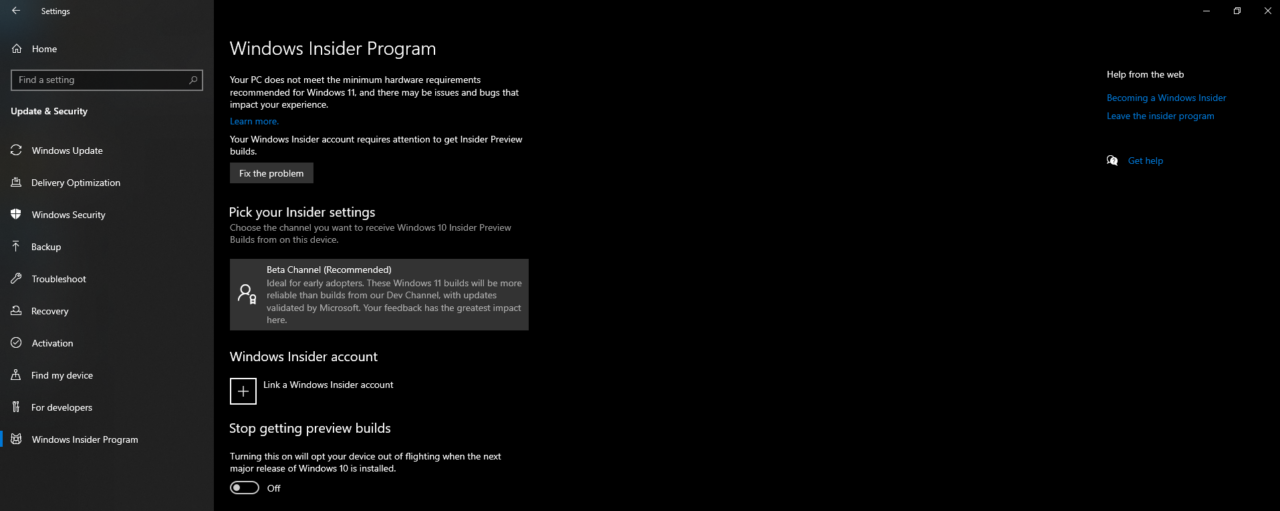
You will be redirected to the primary browser and log in Microsoft account. Get out of Insider Program. Windows will remove the beta tag from the operating system in the next update. You have to be patient until then or reinstall the operating system using a USB flash drive.
3. Enable TPM 2.0
UEFI has changed the way we navigate the BIOS. I will show you the easiest way to access BIOS and enable TPM and Secure Boot in Lenovo Ideapad laptops. Most Lenovo machines have a similar user interface, so you wouldn’t have trouble handling yours.
- Open the “Settings” window by pressing Windows Key + I keys.
- Choose “Recovery” under System.
- Find “Advanced Startup” and click on the “Restart” button.
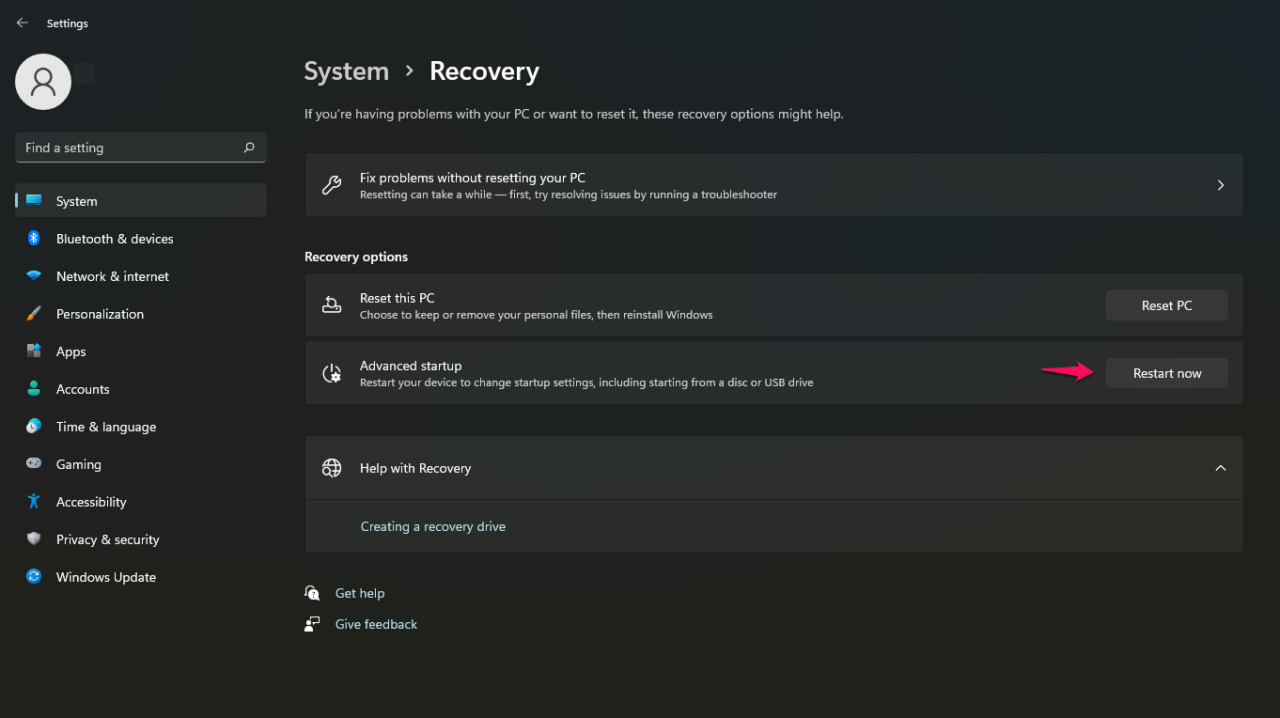
- Click on the “Restart now” button.
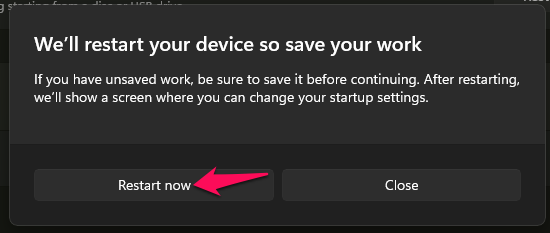
Note: Wait for the Windows machine to boot to recovery mode.
- Choose the “Troubleshoot” option.
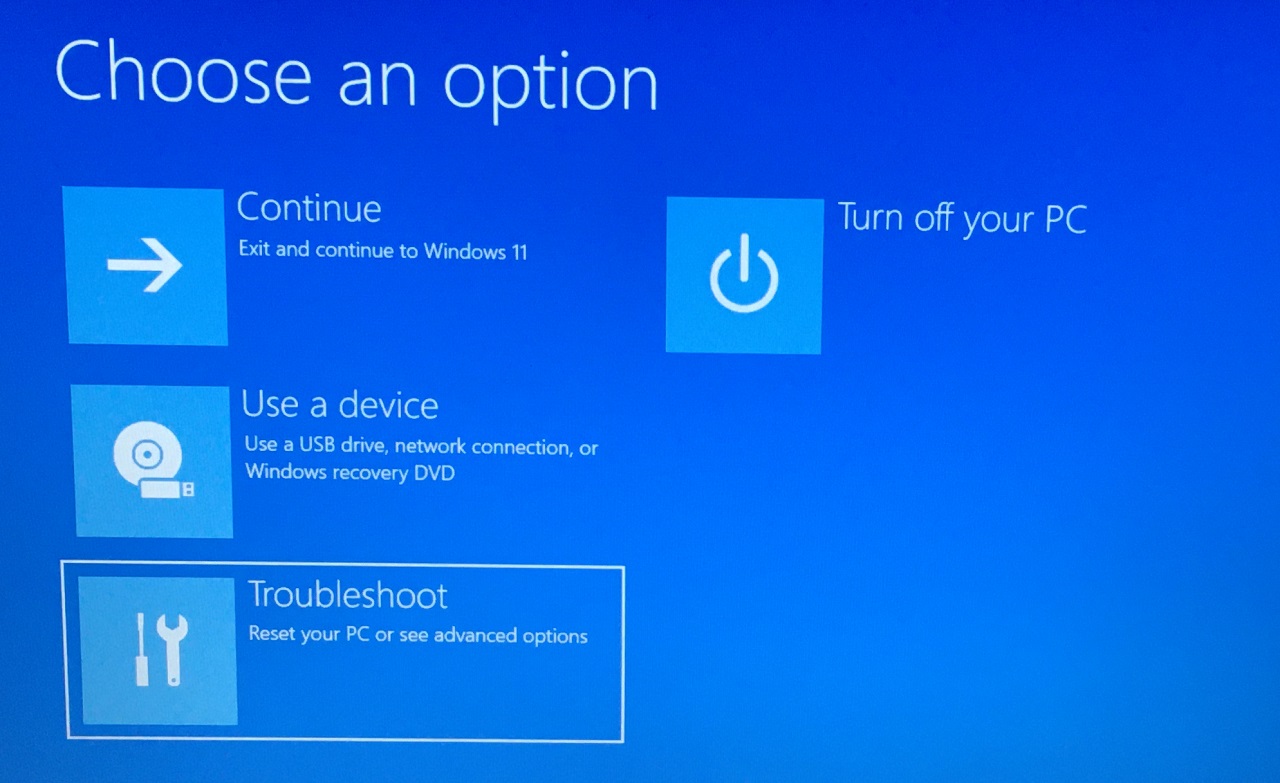
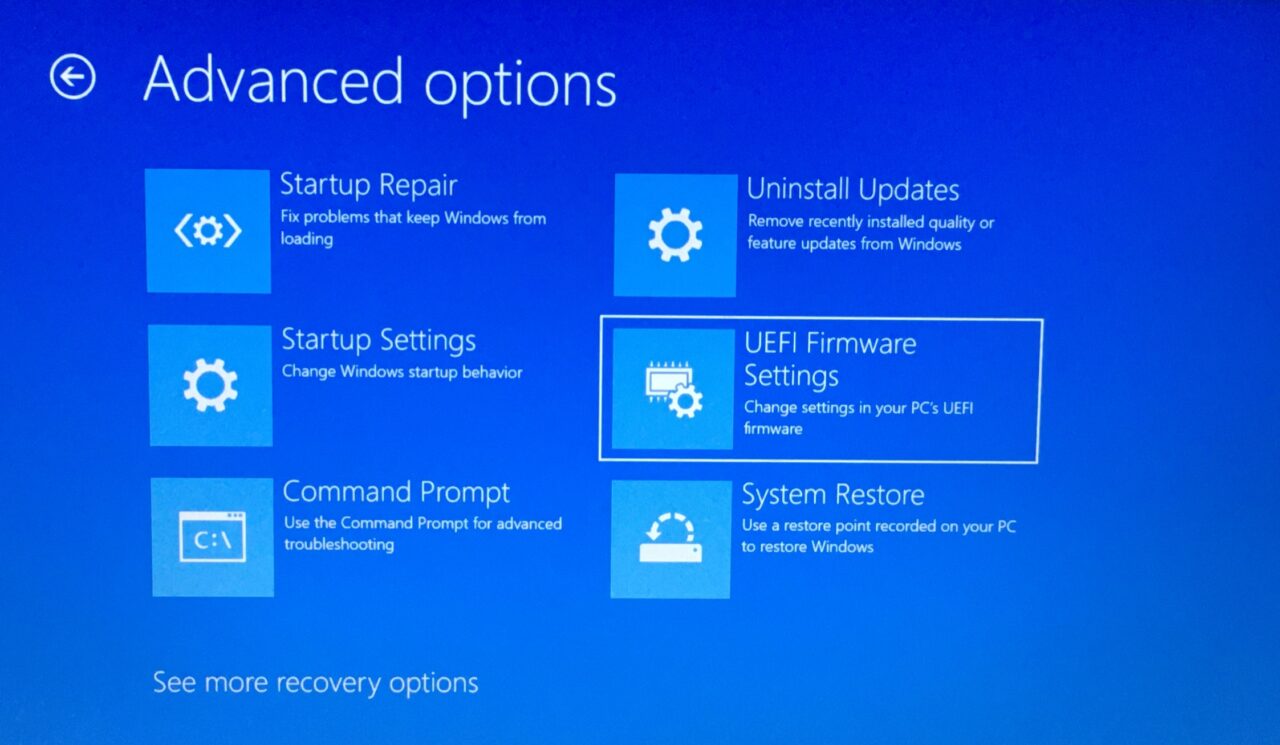
- Choose “Advanced options” from the menu.
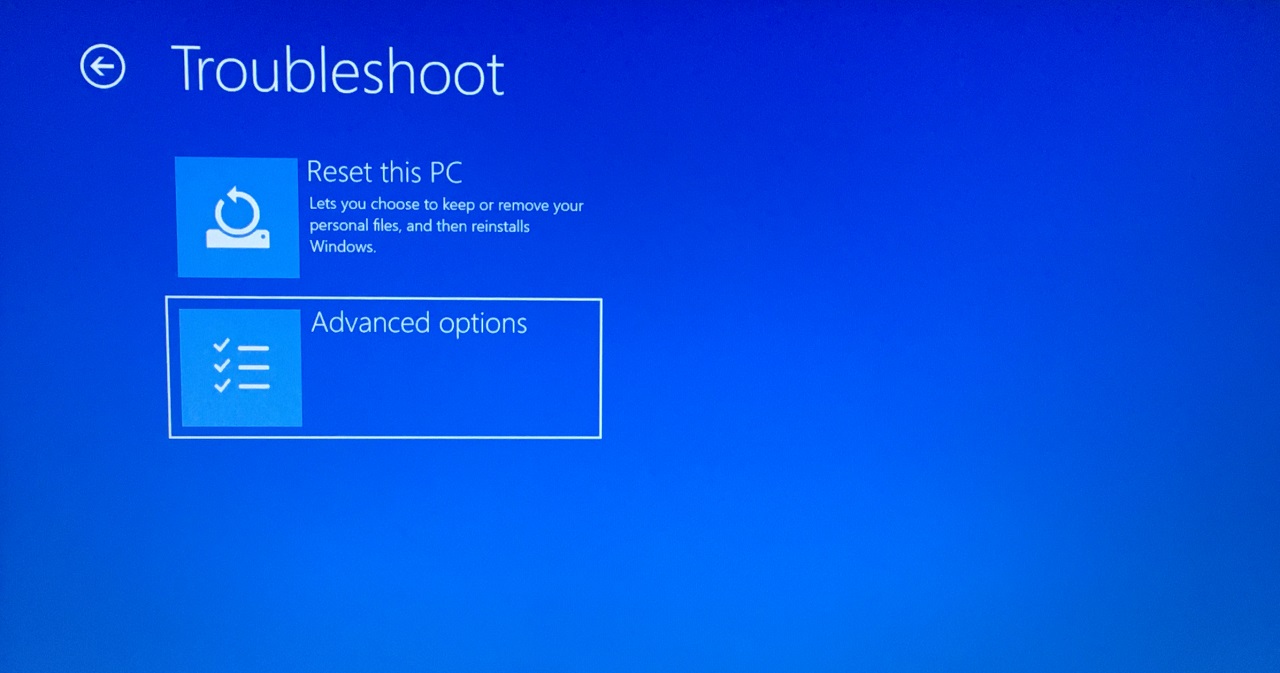
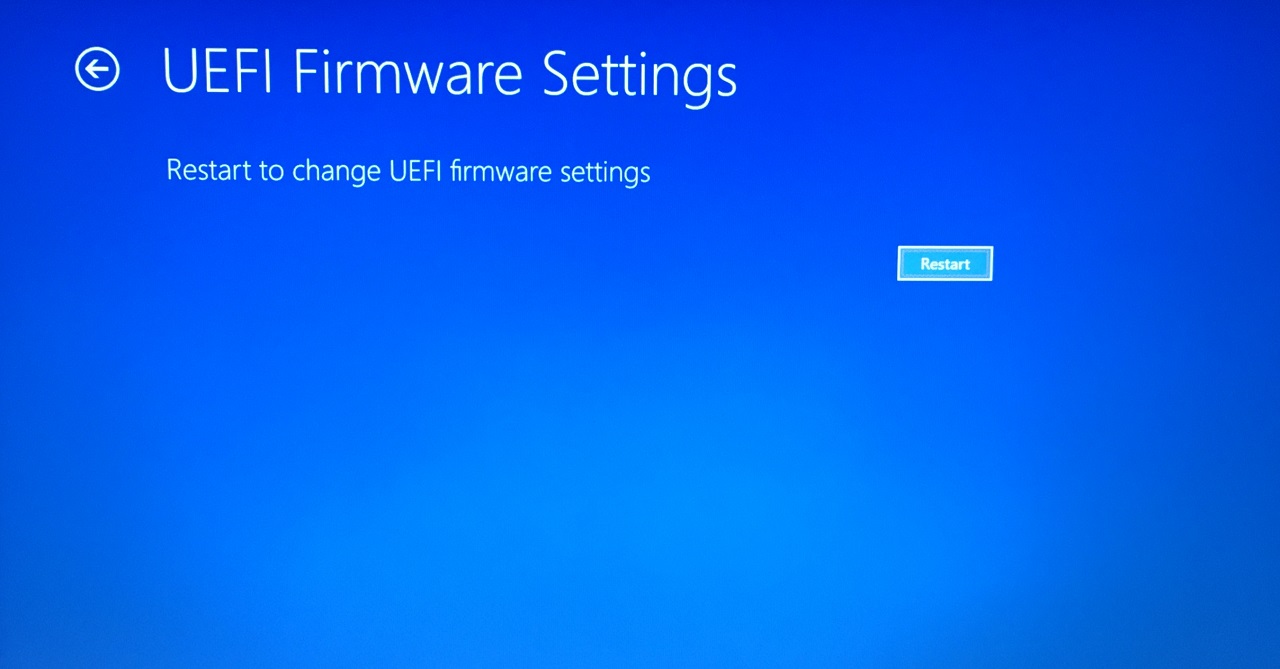
- Choose “UEFI Firmware Settings” from the menu.
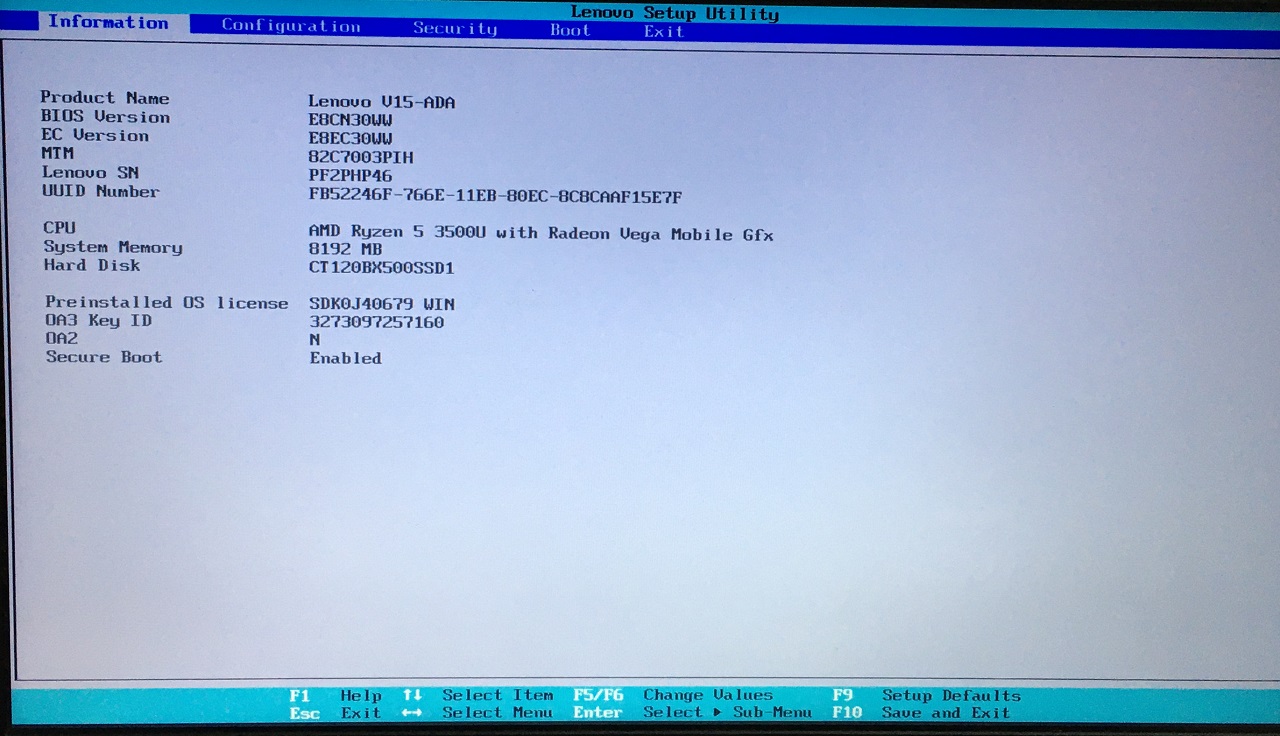
- Press the Enter key to “Restart” the PC and enter it into the BIOS menu.
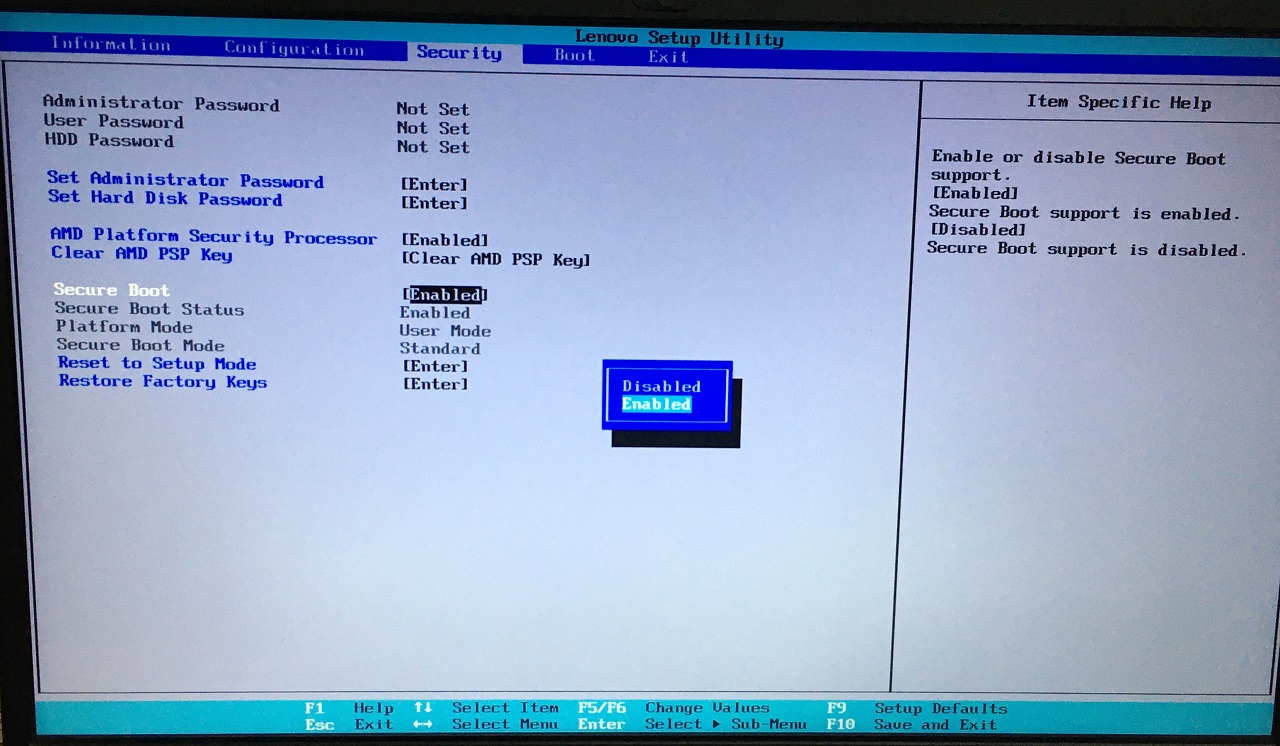
- Choose “Security” from the top main menu. Use arrow keys to navigate the menu.
- Select “AMD Platform Security Processor” from the options.
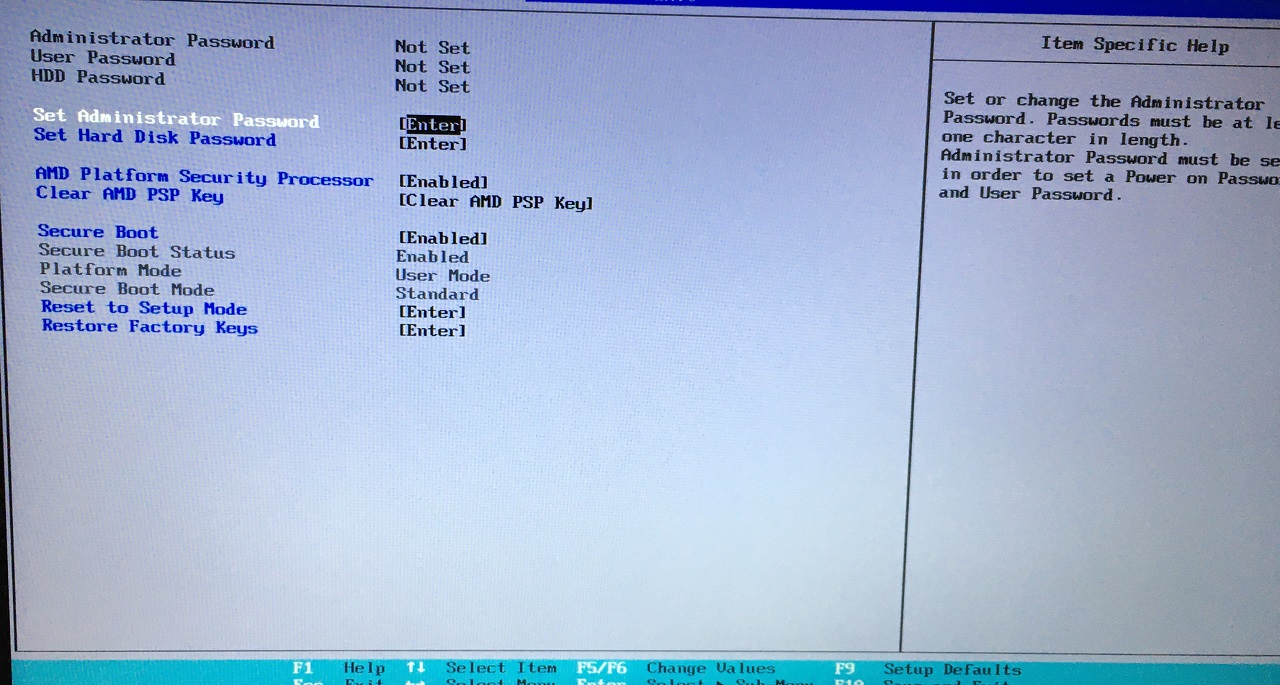
- Press the Enter key to view more options.
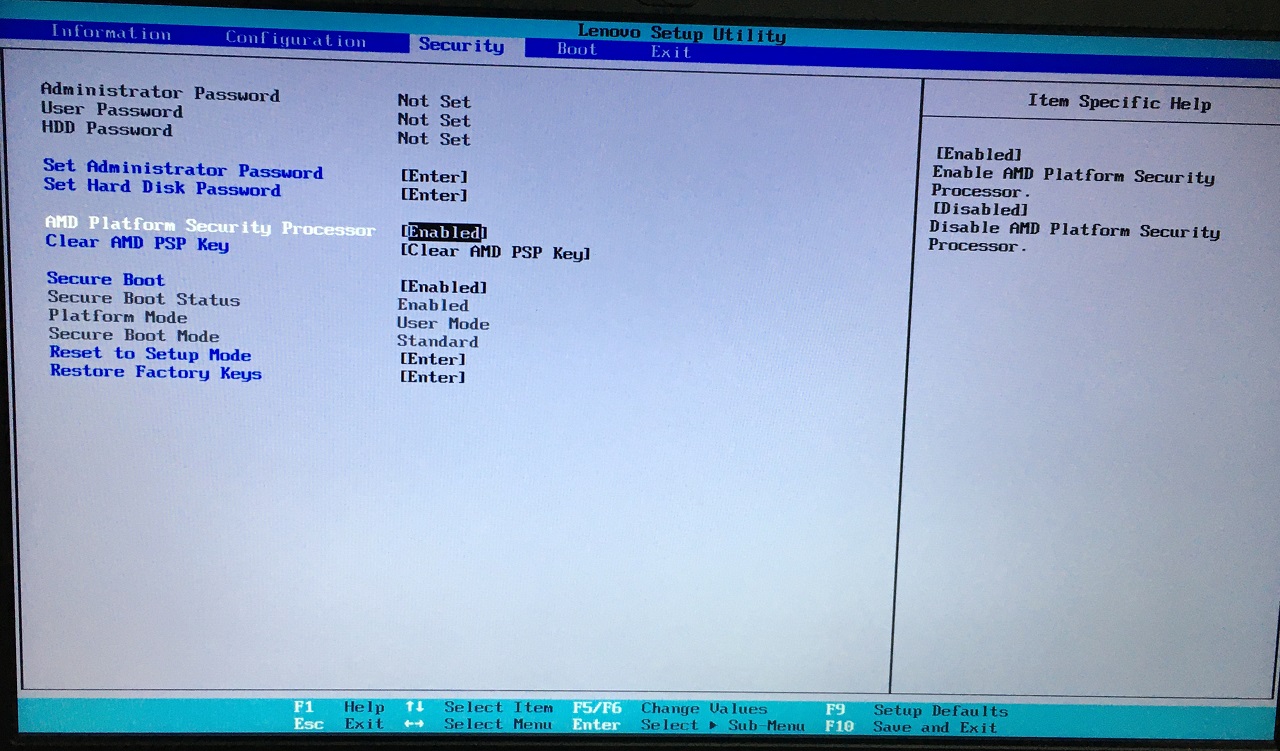
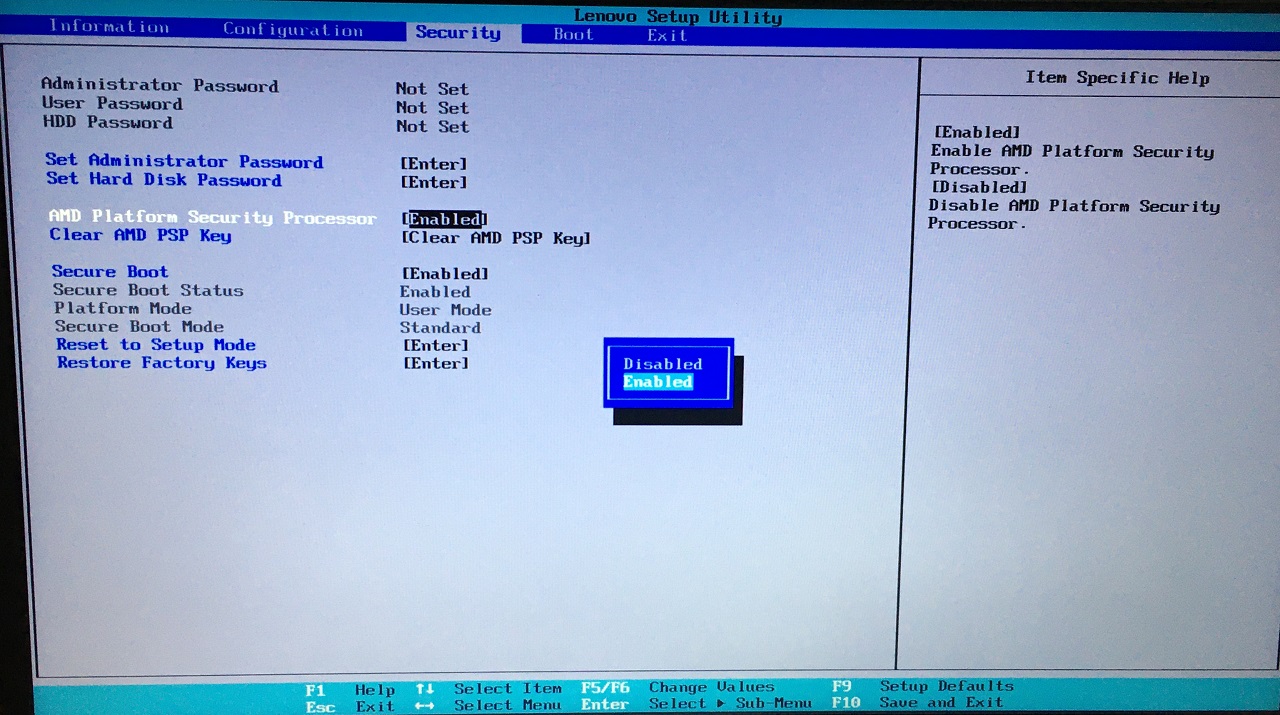
- Select “Enabled” then press the Enter key.
- Choose “Secure Boot” and press the Enter key.
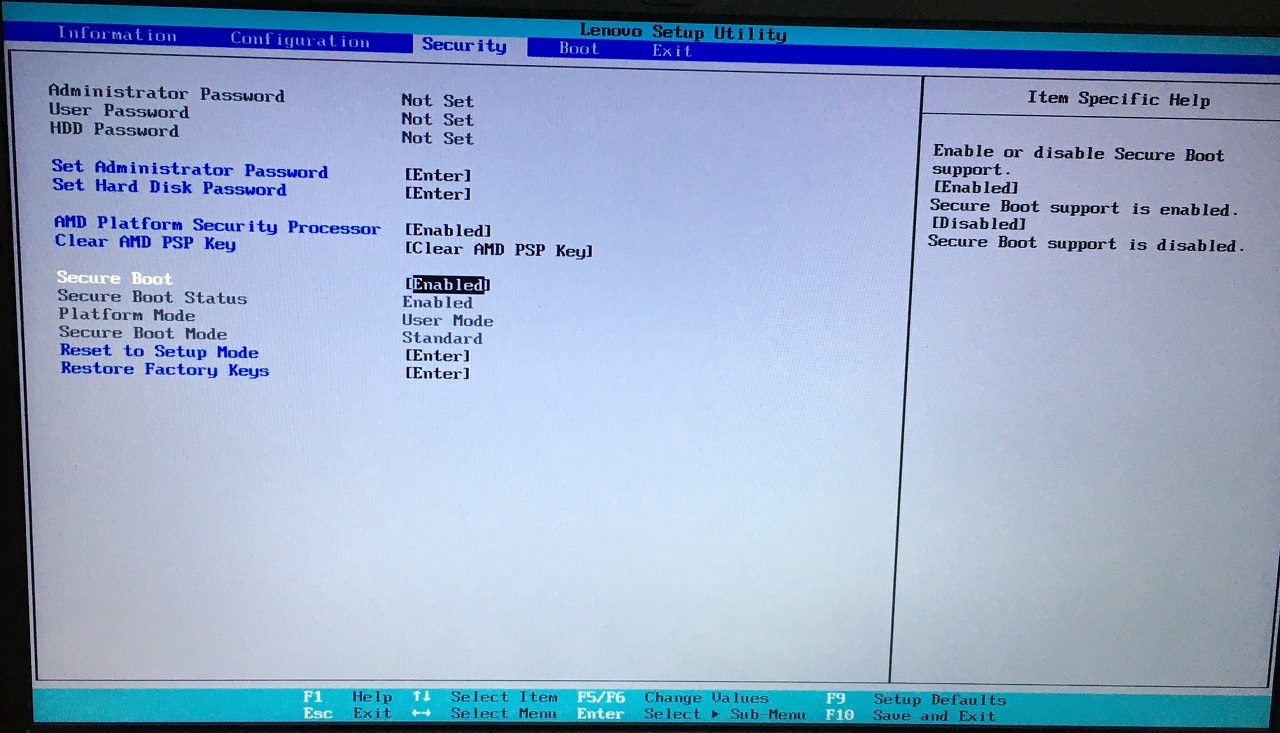
- Select “Enabled” then press the Enter key.
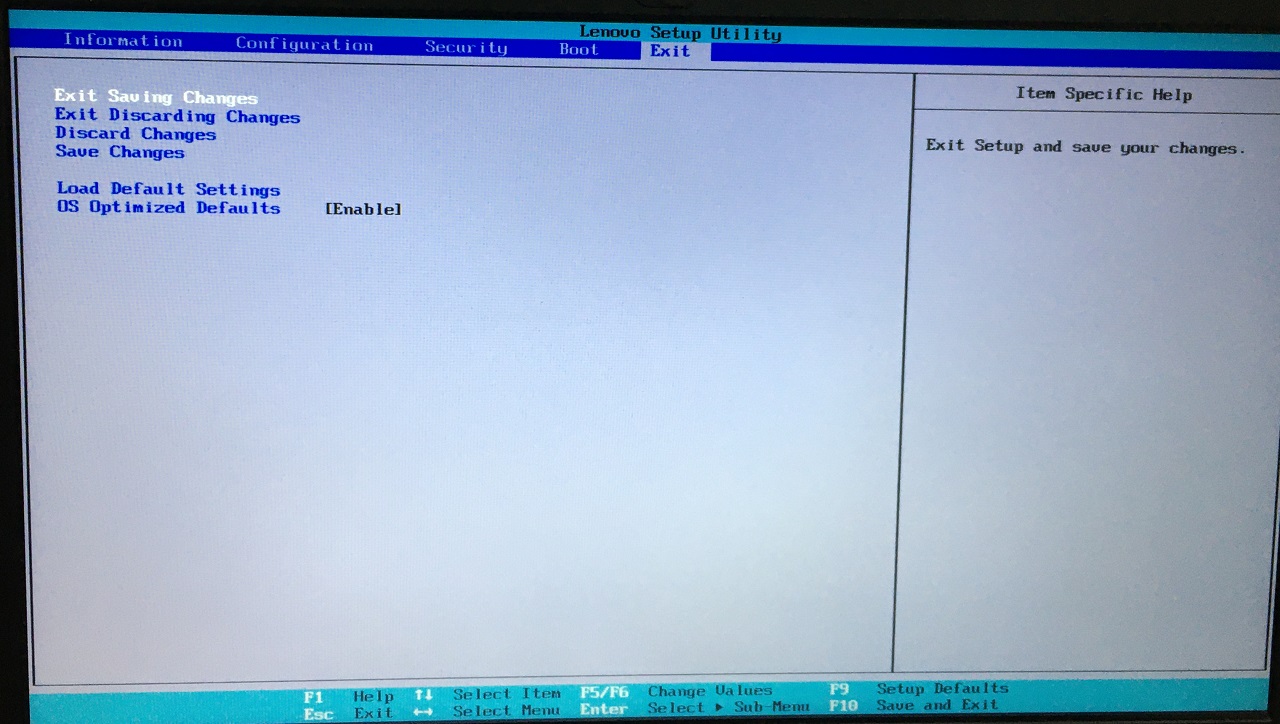
- Choose “Exit Saving Changes” by navigating to the “Exit” menu.
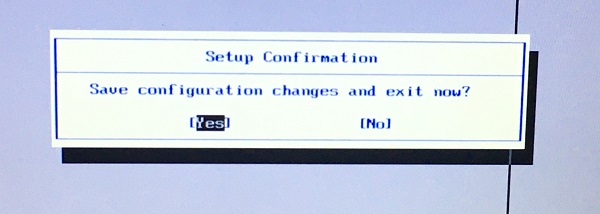
- Click on “Yes” to save changes.
Your PC reboots back into the lock screen. You have successfully enabled TPM 2.0 in Lenovo laptops. Contact the service center or customer support team for further instructions.
4. Enable Secure Boot
Secure Boot is present in the motherboard if TPM 2.0 is supported. You don’t have to perform any scans or enter the command to find the compatibility. It’s a long ride, so be patient throughout the process or visit the service center for assistance.
What do you need to access Secure Boot options?
BIOS Key
You have to find the BIOS menu key, and you can use the search engine.
- For laptops: Lenovo BIOS Key
- For motherboards (assembled desktops): MSI BIOS Key
Online Tutorial
I have noticed that Secure Boot options are different on Lenovo and MSI BIOS. In short, you might be using an Acer laptop or HP laptop, or Asus gaming desktop.
The instructions may be the same, but the names of the options are different for every brand. I wish the manufacturers followed the same BIOS option names.
- Open the “Settings” window by pressing Windows Key + I keys.
- Choose “Recovery” under System.
- Find “Advanced Startup” and click on the “Restart” button.
- Click on the “Restart now” button.
Note: Wait for the Windows machine to boot to recovery mode.
- Choose “Troubleshoot” option.
- Choose “Advanced options” from the menu.
- Choose “UEFI Firmware Settings” from the menu.
- Press the Enter key to “Restart” the PC and enter it into the BIOS menu.
Note: Use arrow up/down/left/right to navigate in BIOS.
- Choose “Advanced” from the top main menu.
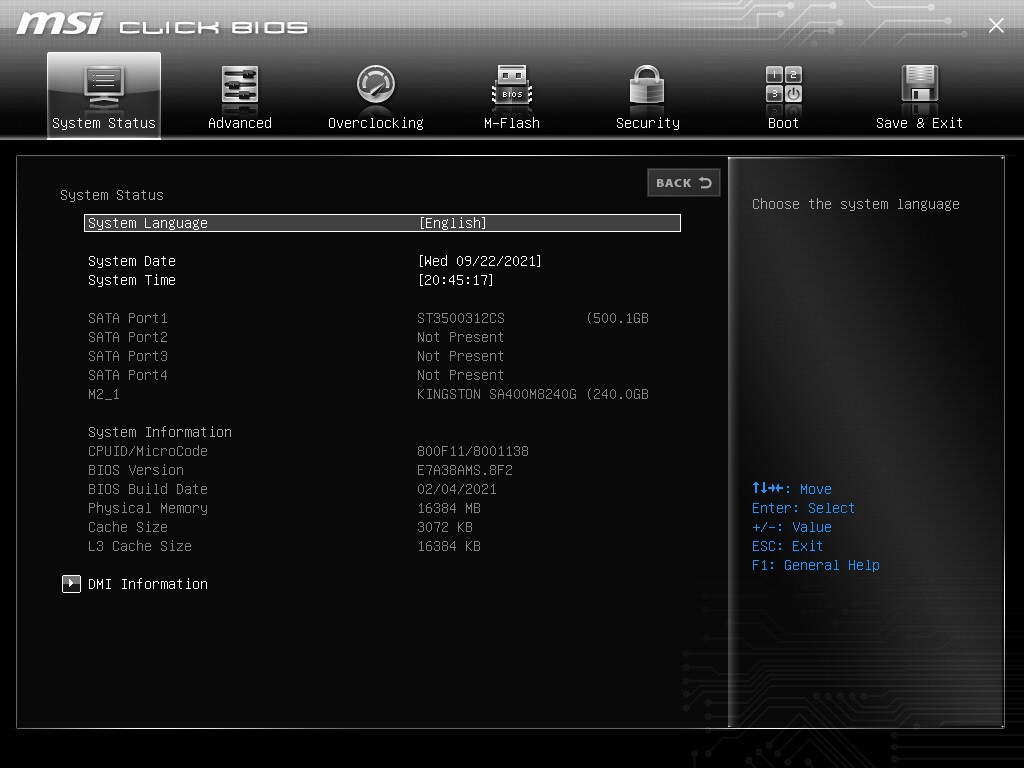
- Choose “Windows OS Configuration” from the options.
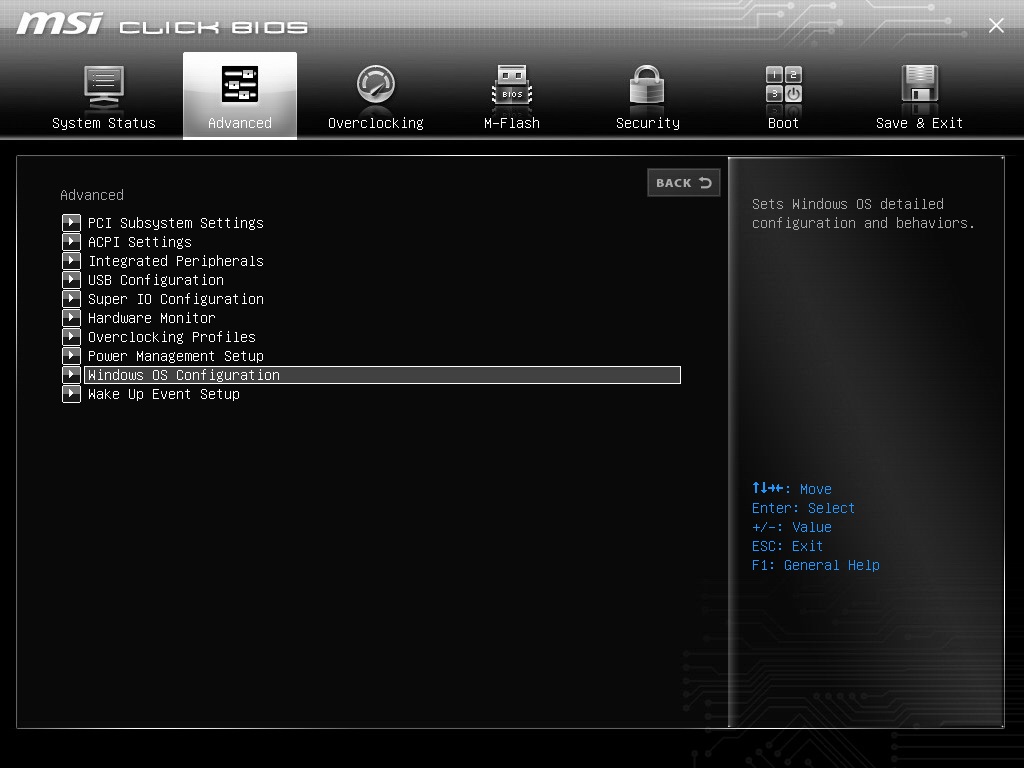
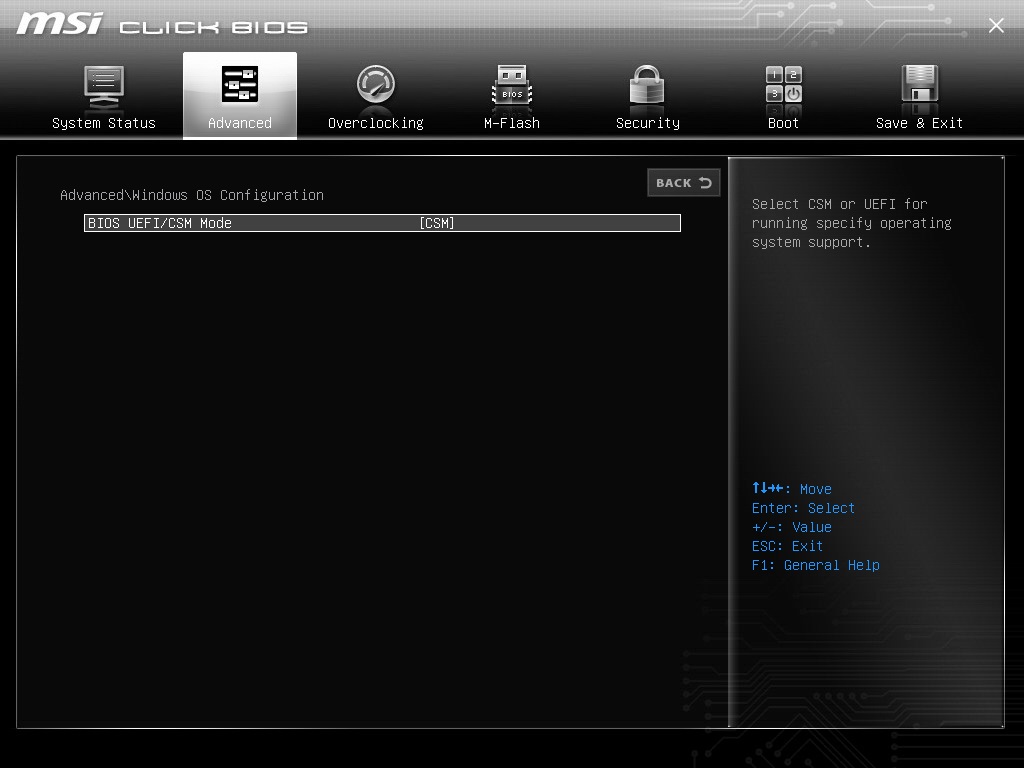
- Choose “BIOS UEFI/CSM Mode” and press the Enter key.
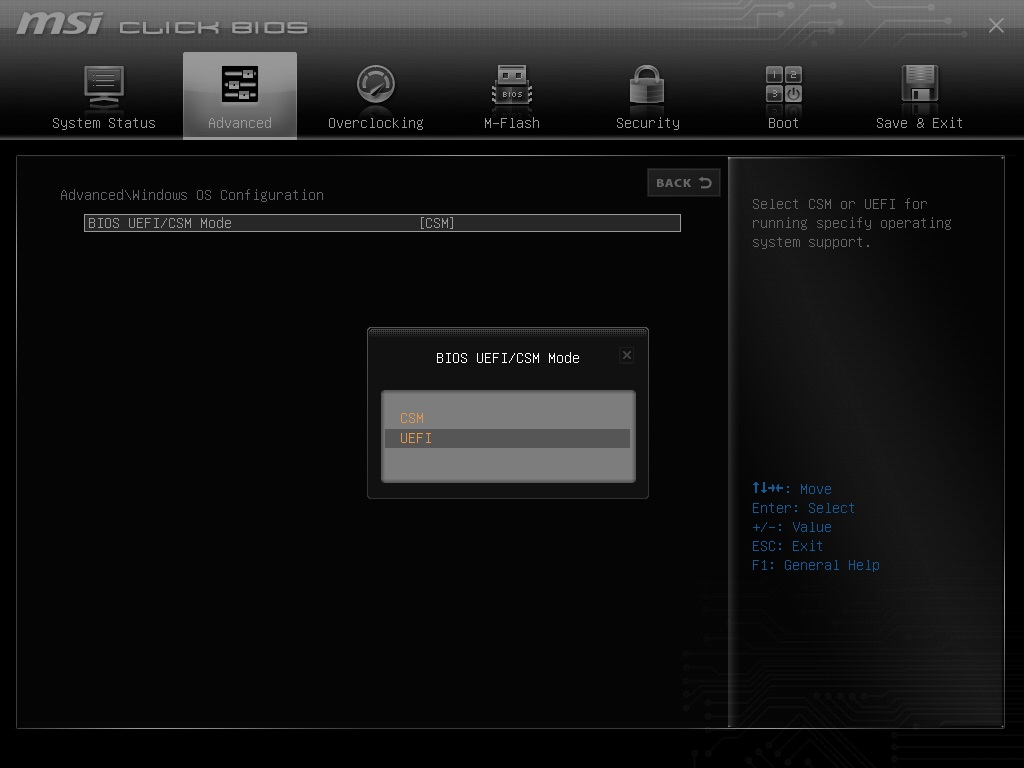
- Choose the “UEFI” option from the pop-up window.
- Use arrow keys to move down. Select “Secure Boot,” and then press the Enter key.
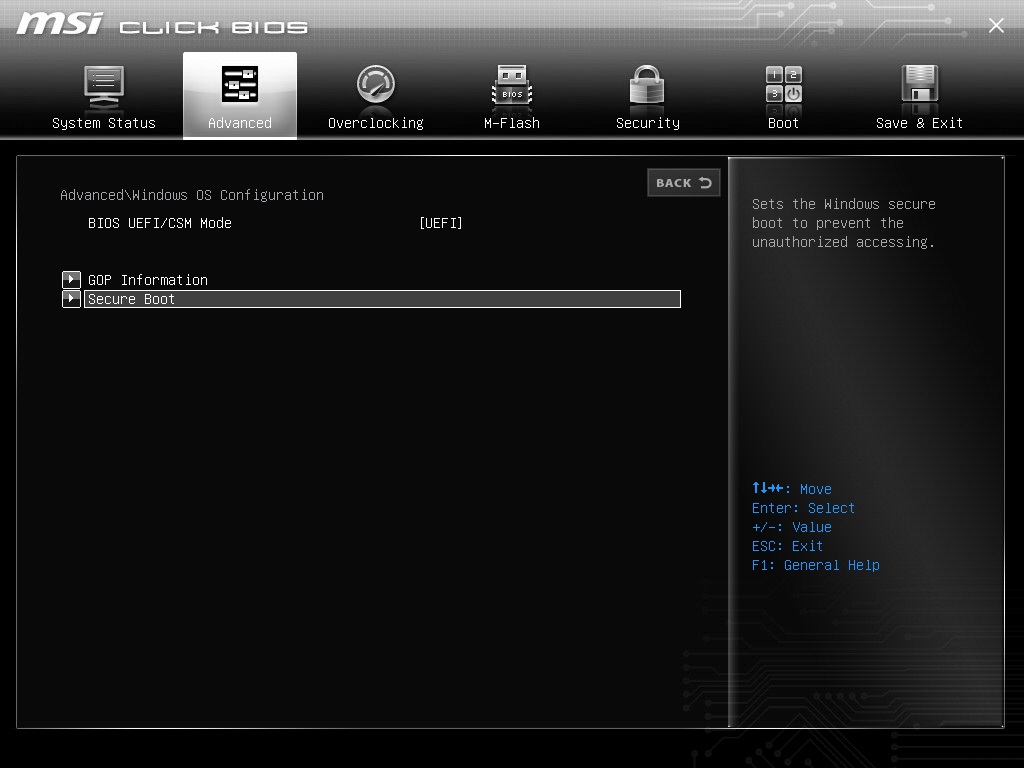
- Secure Boot appears on the screen. Choose and press the Enter key to view more.
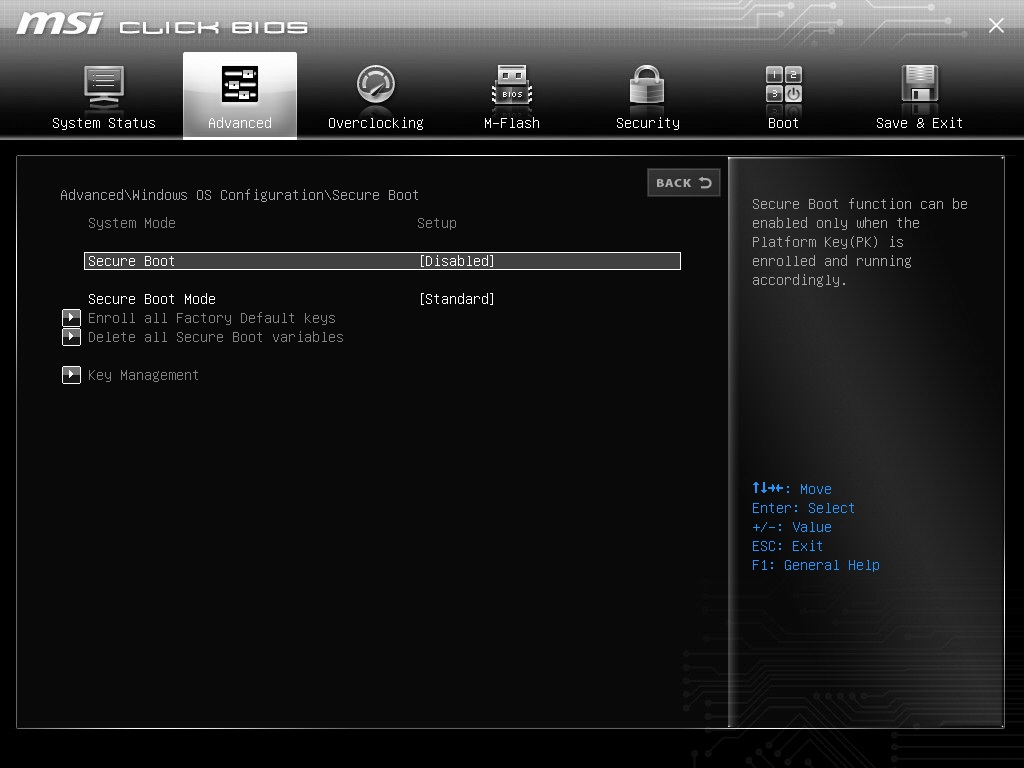
- Select “Enabled” from the pop-up window.
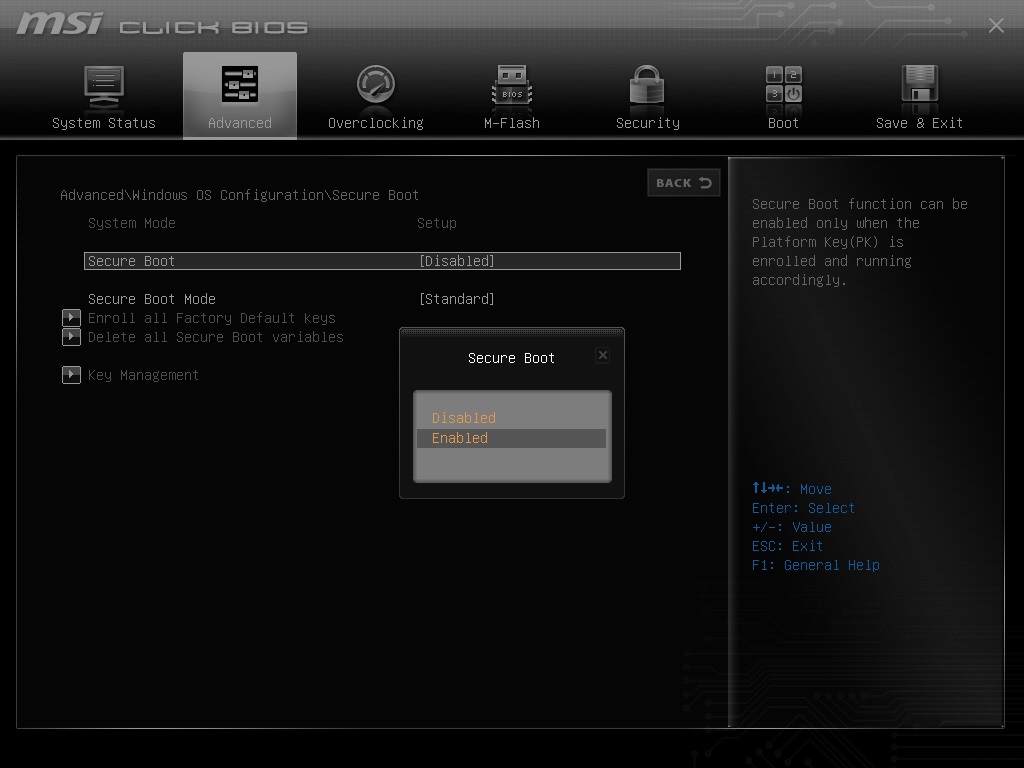
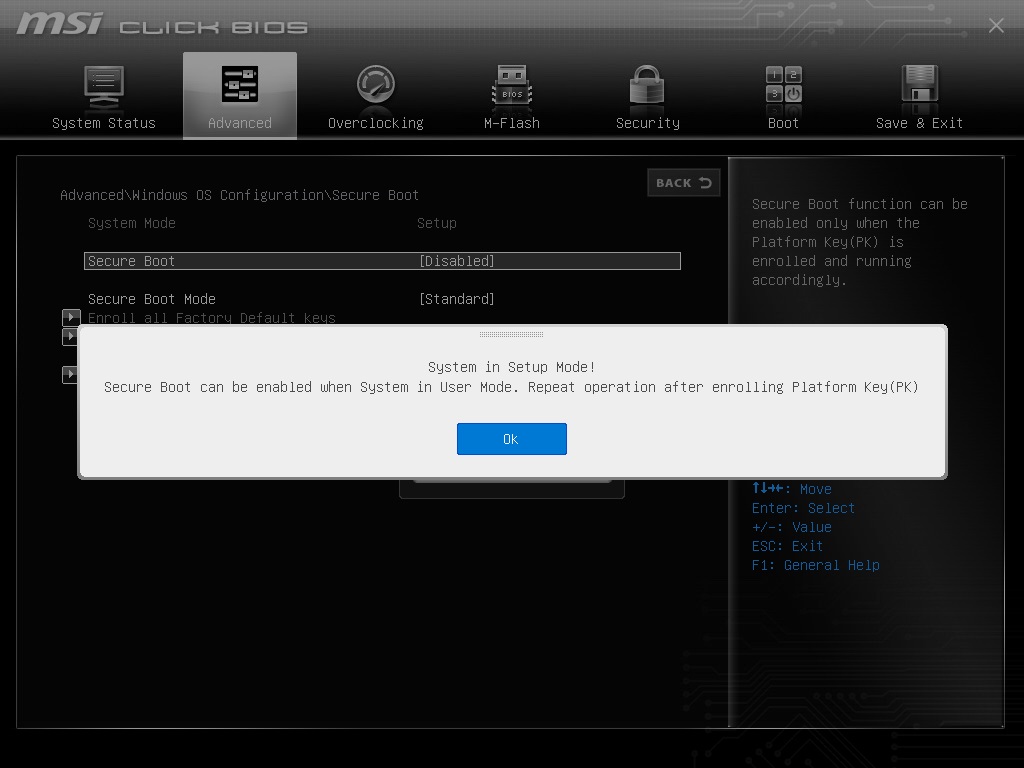
- Press the Enter key.
- Use arrow keys and select “Save & Exit“.
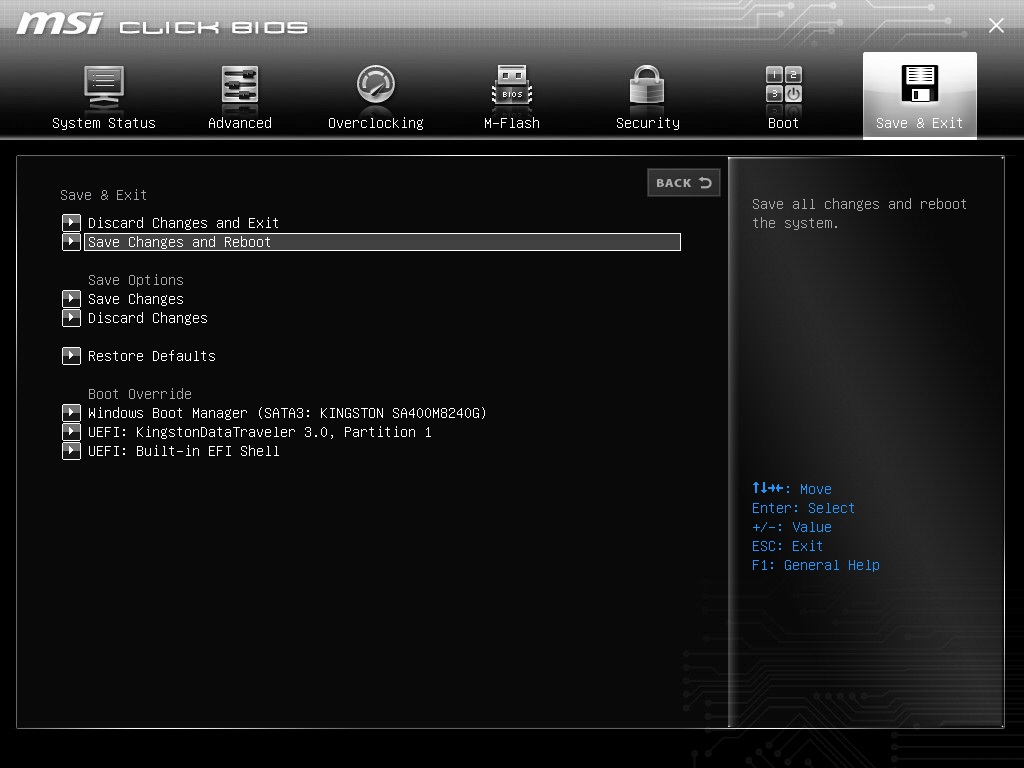
- Click on “Yes” to save the changes.
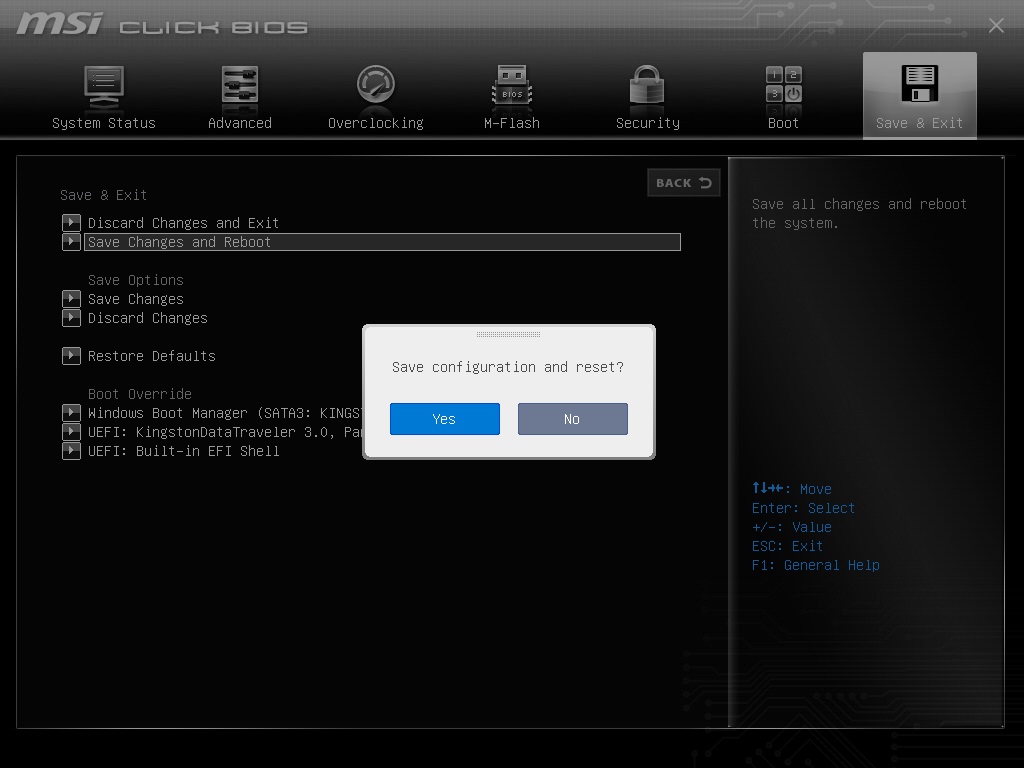
You have successfully enabled Secure Boot on Windows PC.
5. Check for Malware and Threats
Run a full system scan.
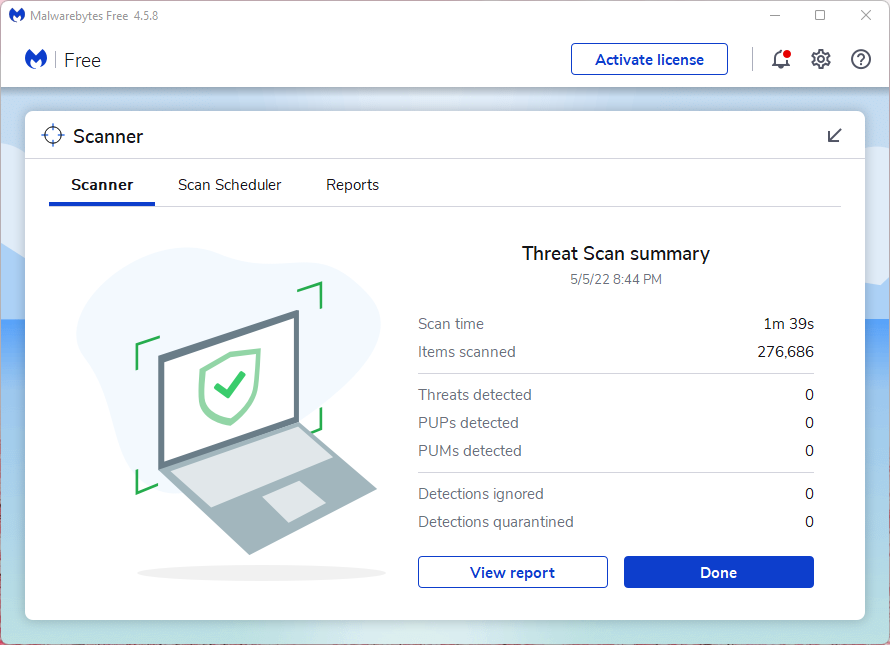
You can use Windows Defender or Windows Security. I have installed Malwarebytes (FREE) in the system, and the free edition allows the users to scan the system. Malwarebytes didn’t sponsor us, so it’s an unbiased suggestion. You can use any anti-virus system, and I suggest the users consider buying the premium version.
Bottom Line
You can resolve “this build of vanguard requires TPM version 2.0” on Windows 11 PC. The VAN9001 error triggers on TPM 2.0 and Secure Boot disabled PCs. You have to enable them manually from BIOS. Remove pirated programs and operating systems since they are known to create problems. Let us know which solution helped you resolve the VAN9001 error in the comment section below.
If you've any thoughts on FIX: (VAN9001) This Build of Vanguard Requires TPM Version 2.0 in Windows 11, then feel free to drop in below comment box. Also, please subscribe to our DigitBin YouTube channel for videos tutorials. Cheers!
