
The 0x80248014 is a Windows Update error code, and it is showing up on multiple Windows 11 machines. I have an Intel Core i3 laptop, and AMD Ryzen 5 desktop and the 0x80248014 popped up on both machines. Microsoft worked on the Windows software for a very long time, and they managed to update the packages without breaking the system. We have to look into the matter and find out what Microsoft wants to tell us with the 0x80248014 error code.
What Causes Windows Update Error 0x80248014?
Windows Update is a complex procedure when it comes to updating the packages and components. However, the operating system canceled the process and we have to learn about it, so you can resolve the issue faster. I have given you a few valid reasons on what triggers the 0x80248014 error since it’s appearing on almost every Intel & AMD machine.
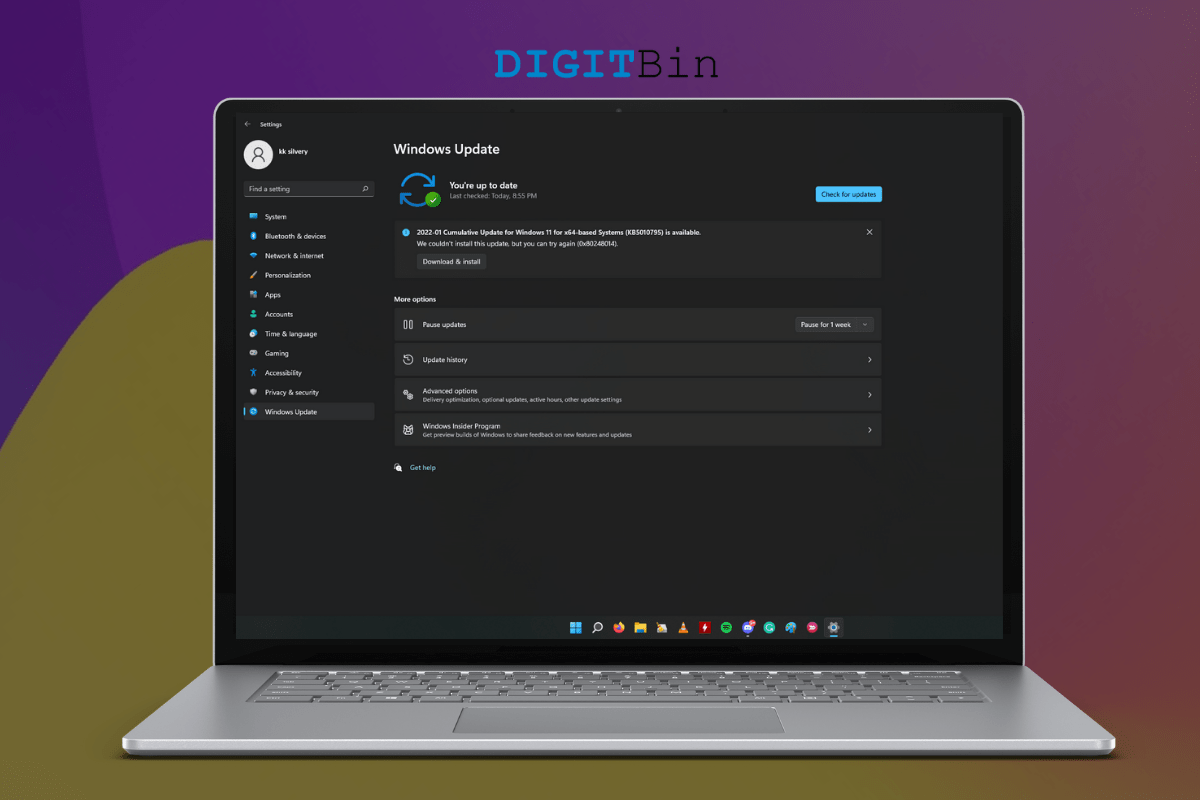
I opened the “Windows Update” in the Settings app.

The Cumulative Update downloaded successfully.

But it failed to install successfully.
Windows Software Bugs: Windows 11 was released on Oct 2021, and Microsoft is working with the developers in the headquarters to make the software stable. You should expect bugs and glitches in the operating system since it was released not so long ago. Of course, it’s going to take a while for the manufacturers and brands to release stable drivers.
Windows Update Errors: I suspect Windows Update is facing some errors in the background that we might be aware of it. We will investigate the matter and put the inbuilt tools in use to identify the culprit.
Corrupted Update Components: It’s not uncommon for Windows to have corrupted update components, and it could be the primary reason why Windows is canceling the process. We will rectify the issue and follow a different approach to resolve it.
Temp Files: The computer operating system creates temporary files in the local storage, so you can open the files faster and load them quickly. The temp files accumulate with time and they tend to interrupt with the new packages. I will show you how to get rid of them using Microsoft’s inbuilt tools.
Insufficient Disk Space: Millions have installed Windows on 240GB or 120GB SSD drives, and that’s what is available in the budget laptop nowadays. My Core i3 laptop shipped with 240GB NVMe SSD, but I maintained 50GB free space in the C drive. Microsoft releases large update packages for the Windows OS, and the internal drive should have minimum free space to save the files.
Malware or Virus: My PC was infected with malware multiple times in the past, and it prevents Windows to install newer updates. Microsoft releases security updates, Windows Defender definitions, and other important components through the service. Malware protects itself then starts destroying the machine bit-by-bit. You should remove the lingering malware or virus from the storage drive, and it will keep the operating system healthy.
Fix 1. Reboot Windows PC

Millions leave the Windows laptop/desktop put the machine into sleep, and leave the premises. Your PC is in standby mode, and it is conserving the battery and hardware resources. However, I wouldn’t say the same for the software because it is running the files, programs, and background services. You should reboot the Windows 10/11 machine from time to time and shut it down once a week for optimal performance.
I want to inform you that putting the Windows machine into sleep mode improves the hardware components’ lifespan. The hardware components have to load the drivers, programs, files, and others every time you turn the machine on. The sleep mode doesn’t load anything and picks up from where you left earlier.
Fix 2. Delete Unnecessary Temp Files
Windows 10 has an inbuilt tool to remove the temp files, and Microsoft continued the feature in the latest Windows 11. Follow my lead to remove unnecessary temp files from the operating system installed partition.
- Open “Settings” from the search bar.
- Click on “Storage” and it is present in the “System” section.

- Click on the “Cleanup Recommendations” option.

- Click on the “See Advanced Options” option.

I selected every option in the storage feature except “Downloads”.
- Click on the “Remove files” button.

- Confirm the action and click on “Continue” to allow Windows to delete the temp files.

- Temporary files cleaned in the PC.

Allow Windows to remove the temp files from the system. There is a way to remove the files manually, but you can automate the process from here.
Fix 3. Turn Off Antivirus System
Turning off the antivirus system is the suggestion I would go against it, but you can do it with a different approach. You may hear about “false positive” and Windows Security is incorporated with third-party security solutions.
You have to turn off the antivirus system on the PC and allow the Windows Update to take over the process. I recommend you close background programs such as browsers and let the updates install completely. Before proceeding, you can check the antivirus recorded reports, and it will give you an idea of whether the machine faced any threat in the past thirty days.
Fix 4. Troubleshoot Windows Update
Microsoft introduced an advanced troubleshooter in the earlier version, and they continued the feature in the latest Windows 11. You can allow the inbuilt troubleshooter to scan the Windows Update for problems, and it will resolve the minor issues automatically.
- Open “Settings” from the search bar.
- Click on “Troubleshoot” present in the “System” section.

- Select “Other troubleshooters” from the options.

- Click on “Run” beside the “Windows Update” option.

- A new window shows up on the screen and allows the troubleshooter to scan the component.

- The troubleshooter detected a problem and automated the repairing process.

Note: It’s a surprising result because I have reinstalled the Windows 11 software a few days back.
- The troubleshooter is taking time to detect new problems.

- The troubleshooter resolved the issue.

- You can give feedback by clicking “Yes” to confirm the resolution.

Reboot the Windows machine and end the session with a good note. Go to Windows Update in the Settings and try to search for the updates again or click on “Download & Install”, if it is showing up on the screen.
Fix 5. Start Windows Update Service Manually
The account administrator can start the Windows Update service manually. The user should have administrator privileges, and the service won’t launch without administrator access. I recommend the users restart the Windows machine before starting the update service.
- Press the Start key and open “Services” from the search bar.

- Scroll down and find “Windows Update” from the list. The services are in alphabetical order, so it shouldn’t be difficult to find them.

- Click to select “Windows Update” and right-click the mouse to choose “Properties”.

- Select “Manual” from the startup type.

- Click on the “Start” button.

- The “Windows Update“ is running in the system.

You have to wait patiently for the operating system and let it search for updates. Windows goes through the components and starts the updating process, do not shut down the machine for a few minutes.
Fix 6. Full System Scan in Windows Safe Mode
You shouldn’t take the malware or virus attack out of the math. Millions of Windows PCs have been affected by different types of malware, and they break the system apart with time. You shouldn’t let the malware take over the machine and destroy the internal software components.
- Open “Settings” from the search bar.
- Select “Recovery” under the “System” menu.

- Click on the “Restart now” option.

- Click on “Restart now” to confirm the action.

Note: Windows restarts and the recovery mode shows up in a few moments, so do not force close the system.
- Choose the “Troubleshoot” option.

- Choose “Advanced options” to view more.

- Click on the “Startup Settings” options.

- Click on the “Restart” option.

- Press the 4 key from the keyboard.

Do not choose any other option, such as the “Enable Safe Mode with Networking” option.
- Launch the antivirus system and run a full system scan.
My Windows PC is not infected with malware as per the scan results. Pirated Windows or programs have accessed your machine and gained administrator permissions so they won’t show up as threats. Remove pirated programs and install fresh Windows software in the system.
[Fixed] Error Code 0x80248014 in Windows 11
I applied the solutions that I have suggested above, and you can try to resolve the error code 0x80248014 in Windows 11/10 machines.
- Go to Windows Update in the Settings app.
- Click on “Download & Install” after searching for the updates.

- The Cumulative Update started downloading.

- The download continued without interruptions.

Note: Check your network status and make sure it’s not on a metered network.
- The downloaded finished in a few minutes.

- The installation process begin and started from 1% – 100%. The entire installation process took over ten minutes, so be patient.
- Click on the “Restart now” button.

- I waited 4 – 5 minutes to finish the installation process.

- I checked the update history, and Cumulative Update was installed successfully.

You can resolve the error code 0x80248014 in Windows 11/10 machine.
Bottom Line
Create a bootable Windows 11/10 USB flash drive and reinstall the operating system from scratch. You have to find the product key from the command prompt or PowerShell, and there are many dedicated tutorials out there. Let us know which solution helped you to resolve the 0x80248014 error code in Windows 11/10 machine